Dell Studio 15 Dell Studio 1555 Service Manual - Page 46
Replacing the System Board Assembly
 |
View all Dell Studio 15 manuals
Add to My Manuals
Save this manual to your list of manuals |
Page 46 highlights
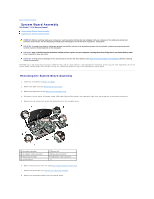
9. Remove the Mini-Card from the system board (see Removing the Mini- Card). 10. Remove the system board. NOTE: Depending on your system configuration, the number of screws shown here may be greater than the number of screws present on your computer. Replacing the System Board Assembly CAUTION: Ensure that any loose cables do not get caught beneath the system board. Follow the steps in Removing the System Board Assembly in reverse order. Back to Contents Page
-
 1
1 -
2
-
3
-
4
-
5
-
6
-
7
-
8
-
9
-
10
-
11
-
12
-
13
-
14
-
15
-
16
-
17
-
18
-
19
-
20
-
21
-
22
-
23
-
24
-
25
-
26
-
27
-
28
-
29
-
30
-
31
-
32
-
33
-
34
-
35
-
36
-
37
-
38
-
39
-
40
-
 41
41 -
 42
42 -
 43
43 -
 44
44 -
 45
45 -
 46
46 -
 47
47 -
 48
48 -
 49
49
 |
 |
9.
Remove the Mini-Card from the system board (see
Removing the Mini
-
Card
).
10.
Remove the system board.
Replacing the System Board Assembly
Follow the steps in
Removing the System Board Assembly
in reverse order.
Back to Contents Page
NOTE:
Depending on your system configuration, the number of screws shown here may be greater than the number of screws present on your
computer.
CAUTION:
Ensure that any loose cables do not get caught beneath the system board.