Dell U2417HA User Guide - Page 29
Organizing Your Cables
 |
View all Dell U2417HA manuals
Add to My Manuals
Save this manual to your list of manuals |
Page 29 highlights
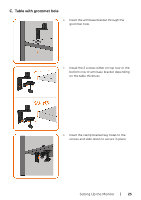
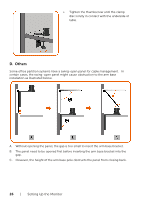
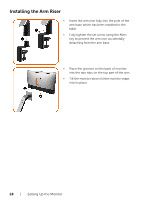
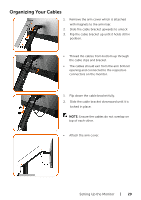
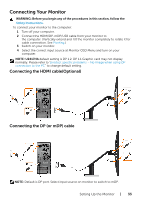
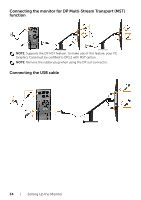
Organizing Your Cables 1. Remove the arm cover which is attached with magnets to the arm riser. 2. Slide the cable bracket upwards to unlock. 3. Flip the cable bracket up until it holds still in position. • Thread the cables from bottom up through the cable clips and bracket. • The cables should exit from the arm bottom opening and connected to the respective connectors on the monitor. 1. Flip down the cable bracket fully. 2. Slide the cable bracket downward until it is locked in place. NOTE: Ensure the cables do not overlap on top of each other. • Attach the arm cover. Setting Up the Monitor | 29
-
 1
1 -
2
-
3
-
4
-
5
-
6
-
7
-
8
-
9
-
10
-
11
-
12
-
13
-
14
-
15
-
16
-
17
-
18
-
19
-
20
-
21
-
22
-
23
-
 24
24 -
 25
25 -
 26
26 -
 27
27 -
 28
28 -
 29
29 -
 30
30 -
 31
31 -
 32
32 -
 33
33 -
 34
34 -
35
-
36
-
37
-
38
-
39
-
40
-
41
-
42
-
43
-
44
-
45
-
46
-
47
-
48
-
49
-
50
-
51
-
52
-
53
-
54
-
55
-
56
-
57
-
58
-
59
-
60
-
61
-
62
 |
 |

Setting Up the Monitor
|
29
Organizing Your Cables
1.
Remove the arm cover which is attached
with magnets to the arm riser.
2.
Slide the cable bracket upwards to unlock.
3.
Flip the cable bracket up until it holds still in
position.
•
Thread the cables from bottom up through
the cable clips and bracket.
•
The cables should exit from the arm bottom
opening and connected to the respective
connectors on the monitor.
1.
Flip down the cable bracket fully.
2.
Slide the cable bracket downward until it is
locked in place.
NOTE:
Ensure the cables do not overlap on
top of each other.
•
Attach the arm cover.