Dell XPS 13 9315 2-in-1 XPS Stylus Users Guide - Page 9
Charging your XPS Stylus
 |
View all Dell XPS 13 9315 2-in-1 manuals
Add to My Manuals
Save this manual to your list of manuals |
Page 9 highlights
The LED indicator on your XPS Stylus starts blinking and turns solid blue after pairing is successfully complete. After successful pairing, your computer and pen connect automatically when Bluetooth is enabled and are within the Bluetooth range. Charging your XPS Stylus 1. Place the flat side of the XPS Stylus on the top of the computer, where the charging area is located-the pen nib can face either the left or the right. 2. During charging, the LED indicator on the XPS Stylus remains solid white. An onscreen message appears showing the percentage charged. Setting up your XPS Stylus 9
-
 1
1 -
2
-
3
-
 4
4 -
 5
5 -
 6
6 -
 7
7 -
 8
8 -
 9
9 -
 10
10 -
 11
11 -
 12
12 -
 13
13 -
 14
14 -
15
-
16
-
17
-
18
 |
 |

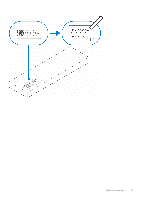
The LED indicator on your XPS Stylus starts blinking and turns solid blue after pairing is successfully complete. After
successful pairing, your computer and pen connect automatically when Bluetooth is enabled and are within the Bluetooth
range.
Charging your XPS Stylus
1.
Place the flat side of the XPS Stylus on the top of the computer, where the charging area is located—the pen nib can face
either the left or the right.
2.
During charging, the LED indicator on the XPS Stylus remains solid white. An onscreen message appears showing the
percentage charged.
Setting up your XPS Stylus
9