Denon AVR 3802 Owners Manual - Page 23
Playing the input source, Example: Stereo - optical input
 |
View all Denon AVR 3802 manuals
Add to My Manuals
Save this manual to your list of manuals |
Page 23 highlights
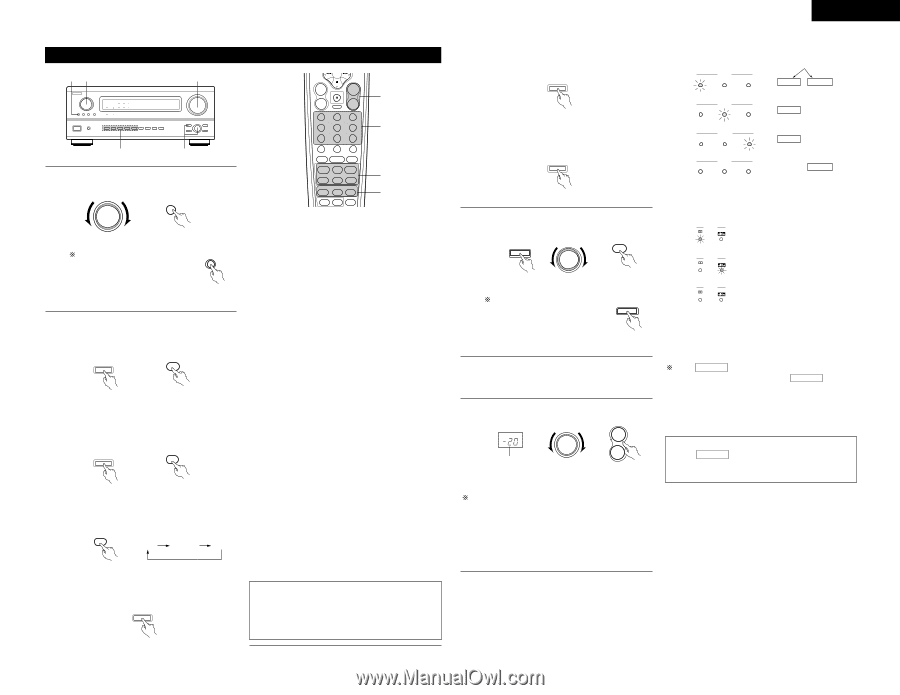
ENGLISH Playing the input source 11 5 B BAND MODE CHANNEL VOLUME TUNING + + SKIP ENTER 4 - SKIP SHIFT MUTING - TUNER PHONO CD 1 2 3 CDR/ TAPE VDP DVD 4 5 6 1 VCR-1 7 VCR-2 /V.AUX 8 TV/DBS 9 2 3 1 Select the input source to be played. Example: CD FUNCTION CD 3 TV/ VCR RDS TEST TONE DOLBY/DTS SURROUND 0 PTY SPEAKER +10 RT OUTPUT SURROUND DSP SIMU. 5CH / 7CH STEREO 6.1 / 7.1 SURROUND DIRECT MODE INPUT ANALOG SYSTEM CALL CALL 1 CALL 2 STEREO EXT.IN BACKLIGHT 3 2 Input mode selection function Different input modes can be selected for the different (Main unit) (Remote control unit) input sources. The selected input modes for the separate input sources are stored in the memory. To select the input source SOURCE when REC MULTI OUT or q AUTO (auto mode) In this mode, the types of signals being input to the TUNING PRESET is selected, digital and analog input jacks for the selected input press the SOURCE button source are detected and the program in the AVR- then operate the input function (Main unit) selector. 3802's surround decoder is selected automatically upon playback. This mode can be selected for all input sources other than PHONO and TUNER. 2 Select the input mode. • Selecting the analog mode The presence or absence of digital signals is detected, the signals input to the digital input jacks are identified and decoding and playback are performed Press the ANALOG button to switch to the automatically in DTS, Dolby Digital or PCM (2 channel analog input. stereo) format. If no digital signal is being input, the ANALOG ANALOG analog input jacks are selected. Use this mode to play Dolby Digital signals. w PCM (exclusive PCM signal playback mode) Decoding and playback are only performed when PCM (Main unit) (Remote control unit) signals are being input. Note that noise may be generated when using this • Selecting the external input (EXT. IN) mode Press the EXT. IN (on the EXT. IN button on the remote control unit) to switch the external input. mode to play signals other than PCM signals. e DTS (exclusive DTS signal playback mode) Decoding and playback are only performed when DTS signals are being input. r ANALOG (exclusive analog audio signal playback EXT.IN EXT.IN mode) The signals input to the analog input jacks are decoded and played. t EXT. IN (external decoder input jack selection mode) (Main unit) (Remote control unit) The signals being input to the external decoder input jacks are played without passing through the surround • Selecting the AUTO, PCM and DTS modes circuitry. The mode switches as shown below each NOTE: time the INPUT MODE button is pressed. • Note that noise will be output when CDs or LDs recorded in DTS format are played in the "PCM" MODE AUTO PCM DTS (exclusive PCM signal playback) or "ANALOG" (exclusive PCM signal playback) mode. Select the AUTO or DTS mode when playing signals recorded in (Remote control unit) DTS from a laser disc player or CD player. • Selecting the AUTO mode Press the AUTO button to switch to the auto mode. AUTO Note on playing a source encorded with DTS • Noise may be generated at the beginning of playback and while searching during DTS playback in the AUTO mode. If so, play in the DTS mode. (Main unit) • Selecting the PCM mode Press the PCM button to switch to the PCM signal input. PCM (Main unit) • Selecting the DTS mode Press the DTS button to switch to the DTS signal input. DTS Input mode display • In the AUTO mode AUTO INPUT PCM DTS One of these lights, depending on the input signal. DIGITAL ANALOG • In the DIGITAL PCM mode AUTO INPUT PCM DTS DIGITAL • In the DIGITAL DTS mode AUTO INPUT PCM DTS DIGITAL • In the ANALOG mode AUTO INPUT PCM DTS ANALOG (Main unit) Input signal display 3 Select the play mode. Example: Stereo • DOLBY DIGITAL SIGNAL DIGITAL SURROUND MODE SELECT STEREO • DTS SIGNAL DIGITAL (Main unit) (Remote control unit) To select the surround mode while adjusting the surround parameters, channel volume or tone control, press the surround mode button then operate the selector. SURROUND MODE (Main unit) • PCM SIGNAL DIGITAL 4 Start playback on the selected component. • For operating instructions, refer to the component's manual. 5 Adjust the volume. MASTER VOLUME VOLUME + The volume level is displayed on the master volume level display. (Main unit) - (Remote control unit) The volume can be adjusted within the range of -70 to 0 to 18 dB, in steps of 1 dB. However, when the channel level is set as described on page 13 or page 27, if the volume for any channel is set at +1 dB or greater, the volume cannot be adjusted up to 18 dB. (In this case the maximum volume adjustment range is "18 dB - (Maximum value of channel level)".) The DIGITAL indicator lights when digital signals are being input properly. If the DIGITAL indicator does not light, check whether the digital input component setup (page 14) and connections are correct and whether the component's power is turned on. NOTE: • The DIGITAL indicator will light when playing CD-ROMs containing data other than audio signals, but no sound will be heard. Input mode when playing DTS sources • Noise will be output if DTS-compatible CDs or LDs are played in the "ANALOG" or "PCM" mode. When playing DTS-compatible sources, be sure to connect the source component to the digital input jacks (OPTICAL/COAXIAL) and set the input mode to "DTS". 23
-
 1
1 -
2
-
3
-
4
-
5
-
6
-
7
-
8
-
9
-
10
-
11
-
12
-
13
-
14
-
15
-
16
-
17
-
 18
18 -
 19
19 -
 20
20 -
 21
21 -
 22
22 -
 23
23 -
 24
24 -
 25
25 -
 26
26 -
 27
27 -
 28
28 -
29
-
30
-
31
-
32
-
33
-
34
-
35
-
36
-
37
-
38
-
39
-
40
-
41
-
42
-
43
-
44
-
45
-
46
-
47
-
48
-
49
-
50
-
51
-
52
-
53
-
54
-
55
-
56
-
57
-
58
-
59
-
60
-
61
-
62
-
63
-
64
-
65
-
66
-
67
-
68
-
69
-
70
-
71
-
72
-
73
-
74
-
75
-
76
-
77
-
78
-
79
-
80
-
81
-
82
 |
 |