Denon AVR 3802 Owners Manual - Page 36
Last Function Memory, 14. Initialization Of The Microprocessor, 15. Troubleshooting
 |
View all Denon AVR 3802 manuals
Add to My Manuals
Save this manual to your list of manuals |
Page 36 highlights
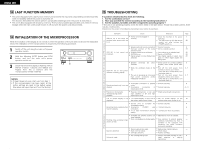
ENGLISH 13 LAST FUNCTION MEMORY • This unit is equipped with a last function memory which stores the input and output setting conditions as they were immediately before the power is switched off. This function eliminates the need to perform complicated resettings when the power is switched on. • The unit is also equipped with a back-up memory. This function provides approximately one week of memory storage when the main unit's power switch is off and with the power cord disconnected. 14 INITIALIZATION OF THE MICROPROCESSOR When the indication of the display is not normal or when the operation of the unit does not shows the reasonable result, the initialization of the microprocessor is required by the following procedure. 1 Switch off the unit using the main unit's power operation switch. B 2 Hold the following AUTO button and PCM button, and turn the main unit's power operation switch on. 3 Check that the entire display is flashing with an interval of about 1 second, and release your fingers from the 2 buttons and the microprocessor will be initialized. 1, 2 2 NOTES: • If step 3 does not work, start over from step 1. • If the microprocessor has been reset, all the button settings are reset to the default values (the values set upon shipment from the factory). 15 TROUBLESHOOTING If a problem should arise,first check the following. 1. Are the connections correct ? 2. Have you operated the receiver according to the Operating Instructions ? 3. Are the speakers, turntable and other components operating property ? If this unit is not operating properly, check the items listed in the table below. Should the problem persist, there may be a malfunction. Disconnect the power immediately and contact your store of purchase. Common problems when listening to the CD, records, tapes and FM broadcasts, etc. Symptom Cause Measures DISPLAY not lit and sound not produced when power switch set to on. • Power cord not plugged in securely. • Check the insertion of the power cord plug. • Turn the power on with the remote control unit after turning the POWER switch on. • Speaker cords not securely connected. • Connect securely. • Improper position of the audio • Set to a suitable position. function button. DISPLAY lit but sound not • Volume control set to minimum. • Turn volume up to suitable level. produced. • MUTING is on. • Switch off MUTING. • Digital signals not input Digital input • Input digital signals or select input selected. jacks to which digital signals are being input. DISPLAY not lit and power indicator is flashing rapidly. • Speaker terminals are shortcircuited. • Block the ventilation holes of the set. • The unit is operating at continuous high power conditions and/or inadequate ventilation. • Switch power off, connect speakers properly, then switch power back on. • Turn off the set's power, then ventilate it well to cool it down. Once the set is cooled down, turn the power back on. • Turn off the set's power, then ventilate it well to cool it down. Once the set is cooled down, turn the power back on. Sound produced only from one channel. • Incomplete connection of speaker cords. • Incomplete connection of input/output cords. • Connect securely. • Connect securely. Positions of instruments reversed during stereo playback. • Reverse connections of left and • Check left and right connections. right speakers or left and right input/output cords. The on screen display is not • "On screen display" is set to off on • Set "on screen display" on the displayed. the system setup menu screen. system setup menu screen to on. Humming noise produced when record is playing. • Ground wire of turntable not connected properly. • Incomplete PHONO jack connection. • TV or radio transmission antenna nearby. • Connect securely. • Connect securely. • Contact your store of purchase. Howling noise produced when volume is high. • Turntable and speaker systems too close together. • Floor is unstable and vibrates easily. • Separate as much as possible. • Use cushions to absorb speaker vibrations transmitted by floor. If turntable is not equipped with insulators, use audio insulators (commonly available). Sound is distorted. • Stylus pressure too weak. • Dust or dirt on stylus. • Cartridge defective. • Apply proper stylus pressure. • Check stylus. • Replace cartridge. Volume is weak. • MC cartridge being used. • Replace with MM cartridge or use a head amplifier or step-up transformer. Page 4 22 8 23 23 24 23 8 3, 7 3, 7 8 4 ~ 8 8 15 4 4 - - - - - - 4 When playing records 36
-
 1
1 -
2
-
3
-
4
-
5
-
6
-
7
-
8
-
9
-
10
-
11
-
12
-
13
-
14
-
15
-
16
-
17
-
18
-
19
-
20
-
21
-
22
-
23
-
24
-
25
-
26
-
27
-
28
-
29
-
30
-
 31
31 -
 32
32 -
 33
33 -
 34
34 -
 35
35 -
 36
36 -
 37
37 -
 38
38 -
 39
39 -
 40
40 -
 41
41 -
42
-
43
-
44
-
45
-
46
-
47
-
48
-
49
-
50
-
51
-
52
-
53
-
54
-
55
-
56
-
57
-
58
-
59
-
60
-
61
-
62
-
63
-
64
-
65
-
66
-
67
-
68
-
69
-
70
-
71
-
72
-
73
-
74
-
75
-
76
-
77
-
78
-
79
-
80
-
81
-
82
 |
 |
