Denon AVR-991 Owners Manual - English - Page 4

Accessories, About this manual - preset code

Page 4 highlights

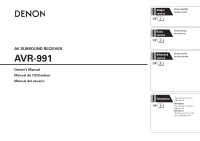
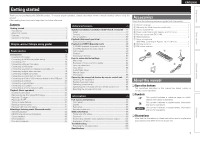
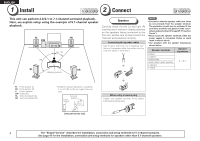
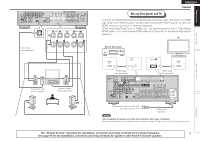
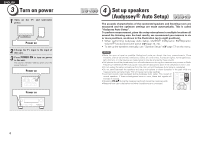
ENGLISH Simple version Getting started Basic version Advanced version Thank you for purchasing this DENON product. To ensure proper operation, please read these owner's manual carefully before using the product. After reading them, be sure to keep them for future reference. Contents Getting started 1 Accessories 1 About this manual 1 Features 2 Cautions on handling 2 Simple version (Simple setup guide 3 Basic version 12 Connections 13 Important information 13 Connecting an HDMI-compatible device 14 Connecting a TV 16 Connecting a Blu-ray Disc player 16 Connecting a DVD player 17 Connecting a set-top box (Satellite tuner/cable TV 17 Connecting a digital video recorder 18 Connecting a digital camcorder 18 Connecting a control dock for iPod 19 Connecting an iPod or USB memory device to the USB port·····19 Connecting an antenna 20 Connecting a record player 21 Connecting a CD player 21 Connecting to a home network (LAN 22 Playback (Basic operation 23 Important information 23 Playing a Blu-ray Disc player/DVD player 24 Playing a CD player 24 Playing an iPod 24 Tuning in radio stations 27 Playing a network audio 31 Playing a USB memory device 41 Selecting a listening mode (Surround mode 43 Standard playback 43 DENON original surround playback 45 Stereo playback 45 Direct playback 45 Pure direct playback 45 Advanced version 46 Speaker installation/connection (Other than 5.1-channel 47 Install 47 Connect 48 Set up speakers 50 Playback (Advanced operation 52 Convenient functions 52 Playback in ZONE2 (Separate room 59 q ZONE2 playback by speaker output 59 w ZONE2 playback by audio output 59 Video output 59 Playback 60 Quick select function 60 How to make detailed settings 61 Menu map 61 Examples of menu and front display 62 Inputting characters 63 Input Setup 65 Audio/Video Adjust 71 Manual Setup 77 Information 88 Operating the connected devices by remote control unit 89 Operating AV equipment 89 Registering preset codes 89 Operating components 92 Specifying the zone used with the remote control unit 93 Resetting the remote control unit 93 Information 93 Part names and functions 94 Front panel 94 Display 94 Rear panel 95 Remote control unit 96 Other information 98 Trademark information 98 Surround 99 Relationship between video signals and monitor output 103 Explanation of terms 104 Troubleshooting 106 Resetting the microprocessor 109 Specifications 110 Accessories Check that the following parts are supplied with the product. q Owner's manual 1 w Warranty (for North America model only 1 e Service network list 1 r Power cord (Cord length: Approx. 5.9 ft / 1.8 m 1 t Remote control unit (RC-1146 1 y R6/AA batteries 2 u Setup microphone (DM-A409, Cord length: Approx. 19.7 ft / 6.0 m 1 i AM loop antenna 1 o FM indoor antenna 1 r t u i o About this manual nnOperation buttons The operations described in this manual are based mainly on remote control operation. nnSymbols v This symbol indicates a reference page on which related information is described. This symbol indicates a supplementary information and tips for operations. NOTE This symbol indicates a supplementary information and tips for operations. nnIllustrations Note that the illustrations in these instructions are for explanation purposes and may differ from the actual unit. 1 Information

  • 1
  • 2
  • 3
  • 4
  • 5
  • 6
  • 7
  • 8
  • 9
  • 10
  • 11
  • 12
  • 13
  • 14
  • 15
  • 16
  • 17
  • 18
  • 19
  • 20
  • 21
  • 22
  • 23
  • 24
  • 25
  • 26
  • 27
  • 28
  • 29
  • 30
  • 31
  • 32
  • 33
  • 34
  • 35
  • 36
  • 37
  • 38
  • 39
  • 40
  • 41
  • 42
  • 43
  • 44
  • 45
  • 46
  • 47
  • 48
  • 49
  • 50
  • 51
  • 52
  • 53
  • 54
  • 55
  • 56
  • 57
  • 58
  • 59
  • 60
  • 61
  • 62
  • 63
  • 64
  • 65
  • 66
  • 67
  • 68
  • 69
  • 70
  • 71
  • 72
  • 73
  • 74
  • 75
  • 76
  • 77
  • 78
  • 79
  • 80
  • 81
  • 82
  • 83
  • 84
  • 85
  • 86
  • 87
  • 88
  • 89
  • 90
  • 91
  • 92
  • 93
  • 94
  • 95
  • 96
  • 97
  • 98
  • 99
  • 100
  • 101
  • 102
  • 103
  • 104
  • 105
  • 106
  • 107
  • 108
  • 109
  • 110
  • 111
  • 112
  • 113
  • 114
  • 115
  • 116

1
ENGLISH
Basic version
Simple version
Advanced version
Information
Contents
Thank you for purchasing this DENON product. To ensure proper operation, please read these owner’s manual carefully before using the
product.
After reading them, be sure to keep them for future reference.
Getting started
Accessories
Check that the following parts are supplied with the product.
q
Owner’s manual
......................................................................
1
w
Warranty (for North America model only)
................................
1
e
Service network list
.................................................................
1
r
Power cord (Cord length: Approx. 5.9 ft / 1.8 m)
....................
1
t
Remote control unit (RC-1146)
................................................
1
y
R6/AA batteries
.......................................................................
2
u
Setup microphone
(DM-A409, Cord length: Approx. 19.7 ft / 6.0 m)
....................
1
i
AM loop antenna
.....................................................................
1
o
FM indoor antenna
..................................................................
1
t
r
i
o
u
About this manual
n
Operation buttons
The operations described in this manual are based mainly on
remote control operation.
n
Symbols
v
This symbol indicates a reference page on which
related information is described.
This symbol indicates a supplementary information
and tips for operations.
NOTE
This symbol indicates a supplementary information
and tips for operations.
n
Illustrations
Note that the illustrations in these instructions are for explanation
purposes and may differ from the actual unit.
Simple version (Simple setup guide)
··························3
Basic version
··········································································12
Connections
·················································································13
Important information ·································································13
Connecting an HDMI-compatible device ····································14
Connecting a TV··········································································16
Connecting a Blu-ray Disc player ················································16
Connecting a DVD player ····························································17
Connecting a set-top box (Satellite tuner/cable TV) ····················17
Connecting a digital video recorder ············································18
Connecting a digital camcorder ··················································18
Connecting a control dock for iPod ·············································19
Connecting an iPod or USB memory device to the USB port·····19
Connecting an antenna ·······························································20
Connecting a record player ·························································21
Connecting a CD player ······························································21
Connecting to a home network (LAN) ········································22
Playback (Basic operation)
·························································23
Important information ·································································23
Playing a Blu-ray Disc player/DVD player ····································24
Playing a CD player ·····································································24
Playing an iPod
®
·········································································24
Tuning in radio stations ·······························································27
Playing a network audio ······························································31
Playing a USB memory device····················································41
Selecting a listening mode (Surround mode)
··························43
Standard playback ·······································································43
DENON original surround playback·············································45
Stereo playback ··········································································45
Direct playback ···········································································45
Pure direct playback····································································45
Advanced version
·······························································46
Speaker installation/connection (Other than 5.1-channel)
·····47
Install ··························································································47
Connect ······················································································48
Set up speakers ··········································································50
Playback (Advanced operation)
·················································52
Convenient functions ··································································52
Playback in ZONE2 (Separate room)
········································59
q
ZONE2 playback by speaker output ·······································59
w
ZONE2 playback by audio output ···········································59
Video output ···············································································59
Playback ······················································································60
Quick select function ··································································60
How to make detailed settings
··················································61
Menu map ··················································································61
Examples of menu and front display ··········································62
Inputting characters ···································································63
Input Setup ·················································································65
Audio/Video Adjust ·····································································71
Manual Setup··············································································77
Information ·················································································88
Operating the connected devices by remote control unit
······89
Operating AV equipment ····························································89
Registering preset codes ····························································89
Operating components ·······························································92
Specifying the zone used with the remote control unit ··············93
Resetting the remote control unit···············································93
Information
·············································································93
Part names and functions
···························································94
Front panel ··················································································94
Display ························································································94
Rear panel ···················································································95
Remote control unit ····································································96
Other information
·······································································98
Trademark information································································98
Surround ·····················································································99
Relationship between video signals and monitor output ··········103
Explanation of terms ·································································104
Troubleshooting
········································································106
Resetting the microprocessor ··················································109
Specifications
············································································110
Getting started
··············································································1
Accessories ··················································································1
About this manual ·········································································1
Features ························································································2
Cautions on handling ····································································2