Denon AVR-991 Owners Manual - English - Page 89
Return - update retry
 |
UPC - 883795001397
View all Denon AVR-991 manuals
Add to My Manuals
Save this manual to your list of manuals |
Page 89 highlights
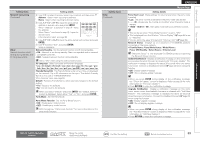
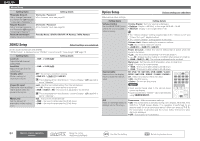
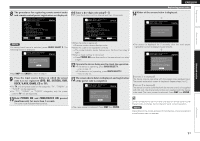
ENGLISH Manual Setup Setting items Setup Lock Protect settings from inadvertent change. ON : Turn protection on. OFF : Turn protection off. Setting details When canceling the setting, set "Setup Lock" to "OFF". NOTE When "Setup Lock" is set to "ON", the settings listed below can no longer be changed. Also, "SETUP LOCKED!" is displayed if you attempt to operate related settings. · Menu operations · RESTORER · Dynamic Volume® · Channel Level · MultEQ® XT · Dynamic EQ® Maintenance Mode NOTE Use when receiving maintenance from a DENON Only use this function if so instructed by a DENON serviceperson or service engineer or custom installer. installer. Firmware Update Update the firmware of the receiver. Check for Update : Check for firmware updates. You can also check approximately how long it will take to complete an update. Start : Execute the update process. When updating starts, the power indicator becomes red and the menu screen is shut down. The amount of update time which has elapsed is displayed. When updating is complete, the power indicator becomes green and normal status is resumed. • If updating fails, the set automatically retries, but if updating is still not possible, one of the messages shown below is displayed. If the display reads as shown below, check the settings and network environment, then update again. Display Description Updating fail Login failed Server is busy Connection fail Download fail Updating failed. Failure to log into server. Server is busy. Wait a while then try again. Failure in connecting to server. Downloading of the firmware has failed. Setting items Add New Feature Display new features that can be downloaded to this unit and perform an update. Setting details Upgrade : Execute the upgrade process. When updating starts, the power indicator becomes red and the menu screen is shut down. The amount of update time which has elapsed is displayed. When upgrading is complete, the power indicator becomes green and normal status is resumed. • If the upgrade is not successful, an error message identical to those in "Firmware Update" will appear on the display. Check the settings and network environment, then update again. Upgrade Status : Display a list of the additional functions provided by the upgrade. See the DENON website for details about updates. When the procedure is complete, "Registered" is displayed in this menu and updates can be carried out. If the procedure has not been carried out, "Not Registered" is displayed. The ID number shown on this screen is needed when carrying out the procedure. The ID number can also be displayed by pressing and holding o and RETURN for at least 3 seconds. 86 Remote control operation buttons Move the cursor (Up/Down/Left/Right) Confirm the setting Return to previous menu
-
 1
1 -
2
-
3
-
4
-
5
-
6
-
7
-
8
-
9
-
10
-
11
-
12
-
13
-
14
-
15
-
16
-
17
-
18
-
19
-
20
-
21
-
22
-
23
-
24
-
25
-
26
-
27
-
28
-
29
-
30
-
31
-
32
-
33
-
34
-
35
-
36
-
37
-
38
-
39
-
40
-
41
-
42
-
43
-
44
-
45
-
46
-
47
-
48
-
49
-
50
-
51
-
52
-
53
-
54
-
55
-
56
-
57
-
58
-
59
-
60
-
61
-
62
-
63
-
64
-
65
-
66
-
67
-
68
-
69
-
70
-
71
-
72
-
73
-
74
-
75
-
76
-
77
-
78
-
79
-
80
-
81
-
82
-
83
-
 84
84 -
 85
85 -
 86
86 -
 87
87 -
 88
88 -
 89
89 -
 90
90 -
 91
91 -
 92
92 -
 93
93 -
 94
94 -
95
-
96
-
97
-
98
-
99
-
100
-
101
-
102
-
103
-
104
-
105
-
106
-
107
-
108
-
109
-
110
-
111
-
112
-
113
-
114
-
115
-
116
 |
 |