Denon DND6000 Operating Instructions - Page 17
Sampler
 |
UPC - 081757506366
View all Denon DND6000 manuals
Add to My Manuals
Save this manual to your list of manuals |
Page 17 highlights
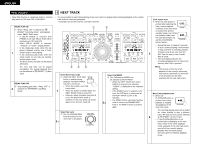
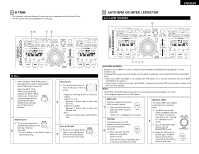
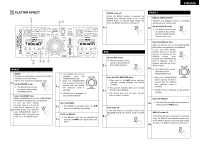
ENGLISH 11 SAMPLER DN-D6000 has Sampler of 15 seconds length. This Sampler can also be looped and scratching during playback. i, !0 q, r, !0 y, u w, o e, t !1, !3, !4, !6 !2, !5 Record in Sampler q When the SAMP button is pushed in the standby or playing, the sound from SAMP point is recorded to Sampler memory up to 15 1 seconds. • The SAMP button is flashing while recording. When the recording is completed, the button turns off and the corresponding SAMP B LED lights up. • The remain time of the Sampler memory is displayed in the character display. Setting B point w When the B button is pushed during Sampler recording, the Sampler Loop B point is set and the loop mode turns on. 2 • Recording continues for approximately 15 seconds without stopping after set B point. • If the B point is not set, recording end point set as B point automatically. Also EXIT/RELOOP LED light to indicates Sampler Loop mode is set automatically. Stop recording e To stop recording before recording finish 3 automatically with memory full, push the STOP button. • The EXIT/RELOOP LED light to indicates Sampler Loop mode is set automatically. Play Sampler sound r Playback of the Sampler sound starts when the SAMP button is pushed after recording has stopped. • Sampler playback continues in looping. With setting B point, playback loop between A and B point. Without B point setting Sampler loops whole recorded 4 length (about 15 seconds). t To stop the Sampler sound push STOP button. Select Sampler Loop mode You can select loop mode for Sampler when Sampler playback stop. Loop (default): Sampler playback continues with looping. (EXIT/RELOOP LED stays lit) Exit: Sampler playback continues over B 5 point up to recording length. (EXIT/RELOOP LED flashes) Single: Sampler playback stops at B point. (EXIT/RELOOP LED turned off) y To select loop mode, push EXIT/RELOOP button after recording and before playing. Exit and Reloop 6 u The EXIT/RELOOP button can be used same as Seamless Loop function. Reverse Play i You can play the Sampled sound in reverse by pushing the RVS button. In reverse play 7 mode RVS LED lights up. • Reverse playback will take affect when you push the SAMP button after reverse mode has been turned on. To return to normal forward playback, push the RVS button once again. Moving Sampler B point o When the B button is pushed during Sampler 8 playback, the B point moves to the point at which the button was pushed, and loop playback from point A starts. Clearing the Sampler data !0 While pressing the RVS/(CLR) button, push the SAMP button to clear the Sampler. 9 Adjust pitch The Sampler playback pitch can be adjustable. !1 Push the SAMP.PITCH/VOL. button, the pitch input mode is set, PARAMETERS LED flashes and the current settings are displayed on the character display. • Start Sampler playback. !2 Turning the PARAMETERS knob can change the pitch. ✽ When pushing down and turning the PARAMETERS knob, you can change the pitch range 10 times faster. Adjust sound level The Sampler playback sound level can be adjustable. !3 Push the SAMP.VOL button again when the pitch input mode, the sound level input mode is set, PARAMETERS LED flashes and the current settings are displayed on the character display. • Start Sampler playback. !4 Turning the PARAMETERS knob can change the sound level. !5 Push the SAMP.PITCH/VOL. button again to turn the sound level input mode off. • Or, by pushing the RVS/(CLR) button for more than. 1 sec, you can clear Sampler. 17
-
 1
1 -
2
-
3
-
4
-
5
-
6
-
7
-
8
-
9
-
10
-
11
-
 12
12 -
 13
13 -
 14
14 -
 15
15 -
 16
16 -
 17
17 -
 18
18 -
 19
19 -
 20
20 -
 21
21 -
 22
22 -
23
-
24
-
25
-
26
-
27
-
28
-
29
-
30
-
31
-
32
-
33
-
34
-
35
-
36
-
37
-
38
-
39
-
40
 |
 |
