Denon DND6000 Operating Instructions - Page 7
Connections/installation - dn d6000
 |
UPC - 081757506366
View all Denon DND6000 manuals
Add to My Manuals
Save this manual to your list of manuals |
Page 7 highlights
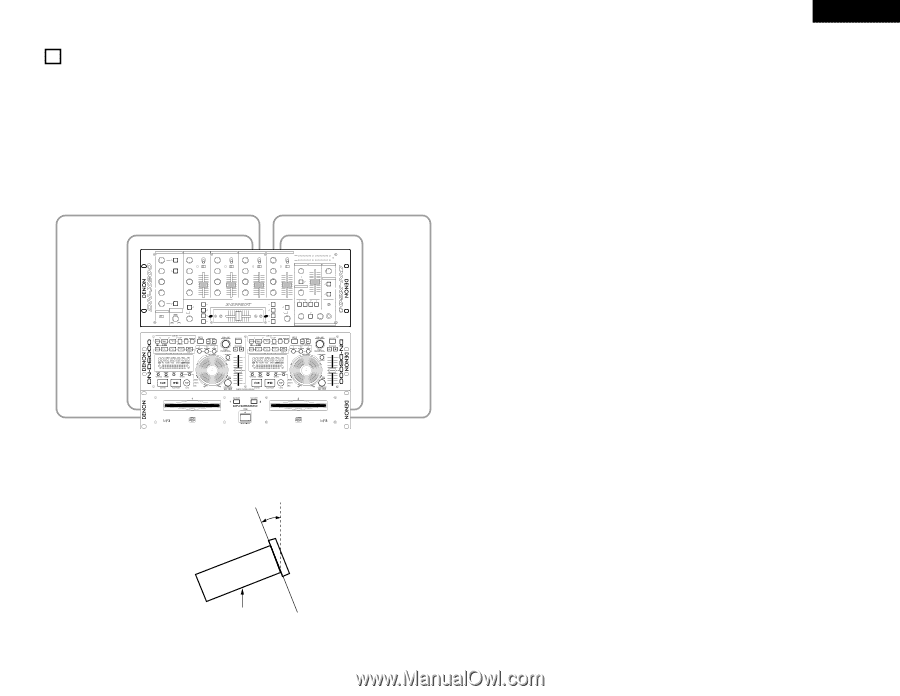
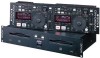
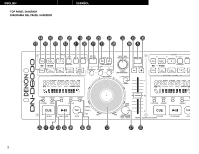
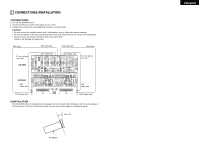
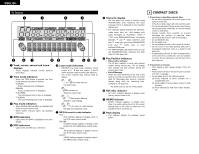
2 CONNECTIONS/INSTALLATION (1)CONNECTIONS 1. Turn off the POWER switch. 2. Connect the RCA pin cords to the inputs on your mixer. 3. Connect the control cord to the REMOTE connector on the RC-D60. CAUTION: • Be sure to use the supplied control cord. Using another type of cable may result in damage. • Be sure the power is off when connecting the control cord. Otherwise the units may not work properly. • Never connect any remote controllers other than the RC-D60. Doing so can damage the equipment. RCA Cord CH3 input jack CH4 input jack RCA Cord 3.5 mm stereo mini cord DN-X800 CH3 Fader jack CH4 Fader jack MIC 0 10 MAIN MIC ON/OFF MIC POST 1 PH1/LN1 MIN MAX GAIN DIGITAL1 LINE2 2 PH2/LN3 MIN MAX GAIN DIGITAL2 LINE4 3 PH3/LN5 MIN MAX GAIN DIGITAL3 LINE6 4 LINE7 MIN MAX GAIN DIGITAL4 - 20 15 10 7 L CUE R PGM - 20 15 10 7 LINE8 ZONE 5310 5310 MASTER 1 3 5 8+ PWR 1 3 5 8+ SUB WOOFER -26dB +10dB HI ON/OFF CH FADER START -26dB +10dB HI 10 8 CH FADER START -26dB +10dB HI 10 8 CH FADER START -26dB +10dB HI 10 8 CH FADER START -26dB +10dB HI 10 8 -26dB +10dB MID 6 -26dB +10dB MID 4 6 -26dB +10dB MID 4 6 -26dB +10dB MID 4 6 -26dB +10dB MID 4 2 2 2 2 -26dB +10dB LOW 0 -26dB +10dB LOW 0 10 AUX MIC CH FADER START ON OFF ON/OFF CROSSFADER CONTOUR CROSS FADER START A X 123 OFF 4 ASSIGN A SAMP. H/S BRAKE H/S 2 H/S 1 0 -26dB +10dB LOW 0 -26dB +10dB LOW DIGITAL A 0 -26dB +10dB LOW SAMP. CROSS FADER START B H/S BRAKE X 123 B H/S 2 OFF 4 H/S 1 ASSIGN B 10 0 10 LEVEL 8 METER 6 4 BOOTH 2 0 0 10 LEVEL CUE MIN MAX FREQ. EFFECT LOOP MAIN MIC CH 1 CH 2 CH 3 CH 4 L-CUE MONO R-PGM RESET CUE PGM PAN STEREO CUE/PGM 0 10 LEVEL PHONES DJ MIXER 3.5 mm stereo mini cord DN-D6000 CD1 Fader jack CD2 Fader jack CD1 Output jack CD2 Output jack (2)INSTALLATION The DN-D6000 will work normally when the player unit is mounted within 10 degrees off the vertical plane at the front panel. If the unit is tilted excessively, the disc may not be loaded or unloaded properly. Max. 10° DN-D6000 ENGLISH 7
-
 1
1 -
 2
2 -
 3
3 -
 4
4 -
 5
5 -
 6
6 -
 7
7 -
 8
8 -
 9
9 -
 10
10 -
 11
11 -
 12
12 -
13
-
14
-
15
-
16
-
17
-
18
-
19
-
20
-
21
-
22
-
23
-
24
-
25
-
26
-
27
-
28
-
29
-
30
-
31
-
32
-
33
-
34
-
35
-
36
-
37
-
38
-
39
-
40
 |
 |