Denon DNHD2500 Operating Instructions - Page 8
English - dj
 |
UPC - 081757507561
View all Denon DNHD2500 manuals
Add to My Manuals
Save this manual to your list of manuals |
Page 8 highlights
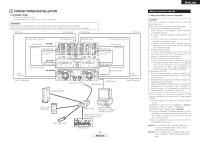
ENGLISH 2. USB Hub q Up to 4 mass storage devices and 1 keyboard can be connected. w It is not possible to connect multiple USB hubs. e Be sure to use hi-speed compatible devices to ensure transfer performance. (Products marked with the hi-speed USB logo recommended) r Bus power type USB hubs have a low power supply capacity, so the operation of the USB device connected to such hubs may be unstable. When using USB HDDs which require strong power or when using multiple USB devices, be sure to use a self-powered type USB hub. t When using a self-powered type USB hub, be sure to supply power to it when using it. y If a USB device connected to the USB hub is not recognized by the DN-HD2500, try disconnecting then reconnecting the device. If there are multiple devices connected to the hub, in some cases they will be recognized if the order in which they are connected is changed. It is best to connect one device at a time to check if it is recognized, then add more devices, checking each time. u Turn the power of the DN-HD2500 off when connecting the USB hub to it. 3. USB Keyboard q Only "QWERTY" type keyboard layouts are supported. w Do not connect multiple units. Doing so will prevent proper operation. e The DN-HD2500 can be operated from the keyboard. For the usable keys and their functions, refer to the table below. Keyboard DN-HD2500 Front Panel Button ↓ 1 PARAMETERS knob (Scroll Up) 2 ↓ PARAMETERS knob (Scroll Down) 3 ENTER Pushing PARAMETERS knob 4 ESC BACK button 5 TAB Change Deck (Keyboard input) 6 INSERT SOURCE button 7 Windows PLAY LIST button 8 ALT NEXT FILE button NOTE: • Keys (characters) other than the ones on the above table are used when inputting characters. For a list of the characters that can be used, see the section called "ABOUT CHARACTER INPUT". 4. All types of USB devices q Operation of the USB device may be unstable when using the bus power only. w Depending on the USB devices' specifications, some devices may not be identified, for example when using multiple devices. e If the USB device is not recognized, it might be recognized if it is disconnected then reconnected. r Devices on which power is supplied from the device to the host equipment side in a way not conforming to USB standards could damage the host equipment. Do not use such devices. t Do not disconnect a USB device when it is selected to be operated by the DN-HD2500 or when the database is being created. Disconnecting while the device is being accessed could damage files, etc. y For large capacity USB devices and USB devices that are not specifically designed for data storage (MP3 players, etc.), it may take some time for the device to be recognized after it is connected to the DNHD2500. u Use devices in agreement with or conforming to compliance tests. 5. PC q Computer on which the Windows XP Service Pack 2 operating system is installed w HDD with enough free space for DENON DJ Music Manager to operate e USB 2.0 connection terminal NOTE: • When connecting the DN-HD2500 to a computer, do not use any software other than DENON DJ Music Manager. The data on the HDD may be destroyed and the DNHD2500 may be damaged if any software other than DENON DJ Music Manager is used. 6. DN-D4000/4500/BU4500 Drive Unit q For a description of the functions and handling of the DN-D4000/4500/BU4500, refer to the respective model's operating instructions. w Refer to the separate table for the correspondence between the front panel keys of the DND4000/4500/BU4500 and DN-HD2500. e If the drive unit's power is turned off while DNHD2500 is in the drive unit control mode, the device selected for operation switches automatically to the DN-HD2500's internal hard disk. r In the case of e, the drive unit cannot be reconnected to the DN-HD2500 simply by turning its power back on. To reconnect it, you must either disconnect then reconnect the connection cable between the DN-HD2500 and the drive unit or turn the DN-HD2500's power off then back on. 7. iPod® q Only Windows format iPods® can be used. Macintosh format iPods® cannot be used. w MP3/WAV files transferred from iTunes® to an iPod® are read-only files, so the MEMO function cannot be used with them. e In iTunes®, place a check mark at "Manually manage music" in "Summary" - "Options". r MP3/WAV files transferred from iTunes® to an iPod® are managed with iPod's® specific file names, so it is not possible to search using the original file names. We recommend searching using ID3 tags (artist, album, title, genre, year, BPM, etc.). ✽ iPod® and iTunes® are trademarks or registered trademarks of Apple Computer, Inc. 8. Others q With the DN-HD2500, the software can be updated using a USB device, but note that some time may be required for the device to be recognized. w Do not use cables other than those conforming to USB standards. Using modified USB cables could damage the DN-HD2500. e If there is a large number of files stored in folders on the device, searching may take some time and operation may be unstable. Keep the number of files per folder to under 1000. DN-HD2500 DN-D4000 DN-D4500 1 PLAY/PAUSE PLAY/PAUSE PLAY/PAUSE 2 CUE/STUTTER CUE CUE/STUTTER 3 JOG MODE JOG MODE/BRAKE - 4 JOG disc JOG wheel JOG wheel 5 •QUICK JUMP, FAST SEARCH SHUTTLE ring 6 A1 A1 SHUTTLE ring A1 7 A2 A2 A2 8B B B 9 FLIP FLIP FLIP 10 A/B TRIM - B TRIM 11 EXIT/RELOOP EXIT/RELOOP EXIT/RELOOP 12 NEXT FILE - - 13 ECHO/LOOP - - 14 FLANGER - - 15 FILTER - - 16 TAP, •LOCK, -AUTO/INPUT BPM 17 PLAYLIST - OPEN/CLOSE - OPEN/CLOSE 18 BRAKE - BRAKE 19 DUMP - - 20 REVERSE - - 21 •PITCH/KEY, -RANGE •PITCH, -RANGE •PITCH/KEY, -RANGE 22 PITCH SLIDER PITCH SLIDER PITCH SLIDER 23 PITCH BEND +/- PITCH BEND +/- PITCH BEND +/- 24 •TIME, -UTIL. •TIME, -TOTAL •TIME, -TOTAL 25 •MEMO, -PRESET •MEMO, -PRESET •MEMO, -PRESET 26 •TITLE/ID3, -C-FADE •TITLE, -FOLDER TITLE 27 •CONT./SINGLE, -RELAY •CONT./SINGLE, -RELAY •CONT./SINGLE, -RELAY 28 BACK 29 SOURCE 30 PARAMETERS - (Display the "SOURCE" selection screen) TRACK SELECT - (Display the "SOURCE" selection screen) TRACK SELECT, -MP3 SEARCH MODE 3 ENGLISH
-
 1
1 -
2
-
 3
3 -
 4
4 -
 5
5 -
 6
6 -
 7
7 -
 8
8 -
 9
9 -
 10
10 -
 11
11 -
 12
12 -
 13
13 -
14
-
15
-
16
-
17
-
18
-
19
-
20
-
21
-
22
-
23
-
24
-
25
-
26
-
27
-
28
-
29
-
30
 |
 |