Dynex DX-L321-10A User Manual (English) - Page 9
Side connections, Remote control - analog to digital
 |
View all Dynex DX-L321-10A manuals
Add to My Manuals
Save this manual to your list of manuals |
Page 9 highlights
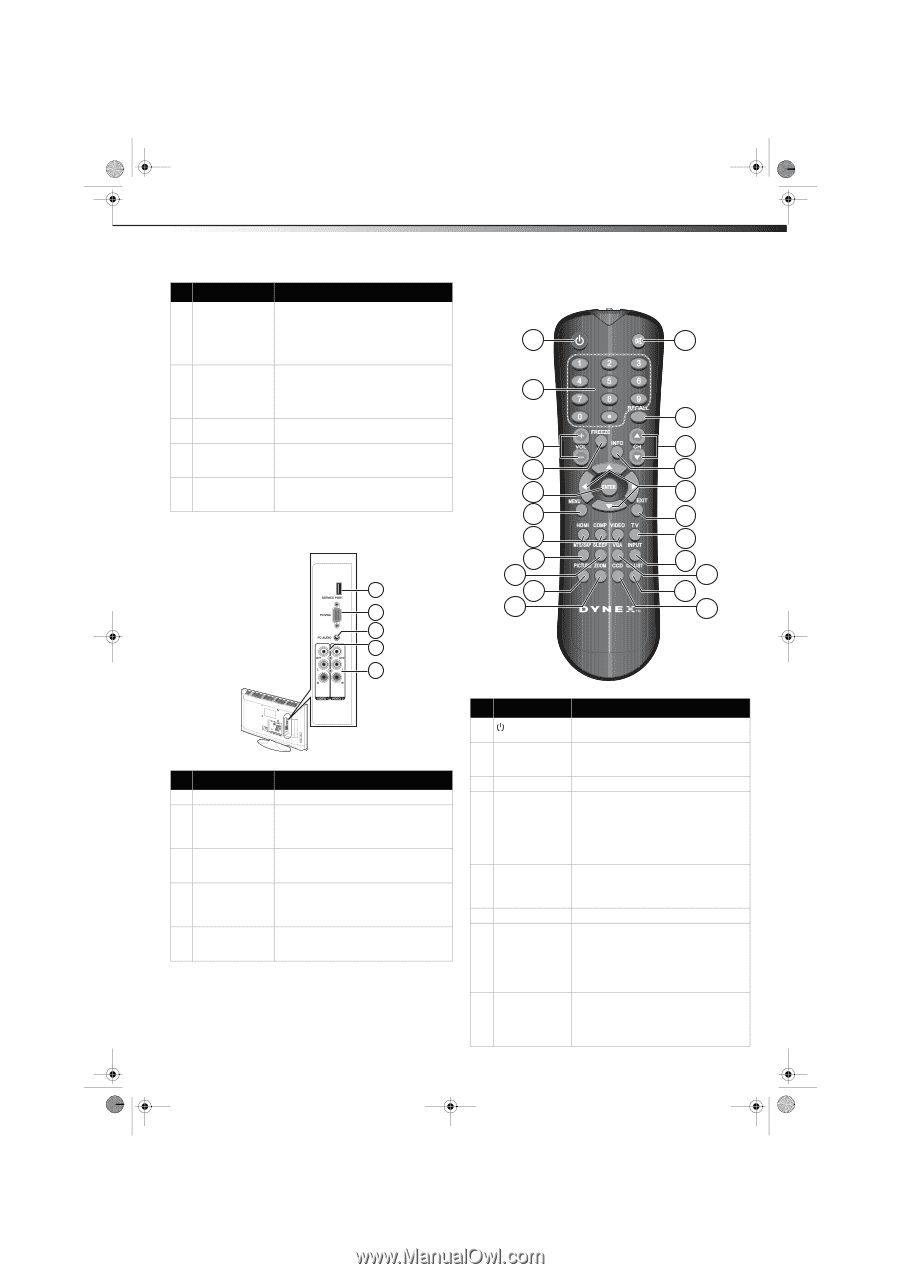
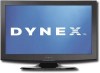
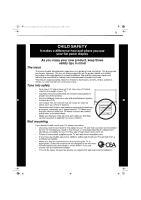
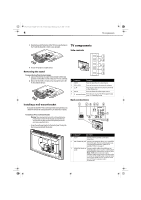
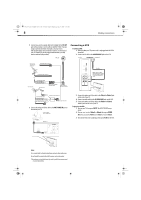
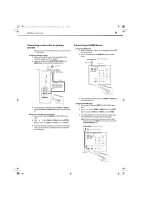
DX-L321-10A_09-0407_MAN_ENG_V3.book Page 5 Wednesday, May 13, 2009 11:38 AM TV components 5 ## Component Description 4 HDMI 1 and 2 jacks Connect an HDMI device, such as a cable box or DVD player, to one of these jacks. An HDMI cable carries both video and audio, so you do not need to make an audio connection. For more information, see "Connecting an HDMI device" on page 9. 5 COMPONENT IN (Y, Connect a component video device to Pb, Pr) jacks these jacks. Cables are often color-coded to connectors. For more information, see "Connecting a component video device" on page 10. 6 SPDIF out jack Connect a digital optical cable from this jack to an external digital audio receiver. 7 Audio output jacks Connect audio cables (L and R) from these (L and R) jacks to an external audio amplifier or receiver. 8 Component audio Connect audio cables (L and R) from an input jacks (L and external audio source, such as a DVD player, R) 1 and 2 to these jacks. Side connections 1 2 3 4 5 Remote control 1 2 3 4 5 6 7 8 9 10 11 12 13 14 15 16 17 18 19 20 21 22 ## Component Description 1 Service port 2 PC VGA jack 3 PC Audio For service update only. Do not use. Connect a 15-pin VGA cable from a computer to this jack. For more information, see "Connecting a computer" on page 10. Connect a mini audio cable from your computer sound card AUDIO OUT jack to this jack. 4 AV1 and AV2 jacks Connect the video output from an external video device to one of these jacks. For more information, see "Connecting a VCR" on page 8. 5 Composite audio Connect audio cables (L and R) from these output jacks (L and jacks to an external analog audio amplifier R) 1 and 2 or receiver. # Button Description 1 (Power) Press to turn on your TV. Press again to put your TV in Standby mode. 2 Numbers/• (dot) Press to enter channel numbers or the parental control password. Press the • (dot) button to select a digital sub-channel. 3 VOL+/VOL- Press to increase or decrease the volume. 4 FREEZE Press once to view an image capture of the display in a separate screen, while the programming continues to run. Press again to display the image capture using the entire screen. To continue with the regular programming display, press the button one more time. 5 ENTER During TV viewing, press to switch to the keyed in channel entry. In menu mode, press to confirm selections in an on-screen menu or to open a submenu. 6 MENU Press to open the on-screen menu. 7 HDMI, COMP, VIDEO Press HDMI to select the HDMI 1 or HDMI 2 video input source. Press COMP to select the Component 1 or Component 2 video input source. Press VIDEO to select Video 1 or Video 2 as the video input source. 8 MTS/SAP Press to enable the SAP (Second Audio Program) function. This lets you listen to a program using an alternative second language. Function availability depends on your TV provider.
-
 1
1 -
2
-
3
-
 4
4 -
 5
5 -
 6
6 -
 7
7 -
 8
8 -
 9
9 -
 10
10 -
 11
11 -
 12
12 -
 13
13 -
 14
14 -
15
-
16
-
17
-
18
-
19
-
20
-
21
-
22
-
23
-
24
-
25
-
26
-
27
-
28
-
29
-
30
-
31
-
32
 |
 |