Dynex DX19L200A12 User Manual - Page 19
Using the remote control, Turning on your TV for the first
 |
View all Dynex DX19L200A12 manuals
Add to My Manuals
Save this manual to your list of manuals |
Page 19 highlights
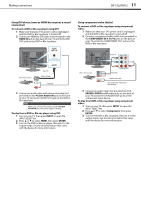
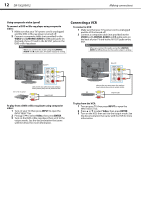
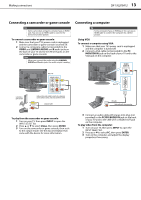
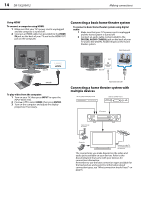
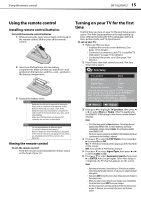
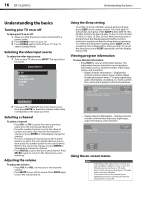
Using the remote control DX-19L200A12 15 Using the remote control Installing remote control batteries To install the remote control batteries: 1 While pressing the cover release latch on the back of the remote control, lift the cover off the remote control. 2 Insert two AAA batteries into the battery compartment. Make sure that you match the + and - symbols on the batteries with the + and - symbols in the battery compartment. 3 Replace the battery cover. Cautions • Batteries should not be exposed to excessive heat, such as sunshine, heat registers, or fire. • Battery chemicals can cause a rash. If the batteries leak, clean the battery compartment with a cloth. If chemicals touch your skin, wash immediately. • Make sure that batteries are disposed of correctly. Do not burn or incinerate. Notes Do not mix batteries of different types. Do not mix old and new batteries. Remove batteries when the charge is depleted. If the remote control is not going to be used for an extended period of time, remove the batteries. Aiming the remote control To aim the remote control: • Point the remote control towards the remote sensor on the front of your TV. Turning on your TV for the first time The first time you turn on your TV, the Auto Setup screen opens. The Auto Setup guides you through setting up basic settings including the menu language, date and time, picture mode, and TV signal source. To set up your TV: 1 Make sure that you have: • Installed the remote control batteries. (See page 15 for details). • Connected an antenna, cable TV, or satellite TV. (See page 7 to page 10 for details.) • Connected the power cord. (See page 7 for details.) 2 Press Power, then wait several seconds. The Auto Setup menu opens. Auto Setup TV Location Store E-POP Demo Off Signal Type Cable Automatic Search Start This unit has been preset to STORE brightness. This setting does not qualify under ENERGY Star. To reduce brightness and energy consumption, change setting to "HOME". This setting does qualify under ENERGY STAR. :Select :Adjust 3 Press or to highlight TV Location, then press or to select Store or Home. (This TV qualifies for the ENERGY STAR rating in the Home mode default setting). Notes: • This TV has been preset to Store brightness. This setting does not qualify under ENERGY STAR. To reduce brightness and energy consumption, change setting to Home. This setting does qualify under ENERGY STAR. • The device may not conform to the ENERGY STAR standard after Reset is performed or the Backlight is adjusted. 4 Press or to select E-POP Demo, then press or to select On or Off. On-A TV feature introduction pops up at the bottom of the screen. Off-Turn off the E-POP Demo feature. 5 Press or to select Signal Type, then press or to select Cable or Air. 6 Press or to select Automatic Search, then press or ENTER. Auto Setup begins. After Auto Setup is completed, the TV channel appears on the screen. Notes: • Depending on reception, it may take up to 30 minutes to complete memorizing digital cable channels. Let the process complete without interruption. • If you press EXIT during the process, Auto Setup stops and changes to the normal screen. • When you make a menu selection, your changes occur immediately. You do not have to press EXIT to see your changes. • The auto setup process will only start by itself the first time you turn on your TV. However, you can restart the process via the menu system.
-
 1
1 -
2
-
3
-
4
-
5
-
6
-
7
-
8
-
9
-
10
-
11
-
12
-
13
-
 14
14 -
 15
15 -
 16
16 -
 17
17 -
 18
18 -
 19
19 -
 20
20 -
 21
21 -
 22
22 -
 23
23 -
 24
24 -
25
-
26
-
27
-
28
-
29
-
30
-
31
-
32
-
33
-
34
-
35
-
36
-
37
-
38
-
39
-
40
-
41
-
42
-
43
-
44
-
45
-
46
-
47
-
48
 |
 |