Dynex DX19L200A12 User Manual - Page 28
Changing channel settings
 |
View all Dynex DX19L200A12 manuals
Add to My Manuals
Save this manual to your list of manuals |
Page 28 highlights
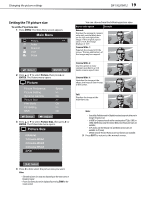
24 DX-19L200A12 Changing channel settings Changing the HDMI audio setting The HDMI input receives digital audio and uncompressed video from an HDMI equipped device or uncompressed digital video from a DVI equipped device. When you connect a DVI equipped device to this TV with an HDMI-to-DVI adaptor cable, it only carries the video signal. Therefore, you will also need to connect separate analog audio leads. Use this setting to select the correct audio source. To change the HDMI audio setting: 1 Press MENU. The Main Menu screen appears. Main Menu Picture Audio >> CH Channel Lock Setup :Select ENTER :Set 2 Press or to select Audio, then press or ENTER. The Audio menu opens. Audio Equalizer Mode Audio Setting MTS Surround Auto Volume Audio Language HDMI Audio Flat >> Stereo Off Off Spanish HDMI :Select :Adjust 3 Press or to select HDMI Audio, then press or to change the setting. You can select: • HDMI -Select this setting when you use an HDMI cable to connect a signal source to your TV. • DVI-Select this setting when you use an HDMI-DVI cable to connect a video source to your TV and analog audio cables to connect the audio. 4 Press EXIT to return to the normal screen. Changing channel settings Setting the signal type To set the Signal Type: 1 Change Input Mode to TV, if not already selected. 2 Press MENU. The Main Menu screen appears. Main Menu Picture Audio CH Channel >> Lock Setup :Select ENTER :Set 3 Press or to select Channel, then press or ENTER. The Channel menu opens. 4 Press or to select Auto Ch Memory, then press or ENTER. The Auto Ch Memory screen opens. CH Auto Ch Memory Signal Type Automatic Search Cable Start :Select :Adjust 5 Press or to select Signal Type, then press or to select Air or Cable. 6 Press EXIT to return to the normal screen.
-
 1
1 -
2
-
3
-
4
-
5
-
6
-
7
-
8
-
9
-
10
-
11
-
12
-
13
-
14
-
15
-
16
-
17
-
18
-
19
-
20
-
21
-
22
-
 23
23 -
 24
24 -
 25
25 -
 26
26 -
 27
27 -
 28
28 -
 29
29 -
 30
30 -
 31
31 -
 32
32 -
 33
33 -
34
-
35
-
36
-
37
-
38
-
39
-
40
-
41
-
42
-
43
-
44
-
45
-
46
-
47
-
48
 |
 |
