Dynex DX19L200A12 User Manual - Page 25
Changing the audio settings
 |
View all Dynex DX19L200A12 manuals
Add to My Manuals
Save this manual to your list of manuals |
Page 25 highlights
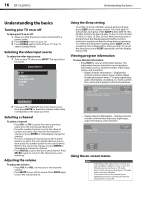
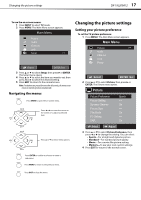
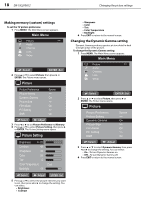
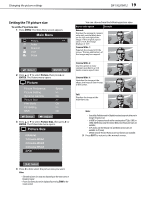
Changing the audio settings DX-19L200A12 21 • Clock-Adjust this to minimize any vertical bars or stripes on the screen. • Phase-Adjust this to optimize the picture quality after the frequency has been set. • Auto Adjust-Adjusts PC settings automatically. 5 Press EXIT to return to the normal screen. Changing the DNR setting DNR (Digital Noise Reduction can reduce the roughness of the picture. To change the DNR setting: 1 Press MENU. The Main Menu screen appears. Main Menu Picture >> Audio CH Channel Lock Setup :Select ENTER :Set 2 Press or to select Picture, then press or ENTER. The Picture menu opens. Picture Picture Preference Picture Setting Dynamic Gamma Picture Size Film Mode PC Setting DNR Sports >> On >> On >> On :Select :Adjust 3 Press or to select DNR, then press or to change the setting. You can select: • On-Turns DNR on. • Off-Turns DNR off. 4 Press EXIT to return to the normal screen. Changing the audio settings Setting the equalizer mode To set the equalizer mode: 1 Press MENU. The Main Menu screen appears. Main Menu Picture Audio >> CH Channel Lock Setup :Select ENTER :Set 2 Press or to select Audio, then press or ENTER. The Audio menu opens. Audio Equalizer Mode Audio Setting MTS Surround Auto Volume Audio Language HDMI Audio Flat >> Stereo Off Off Spanish HDMI :Select :Adjust 3 Press or to select the Equalizer Mode preset you want. You can select: • Standard-For standard sound reproduction. • Music-To optimize the sound for music. • Movie-For a movie-like sound quality. • News-To optimize the sound for talking. • Memory-To customize the sound settings to your taste. • Flat-Turns off the sound equalizer. 4 Press EXIT to return to the normal screen.
-
 1
1 -
2
-
3
-
4
-
5
-
6
-
7
-
8
-
9
-
10
-
11
-
12
-
13
-
14
-
15
-
16
-
17
-
18
-
19
-
 20
20 -
 21
21 -
 22
22 -
 23
23 -
 24
24 -
 25
25 -
 26
26 -
 27
27 -
 28
28 -
 29
29 -
 30
30 -
31
-
32
-
33
-
34
-
35
-
36
-
37
-
38
-
39
-
40
-
41
-
42
-
43
-
44
-
45
-
46
-
47
-
48
 |
 |
