Electrolux EW26SS75QS Complete Owner's Guide (English) - Page 10
Removing the Doors
 |
View all Electrolux EW26SS75QS manuals
Add to My Manuals
Save this manual to your list of manuals |
Page 10 highlights
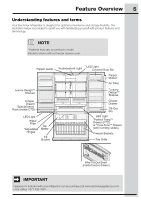
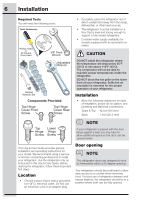
10 Removing the Doors Getting through narrow spaces If your refrigerator will not fit through an entrance area, you can remove the doors. Check first by measuring the entrance. To prepare for removing the doors: 1 Make sure the electrical power cord is unplugged from the wall outlet. 2 Open the freezer drawer and remove the toe grille (see "Installation" section). 3 Remove any food from the door shelves and close the doors. To remove the refrigerator doors: 1 Trace lightly around the door's top hinges with a pencil. This makes reinstallation easier. 3 Unscrew the three lower hinge screws and hinge if necessary. To reinstall the right door, reverse the above steps. Lower Hinge Removal Once both doors are in place, ensure they are aligned with each other and level (please see the "Installation" section for more details), and replace the top hinge cover. Front Cover Screw Top Hinge Cover Rear Cover Screw Hinge Screws Multi-wire Cables Leave Hinge With Door Ground Screw Top Hinge 2 Disconnect the harness by grasping both sides of the connector firmly, depress the latch, and pull apart. Remove the two screws from the top hinge. Lift the door off of the bottom hinge and set it aside. CAUTION Be sure doors are set aside in a secure position where they cannot fall and cause personal injury, or damage to the doors or handles. Removing Freezer Drawer 1 Open freezer drawer. 2 Remove drawer screws on right and left sides (two screws on each side). Remove hex head drawer screw Remove hex head drawer screw Do Not Remove Other Screws Remove Hex Head Drawer Screw Remove Hex Head Drawer Screw CAUTION Drawer is heavy. Use caution when lifting. 3 Lift drawer up and out to remove.
-
 1
1 -
2
-
3
-
4
-
 5
5 -
 6
6 -
 7
7 -
 8
8 -
 9
9 -
 10
10 -
 11
11 -
 12
12 -
 13
13 -
 14
14 -
 15
15 -
16
-
17
-
18
-
19
-
20
-
21
-
22
-
23
-
24
-
25
-
26
-
27
-
28
-
29
-
30
-
31
-
32
-
33
-
34
-
35
-
36
 |
 |
