Electrolux EW30GS80RS Complete Owner s Guide English - Page 11
Getting Started
 |
View all Electrolux EW30GS80RS manuals
Add to My Manuals
Save this manual to your list of manuals |
Page 11 highlights
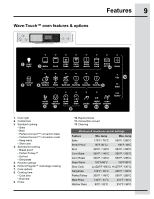
Getting Started 11 Setting clock at power up Timers When the appliance is powered up for the first time or when the electric supply to the appliance has been interrupted, the display will flash 12:00. Before any function of the oven can be set, CANCEL off must be pressed. This will set the clock at 12:00. To set the clock for the actual time the user pref key must first be pressed to bring the oven to the clock mode. Be sure to set the correct time on the clock before using the oven, especially if cooking with added time instructions See below to set the clock time (example: 1:30): Step Example Press The two timers provided with the oven control serve as extra reminders in the kitchen. When a timer reaches less than 1 hour, the display will start to count down in minutes and seconds. When the time runs out the active timer will beep, "0:00" will flash. The following time settings apply to the timers: • Min. time: 1 minute • Max. time: 11 hours 59 minutes See example below to set the timer for 5 minutes: Example 1. Press user pref. CLO 1200 appears in the display 2. Enter 1 3 0 using the numeric keypad. 1 3 0 Step 1. Press TIMER Press 3. Press START enter to accept the new time. 2. Enter 5 minutes 4. Press CANCEL off to exit the user preferences menu. Wave-Touch™ display modes 3. Press TIMER To cancel after setting the timer, press the TIMER key again. Sleep mode Your control will remain in a sleep mode when not in use. Only the clock will display during this mode. You will need to wake the control to begin any function - Fig. 1. Awake mode To awake the control touch within the display panel. If the control panel is not touched again within 2 minutes, the control will return to the sleep mode. To start cooking you must select either the upper oven or the warmer oven. User preferences will be available during the awake mode as well as timers, oven light and the control lock - Fig. 2. Sleep mode Fig.1 NOTE The timer(s) will not affect the cooking process. Temperature visual display Your oven is equipped with a temperature visual display for each oven. When a cooking mode is set, the actual temperature will be shown in the display and will rise as the unit preheats. When the unit has reached its target temperature, a chime will sound to remind you to place the food in the oven. This feature will be active with some cooking modes; bake, convection bake, convection roast and perfect turkey. The cooking modes which does not feature the temperature visual display will be noted in their descriptions. NOTE: The lowest temperature that can be displayed is 100°F. Awake mode Fig.2
-
 1
1 -
2
-
3
-
4
-
5
-
 6
6 -
 7
7 -
 8
8 -
 9
9 -
 10
10 -
 11
11 -
 12
12 -
 13
13 -
 14
14 -
 15
15 -
 16
16 -
17
-
18
-
19
-
20
-
21
-
22
-
23
-
24
-
25
-
26
-
27
-
28
-
29
-
30
-
31
-
32
-
33
-
34
-
35
-
36
-
37
-
38
-
39
-
40
-
41
-
42
-
43
-
44
-
45
-
46
-
47
-
48
-
49
-
50
-
51
-
52
-
53
-
54
-
55
-
56
 |
 |
