Epson 7800 Printer Guide - Page 64
Printing Trim Lines, Using Cut Sheet Paper - driver mac
 |
UPC - 010343855205
View all Epson 7800 manuals
Add to My Manuals
Save this manual to your list of manuals |
Page 64 highlights
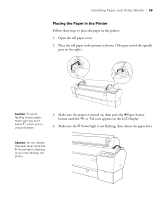
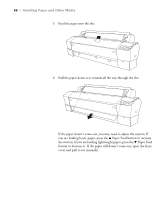
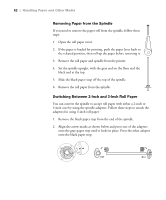
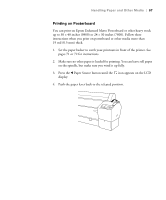
64 | Handling Paper and Other Media Printing Trim Lines You can print trim lines on the right edge of your pages (if you're using auto cut) or on the right and bottom edge (if you're not using auto cut). Follow these steps: 1. Press the Menu button. 2. Press the Menu button again to select the Printer Setup menu and highlight PLATEN GAP. 3. Press the d button to highlight PAGE LINE. 4. Press the Menu button. 5. Press the d button to highlight ON. 6. Press the button to save the setting. An asterisk appears next to ON. 7. Press the Pause button to exit the menu. You can also specify trim lines from your printer driver software. For instructions, see page 90 (Mac OS X) or page 105 (Windows). Using Cut Sheet Paper You can print on many types of cut sheet paper and other media. The printer accepts sheets ranging from letter size to 24 inches wide (7800) or 44 inches wide (9800). You can leave your roll paper on the spindle when you print on cut sheets; make sure it is removed from the paper path and rolled up. If you're using stock thicker than 19 mil (0.5 mm), load it as described on page 67. If you're loading small sheets or fine art paper, see page 66. 2-64
-
 1
1 -
2
-
3
-
4
-
5
-
6
-
7
-
8
-
9
-
10
-
11
-
12
-
13
-
14
-
15
-
16
-
17
-
18
-
19
-
20
-
21
-
22
-
23
-
24
-
25
-
26
-
27
-
28
-
29
-
30
-
31
-
32
-
33
-
34
-
35
-
36
-
37
-
38
-
39
-
40
-
41
-
42
-
43
-
44
-
45
-
46
-
47
-
48
-
49
-
50
-
51
-
52
-
53
-
54
-
55
-
56
-
57
-
58
-
 59
59 -
 60
60 -
 61
61 -
 62
62 -
 63
63 -
 64
64 -
 65
65 -
 66
66 -
 67
67 -
 68
68 -
 69
69 -
70
-
71
-
72
-
73
-
74
-
75
-
76
-
77
-
78
-
79
-
80
-
81
-
82
-
83
-
84
-
85
-
86
-
87
-
88
-
89
-
90
-
91
-
92
-
93
-
94
-
95
-
96
-
97
-
98
-
99
-
100
-
101
-
102
-
103
-
104
-
105
-
106
-
107
-
108
-
109
-
110
-
111
-
112
-
113
-
114
-
115
-
116
-
117
-
118
-
119
-
120
-
121
-
122
-
123
-
124
-
125
-
126
-
127
-
128
-
129
-
130
-
131
-
132
-
133
-
134
-
135
-
136
-
137
-
138
-
139
-
140
-
141
-
142
-
143
-
144
-
145
-
146
-
147
-
148
-
149
-
150
-
151
-
152
-
153
-
154
-
155
-
156
-
157
-
158
-
159
-
160
-
161
-
162
-
163
-
164
-
165
-
166
-
167
-
168
-
169
-
170
-
171
-
172
-
173
-
174
-
175
-
176
 |
 |
