Epson 835p Product Information Guide - Page 14
Orange, Green - powerlite wireless
 |
UPC - 010343851160
View all Epson 835p manuals
Add to My Manuals
Save this manual to your list of manuals |
Page 14 highlights
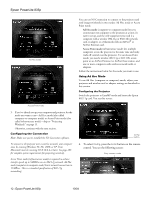
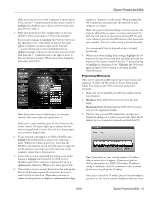
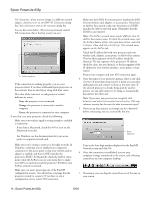
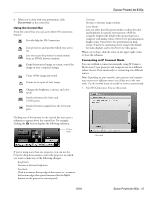
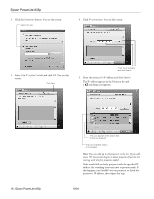
Epson PowerLite 835p NS Connection. If you want to change to a different network adapter, click Extension on the EMP NS Connection dialog box, then click Switch LAN on the extension dialog box. You see the screen below. (If you have previously started NS Connection, this is the first screen you see.) Select projector If the connection is working properly, you see your projector listed. If you have additional Epson projectors on the network, they are also listed, along with their status. The color of the icon next to each projector's name indicates its status: ❏ Gray: the projector is not connected ❏ Orange: the projector is connected to another computer ❏ Green: the projector is connected to your computer If you don't see your projector, check the following: ❏ Make sure your wireless signal is strong enough to establish a connection: If you have a Macintosh, check the AirPort icon on the Macintosh menu bar. For Windows, see the documentation for your access point or computer network card. ❏ Make sure you're trying to connect to the right network. In Windows, verify that you've enabled your computer's connection to the access point or that your wireless card or adapter is enabled, and that its SSID matches the projector's ESSID. In Macintosh, check the AirPort status menu (click the AirPort icon on your menu bar) to make sure AirPort is turned on and the projector's ESSID or your AirPort network is selected. ❏ Make sure you aren't projecting one of the EasyMP configuration screens. (You should see a message that the projector is ready to connect.) If you have to exit a configuration screen, restart NS Connection. ❏ Make sure the ESSID for your projector matches the SSID for your wireless card, adapter, or access point. If you have an AirPort base station, make sure the projector's ESSID matches the AirPort network name. Remember that the ESSID is case-sensitive. Note: The AirPort network name may be different than the AirPort base station name. To check the network name, start the AirPort Admin utility, select your base station, and click Configure. Then click Show All Settings. The network name appears on the AirPort tab. ❏ Check the IP address for both your projector and your wireless card, adapter, access point, or AirPort base station. The first three segments of the IP address should be identical. The last segment of the projector's IP address should be close, but not identical, to the last segment of the IP address for your wireless interface, access point, or base station. ❏ Restart your computer and start NS Connection again. 4. Once the name of your projector appears, select it and click Connect. If more than one projector is listed, you can select additional ones and connect to them at the same time. If the selected projector is already being used by another person, you can still connect to it; doing so automatically disconnects the other user. Note: If you want your presentation encrypted, click Extension and select Use encrypted communication. This step enhances security but decreases the data transmission speed. 5. If you set up the projector to prompt you for a keyword before connecting, you see a screen like this one: Enter keyword Type in the four-digit number displayed on the EasyMP Network screen and click OK. 6. Once the connection is established, you see your computer's image transmitted to the screen, and a floating control bar on your computer desktop: 7. If necessary, you can drag the control bar out of the way on your screen. 14 - Epson PowerLite 835p 10/04
-
 1
1 -
2
-
3
-
4
-
5
-
6
-
7
-
8
-
 9
9 -
 10
10 -
 11
11 -
 12
12 -
 13
13 -
 14
14 -
 15
15 -
 16
16 -
 17
17 -
 18
18 -
 19
19 -
20
 |
 |
