Epson 835p Product Information Guide - Page 18
Replacing the Lamp and Air Filters - powerlite replacement lamp
 |
UPC - 010343851160
View all Epson 835p manuals
Add to My Manuals
Save this manual to your list of manuals |
Page 18 highlights
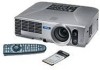
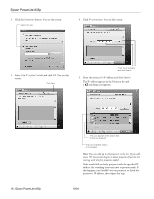
Epson PowerLite 835p 3. Let the projector cool for at least an hour (if it has been on). The lamp is extremely hot immediately after use. 4. Turn the projector over and remove the air filters at the side and bottom of the projector. If the dirt is difficult to remove or a filter is broken, replace the filters as described in the next section. Contact your dealer, by calling Epson at (800) 873-7766, or by visiting the Epson StoreSM at www.epsonstore.com (U.S. sales only). In Canada, please call (800) 463-7766 for dealer referral. Replacing the Lamp and Air Filters The life span of the projection lamp is about 2000 hours if Brightness Control in the Setting menu is set to High (default), and 3000 hours if Brightness Control is set to Low. Note: When you get a replacement lamp for your projector, you should replace the filters. It is time to replace the lamp when: ❏ The projected image gets darker or starts to deteriorate. ❏ The message Replace the lamp appears on the screen when the lamp comes on and the lamp warning light flashes orange. To maintain projector brightness and image quality, replace the lamp as soon as possible. ❏ The lamp warning light flashes red (the lamp is burnt out). Contact your dealer or call Epson at (800) 873-7766 in the United States for a replacement lamp. Request part number V13H010L31. In Canada, please call (800) 463-7766 for dealer referral. Follow these steps to replace the lamp and air filters: 1. Turn off the projector. 2. When the Power light stops flashing, unplug the power cord. WARNING: Let the lamp cool fully before replacing it. It is extremely hot immediately after use. In the unlikely event that the lamp has broken, small glass fragments may be present and should be removed carefully to avoid injury. 5. Insert the two new air filters. They should click into place. 6. Turn the projector back over. 7. Loosen the screw holding the lamp cover in place (you don't need to remove it). Then remove the lamp cover. 8. Loosen the two screws holding the lamp in place (you don't need to remove them). Loosen, but don't remove these screws 9. Grasp the handles as shown and pull the lamp straight out. 18 - Epson PowerLite 835p 10/04
-
 1
1 -
2
-
3
-
4
-
5
-
6
-
7
-
8
-
9
-
10
-
11
-
12
-
 13
13 -
 14
14 -
 15
15 -
 16
16 -
 17
17 -
 18
18 -
 19
19 -
 20
20
 |
 |
