Epson 835p Product Information Guide - Page 3
Positioning the Projector, Connecting the Projector - powerlite manual
 |
UPC - 010343851160
View all Epson 835p manuals
Add to My Manuals
Save this manual to your list of manuals |
Page 3 highlights
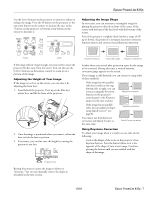
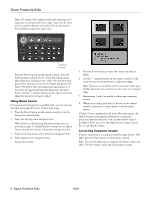
Epson PowerLite 835p Positioning the Projector Follow these guidelines: ❏ Place the projector on a sturdy, level surface between 2.8 and 48.3 feet from the screen. Image size generally increases with distance, but may vary depending on the position of the zoom ring and other settings. ❏ Maximum diagonal size = (projection distance[inches] x 2.54 x 0.32827 + 1.6767) ❏ Minimum diagonal size = (projection distance[inches] x 2.54 x 0.203 + 1.077) To determine the projection distance (in inches) when you know the diagonal size of the screen image: ❏ Maximum projection distance = ((diagonal size[inches] x 4.92611) - 5.30542) / 2.54 ❏ Minimum projection distance = ((diagonal size[inches] x 3.04627) - 5.10769) / 2.54 29.8 to 48.3 ft 5.8 to 9.5 ft 2.8 to 4.7 ft Distance from screen ❏ Place it within 10 feet of an electrical outlet or extension cord and 5 feet of your computer or video source. ❏ Allow space for ventilation around and under the projector. ❏ To avoid a keystone shaped image (an image that is wider on one side), place the projector directly in front of the center of the screen, facing the screen squarely. ❏ If possible, place the projector level with the bottom of the screen. If you place the projector too far below the screen, you may have to tilt it up by extending the front adjustable foot (see page 7). This causes the projected image to lose its shape, but the projector automatically compensates. If the image is still not square, adjust it manually by pressing the Keystone buttons (see page 7) or using Quick Corner (see page 8). If you place the projector higher than the bottom of the screen, the image will be square, but it won't fill the screen. Calculating Image Size and Projection Distance Use the formulas below to find out how large the image will be when you know the distance from projector to screen, or to find out how far from the screen to place the projector if you want an image of a certain size. Since you can change the image size by adjusting the zoom, formulas are given for calculating both minimum and maximum sizes. Note: Formulas given here apply only when the image is not tilted. If you tilt the image up by extending the projector's foot or using electronic keystone correction, your image size may vary. To determine the diagonal size of an image (in inches) when you know the projection distance: Connecting the Projector You can connect the projector to two computer sources or four video sources-up to a total of four sources. You can include an independent sound channel for each source. (See the User's Guide for complete setup instructions.) Using EasyMP®, you can also connect over a wireless network, or view images on a memory card or digital camera. Note: The preview feature lets you see all the sources at a glance, so you can easily switch to the one you want. See page 5. Types of Connections The following connections are possible, depending on the signal your equipment generates and its available output ports. Computer equipment Output signal Analog RGB video DVI Required cable VGA cable VGA-to-BNC cable DVI to VGA cable Video equipment Output signal Composite video S-video Component video RGB video Required cable RCA video cable S-video cable Component to VGA cable VGA cable Note that the projector's Computer ports accept a variety of input signals. If you're connecting to one of these ports, you'll need to make sure that the correct input signal setting is selected or your image won't display properly. 10/04 Epson PowerLite 835p - 3
-
 1
1 -
 2
2 -
 3
3 -
 4
4 -
 5
5 -
 6
6 -
 7
7 -
 8
8 -
 9
9 -
10
-
11
-
12
-
13
-
14
-
15
-
16
-
17
-
18
-
19
-
20
 |
 |
