Epson ActionNote 895 User Manual - Page 57
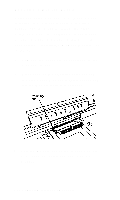
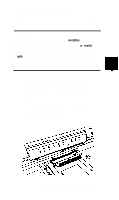
Replacing the Keyboard, with the keyboard at a 45° angle and line
 |
View all Epson ActionNote 895 manuals
Add to My Manuals
Save this manual to your list of manuals |
Page 57 highlights
Replacing the Keyboard When you are ready to replace the keyboard, refer to the illustrations in the previous section as you follow these steps: 1. Carefully lift up the keyboard and position it over the case. 2. Hold the keyboard at a 45° angle and align it so that the clips on the bottom edge fit into the case. 3. Gently lower the top of the keyboard until it is securely in place. You should not have to force it. Make sure the flat cables are not caught under the edge of the keyboard. The top edge of the keyboard should not overlap the bronze-colored ledge of the case. If you have difficulty aligning the keyboard try the following approach hold the top of the keyboard in the center with the keyboard at a 45° angle and line up the clips on the bottom of the keyboard with the case. Gently lift up the keyboard until the clips are aligned. 4. Position the plastic strip above the keyboard and push it back until it snaps Into place. The strip fits tightly but should not obstruct the function keys 5-10 Upgrading Internal Components
-
 1
1 -
2
-
3
-
4
-
5
-
6
-
7
-
8
-
9
-
10
-
11
-
12
-
13
-
14
-
15
-
16
-
17
-
18
-
19
-
20
-
21
-
22
-
23
-
24
-
25
-
26
-
27
-
28
-
29
-
30
-
31
-
32
-
33
-
34
-
35
-
36
-
37
-
38
-
39
-
40
-
41
-
42
-
43
-
44
-
45
-
46
-
47
-
48
-
49
-
50
-
51
-
 52
52 -
 53
53 -
 54
54 -
 55
55 -
 56
56 -
 57
57 -
 58
58 -
 59
59 -
 60
60 -
 61
61 -
 62
62 -
63
-
64
-
65
-
66
-
67
-
68
-
69
-
70
-
71
-
72
-
73
-
74
-
75
-
76
-
77
-
78
-
79
-
80
-
81
-
82
-
83
-
84
-
85
-
86
-
87
-
88
-
89
-
90
-
91
-
92
-
93
-
94
-
95
-
96
-
97
-
98
-
99
-
100
-
101
-
102
-
103
-
104
-
105
-
106
-
107
-
108
-
109
-
110
-
111
-
112
-
113
 |
 |
