Epson C12C800WN User Guide - Page 12
Unpacking the Print Server, Checking the Printer
 |
View all Epson C12C800WN manuals
Add to My Manuals
Save this manual to your list of manuals |
Page 12 highlights
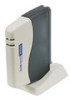
Unpacking the Print Server Take everything out of the box and make sure you have the items shown below. You will also need a parallel cable to connect the print server to your printer. Make sure your cable follows the specifications listed on page 4. power supply base print server print server CD-ROM Checking the Printer Before you connect the print server, print a test page to make sure the printer is working properly. Make sure letter-size or larger paper is loaded. 1. Press the P power button to turn off the printer. 2. Hold down the m paper button as you press and release the P power button. On some printers, you need to hold down the S E load/eject button or b maintenance button. Check the Printer Basics book that came with your printer. 3. Continue holding down the button until the P power light starts flashing, then release it. The printer prints a sheet showing its ROM version number and a nozzle check pattern. If the test page prints, continue with the instructions below for connecting the print server. If the test page doesn't print, check the control panel lights. See the "Problem Solving" chapter in your Printer Basics book for control panel guidelines. If none of the solutions work, contact EPSON as described on page 47. 8
-
 1
1 -
2
-
3
-
4
-
5
-
6
-
 7
7 -
 8
8 -
 9
9 -
 10
10 -
 11
11 -
 12
12 -
 13
13 -
 14
14 -
 15
15 -
 16
16 -
 17
17 -
18
-
19
-
20
-
21
-
22
-
23
-
24
-
25
-
26
-
27
-
28
-
29
-
30
-
31
-
32
-
33
-
34
-
35
-
36
-
37
-
38
-
39
-
40
-
41
-
42
-
43
-
44
-
45
-
46
-
47
-
48
-
49
-
50
-
51
-
52
-
53
-
54
-
55
-
56
-
57
-
58
-
59
-
60
-
61
-
62
-
63
-
64
-
65
-
66
-
67
-
68
 |
 |
