Epson C12C800WN User Guide - Page 14
for instructions., software and con your system for wireless printing. See the next
 |
View all Epson C12C800WN manuals
Add to My Manuals
Save this manual to your list of manuals |
Page 14 highlights
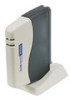
5. Connect the power supply to the print server. 6. Plug the AC adapter into an electrical outlet. Both the green and yellow lights come on for a moment and then go out. If the green light blinks continuously in a regular pattern, try unplugging the print server. If you still see the light blinking after you plug it in again, contact EPSON as described on page 47. 7. Press the P power button on the printer to turn it on. 8. To test the connection between the print server and printer, press the test button for one second and release it. The status page prints. If you hold the test button down for more than 5 seconds, you may reset the print server. If you do this, wait for the print server's lights to go out, then press the button again and release it immediately to print the status page. ■ If the print server status page prints, you're ready to install the software and configure your system for wireless printing. See the next section for instructions. ■ If the status page doesn't print, make sure the printer is ready and is not out of ink or paper. (See page 8 for instructions on testing the printer.) Then turn off the printer, unplug the print server, and check the cable connections at both ends. Plug the server back in, turn on the printer, and press the test button again. If the test page still doesn't print, contact EPSON as described on page 47. 10
-
 1
1 -
2
-
3
-
4
-
5
-
6
-
7
-
8
-
 9
9 -
 10
10 -
 11
11 -
 12
12 -
 13
13 -
 14
14 -
 15
15 -
 16
16 -
 17
17 -
 18
18 -
 19
19 -
20
-
21
-
22
-
23
-
24
-
25
-
26
-
27
-
28
-
29
-
30
-
31
-
32
-
33
-
34
-
35
-
36
-
37
-
38
-
39
-
40
-
41
-
42
-
43
-
44
-
45
-
46
-
47
-
48
-
49
-
50
-
51
-
52
-
53
-
54
-
55
-
56
-
57
-
58
-
59
-
60
-
61
-
62
-
63
-
64
-
65
-
66
-
67
-
68
 |
 |
