Epson C7500GE Technical Reference Guide - Page 34
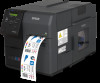
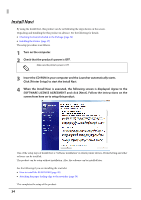
Install Navi, Click [Printer Setup] to start the Install Navi.
 |
View all Epson C7500GE manuals
Add to My Manuals
Save this manual to your list of manuals |
Page 34 highlights
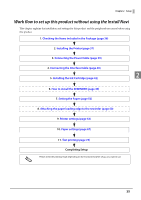
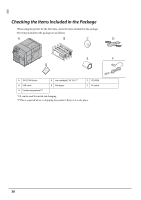
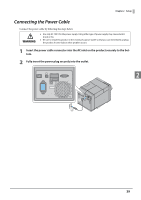
Install Navi By using the Install Navi, this product can be set following the steps shown on the screen. Unpacking and Installing the this product in advance. See the following for details. Checking the Items Included in the Package (page 36) Installing the Printer (page 37) The setup procedure is as follows. 1 Turn on the computer. 2 Check that the product's power is OFF. Make sure the printer's power is OFF. 3 Insert the CD-ROM in your computer and the Launcher automatically starts. Click [Printer Setup] to start the Install Navi. 4 When the Install Navi is executed, the following screen is displayed. Agree to the SOFTWARE LICENSE AGREEMENT and click [Next]. Follow the instructions on the screen from here on to setup this product. One of the setup steps of Install Navi is "Software installation" in which printer drivers, PrinterSetting and other software can be installed. The product can be setup without installation. Also, the software can be installed later. See the following if you are installing the rewinder. How to install the REWINDER (page 49) Attaching the paper leading edge to the rewinder (page 50) This completes the setup of the product. 34
-
 1
1 -
2
-
3
-
4
-
5
-
6
-
7
-
8
-
9
-
10
-
11
-
12
-
13
-
14
-
15
-
16
-
17
-
18
-
19
-
20
-
21
-
22
-
23
-
24
-
25
-
26
-
27
-
28
-
 29
29 -
 30
30 -
 31
31 -
 32
32 -
 33
33 -
 34
34 -
 35
35 -
 36
36 -
 37
37 -
 38
38 -
 39
39 -
40
-
41
-
42
-
43
-
44
-
45
-
46
-
47
-
48
-
49
-
50
-
51
-
52
-
53
-
54
-
55
-
56
-
57
-
58
-
59
-
60
-
61
-
62
-
63
-
64
-
65
-
66
-
67
-
68
-
69
-
70
-
71
-
72
-
73
-
74
-
75
-
76
-
77
-
78
-
79
-
80
-
81
-
82
-
83
-
84
-
85
-
86
-
87
-
88
-
89
-
90
-
91
-
92
-
93
-
94
-
95
-
96
-
97
-
98
-
99
-
100
-
101
-
102
-
103
-
104
-
105
-
106
-
107
-
108
-
109
-
110
-
111
-
112
-
113
-
114
-
115
-
116
-
117
-
118
-
119
-
120
-
121
-
122
-
123
-
124
-
125
-
126
-
127
-
128
-
129
-
130
-
131
-
132
-
133
-
134
-
135
-
136
-
137
-
138
-
139
-
140
-
141
-
142
-
143
-
144
-
145
-
146
-
147
-
148
-
149
-
150
-
151
-
152
-
153
-
154
-
155
-
156
-
157
-
158
-
159
-
160
-
161
-
162
-
163
-
164
-
165
-
166
-
167
-
168
-
169
-
170
-
171
-
172
-
173
-
174
-
175
-
176
-
177
-
178
-
179
-
180
-
181
-
182
-
183
-
184
-
185
-
186
-
187
-
188
-
189
-
190
-
191
-
192
-
193
-
194
-
195
-
196
-
197
-
198
-
199
-
200
-
201
-
202
-
203
-
204
-
205
-
206
-
207
-
208
-
209
-
210
-
211
-
212
-
213
-
214
-
215
-
216
-
217
-
218
-
219
-
220
-
221
-
222
-
223
-
224
-
225
-
226
-
227
-
228
-
229
-
230
-
231
-
232
 |
 |