Epson ELPDC21 Document Camera Operation Guide - Easy Interactive Tools V4.x - Page 19
Save Still Image, Auto White Balance
 |
View all Epson ELPDC21 Document Camera manuals
Add to My Manuals
Save this manual to your list of manuals |
Page 19 highlights
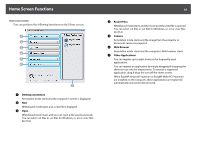
Command Bar Functions C Larger/Smaller • : Drag the cursor to select the area you want to enlarge. The enlarged image is displayed in a new window. You cannot record or save the image in the new window. • : Enlarges the image. • : Reduces the image. D x1 Displays the image at its actual size without any enlargement or reduction. E View full screen Switches the Camera screen to full screen display. Click back to the window display. F Auto Focus to switch Adjusts the image focus automatically. G Freeze Pauses the image temporarily. H Record • : Records document camera images (except for drawings) and audio. While recording, the recording time is displayed in the lower right of the camera image. If audio is not recorded, set the audio input device on the Camera Settings tab on the Settings screen. s "Camera Settings tab" p.22 • : Records document camera images (except for drawings) at one second intervals. Audio is not recorded. • : Stops recording. The recorded image is saved in .avi format for Windows or .mov format for OS X. You can set the save location for the recorded image on the Camera Settings tab on the Settings screen. s "Camera Settings tab" p.22 19 I Save Still Image Saves the image (including drawings) currently being displayed as a still image. J Use current image Pastes the current document camera image onto a page in Whiteboard mode. * This is unavailable when Camera is set as the display format in the Command Bar. K Picture Quality Displays the Picture Quality window. • : Adjusts the contrast of the image. Move the slider to the right to increase the contrast and to the left to decrease the contrast. • : Adjusts the brightness of the image. Move the slider to the right to increase the brightness and to the left to decrease the brightness. • : Adjusts the white balance (tint) of the image. To increase the strength of the blue tint in the image, move the slider to the right. To increase the strength of the red tint in the image, move the slider to the left. When Auto White Balance is selected, the white balance for the image is adjusted automatically. • Reset: Restores the brightness, contrast, and white balance settings to their default settings. * This is not available if the connected document camera does not have a brightness, contrast, or white balance adjustment function. L Pan/Tilt Drag & drop to move the position of the image (only when an image is enlarged). M Drawing Use the Drawing Toolbar to draw on the image.
-
 1
1 -
2
-
3
-
4
-
5
-
6
-
7
-
8
-
9
-
10
-
11
-
12
-
13
-
 14
14 -
 15
15 -
 16
16 -
 17
17 -
 18
18 -
 19
19 -
 20
20 -
 21
21 -
 22
22 -
 23
23 -
 24
24 -
25
-
26
-
27
-
28
-
29
-
30
-
31
 |
 |
