Epson EMP 5100 Owners Manual - Page 29
Connecting to a Macintosh desktop computer, are connecting a second computer.
 |
View all Epson EMP 5100 manuals
Add to My Manuals
Save this manual to your list of manuals |
Page 29 highlights
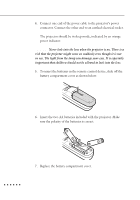
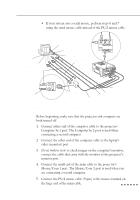
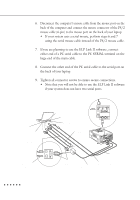
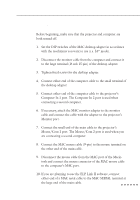
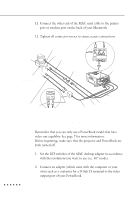
Connecting to a Macintosh desktop computer Before beginning, make sure that the projector and computer are both turned off. 1. Set the DIP switches of the MAC desktop adapter in accordance with the resolutions you want to use (i.e. 16" mode). 2. Disconnect the monitor cable from the computer and connect it to the large terminal (D-sub 15 pin) of the desktop adapter. 3. Tighten fixed screws for the desktop adapter. 4. Connect either end of the computer cable to the small terminal of the desktop adapter. 5. Connect either end of the computer cable to the projector's Computer In 1 port. The Computer In 2 port is used when connecting a second computer. 6. If necessary, attach the MAC monitor adapter to the monitor cable and connect the cable with the adapter to the projector's Monitor port. 7. Connect the small end of the main cable to the projector's Mouse/Com 1 port. The Mouse/Com 2 port is used when you are connecting a second computer. 8. Connect the MAC mouse cable (9-pin) to the mouse terminal on the other end of the main cable. 9. Disconnect the mouse cable from the MAC port of the Macintosh and connect the mouse connector of the MAC mouse cable to the computer's MAC port. 10. If you are planning to use the ELP Link II software, connect either end of a MAC serial cable to the MAC SERIAL terminal at the large end of the main cable. Connecting to a Computer 11
-
 1
1 -
2
-
3
-
4
-
5
-
6
-
7
-
8
-
9
-
10
-
11
-
12
-
13
-
14
-
15
-
16
-
17
-
18
-
19
-
20
-
21
-
22
-
23
-
 24
24 -
 25
25 -
 26
26 -
 27
27 -
 28
28 -
 29
29 -
 30
30 -
 31
31 -
 32
32 -
 33
33 -
 34
34 -
35
-
36
-
37
-
38
-
39
-
40
-
41
-
42
-
43
-
44
-
45
-
46
-
47
-
48
-
49
-
50
-
51
-
52
-
53
-
54
-
55
-
56
-
57
-
58
-
59
-
60
-
61
-
62
-
63
-
64
-
65
-
66
-
67
-
68
-
69
-
70
-
71
-
72
-
73
-
74
-
75
-
76
-
77
-
78
-
79
-
80
-
81
-
82
-
83
-
84
-
85
-
86
-
87
-
88
-
89
-
90
-
91
-
92
-
93
-
94
-
95
-
96
-
97
-
98
-
99
-
100
-
101
-
102
-
103
-
104
-
105
-
106
-
107
-
108
-
109
-
110
-
111
-
112
-
113
-
114
-
115
-
116
-
117
-
118
-
119
-
120
-
121
-
122
 |
 |
