Epson EMP 5100 Owners Manual - Page 31
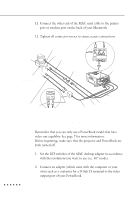
Connect the MAC mouse cable 9-pin to the MOUSE terminal, on the large end of the main cable.
 |
View all Epson EMP 5100 manuals
Add to My Manuals
Save this manual to your list of manuals |
Page 31 highlights
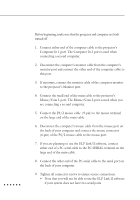
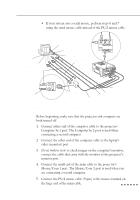
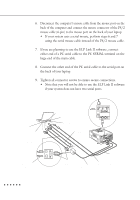
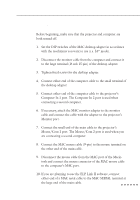
3. Connect the big connector (D-Sub15) of the MAC desktop adapter to the video output port converted in step 2. 4. Tighten the fixed screws for the MAC desktop adapter and the converter. 5. Connect either end of the computer cable to the small connector (D-Sub 15 Mini) of the MAC desktop adapter which you connected in the previous steps. 6. Connect the other end of the computer cable to the projector's Computer In1 port. The Computer In2 port is used when connecting a second computer. 7. If you wish to view or check images on the computer's monitor, attach the big connector (D-Sub 15) of the Macintosh desktop adapter which you connected in the previous steps to the MAC monitor cable and connect it to the projector's Monitor port. *1 8. Connect the small end of the main cable to the projector's Mouse/Com 1 port. The Mouse/Com 2 port is used when connecting a second computer. 9. Connect the MAC mouse cable (9-pin) to the MOUSE terminal on the large end of the main cable. 10. Disconnect the mouse from the computer port, and connect the MAC mouse cable (4-pin) to this port. 11. If you are planning to use the ELP Link II software, connect either end of a MAC serial cable to the MAC SERIAL terminal on the large end of the main cable. 12. Connect the other end of the MAC serial cable to the Printer port or Modem port on the back of your PowerBook. *1. You may need your own adapter or one which came with your computer. This depends on the model of the computer or monitor you connect. Connecting to a Computer 13
-
 1
1 -
2
-
3
-
4
-
5
-
6
-
7
-
8
-
9
-
10
-
11
-
12
-
13
-
14
-
15
-
16
-
17
-
18
-
19
-
20
-
21
-
22
-
23
-
24
-
25
-
 26
26 -
 27
27 -
 28
28 -
 29
29 -
 30
30 -
 31
31 -
 32
32 -
 33
33 -
 34
34 -
 35
35 -
 36
36 -
37
-
38
-
39
-
40
-
41
-
42
-
43
-
44
-
45
-
46
-
47
-
48
-
49
-
50
-
51
-
52
-
53
-
54
-
55
-
56
-
57
-
58
-
59
-
60
-
61
-
62
-
63
-
64
-
65
-
66
-
67
-
68
-
69
-
70
-
71
-
72
-
73
-
74
-
75
-
76
-
77
-
78
-
79
-
80
-
81
-
82
-
83
-
84
-
85
-
86
-
87
-
88
-
89
-
90
-
91
-
92
-
93
-
94
-
95
-
96
-
97
-
98
-
99
-
100
-
101
-
102
-
103
-
104
-
105
-
106
-
107
-
108
-
109
-
110
-
111
-
112
-
113
-
114
-
115
-
116
-
117
-
118
-
119
-
120
-
121
-
122
 |
 |
