Epson LQ-300 Product Information Guide - Page 6
Changing the Printer Settings, LF/FF, Pause
 |
View all Epson LQ-300 manuals
Add to My Manuals
Save this manual to your list of manuals |
Page 6 highlights
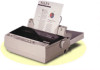
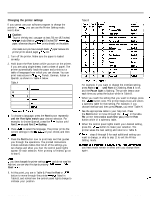
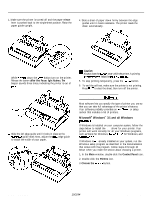
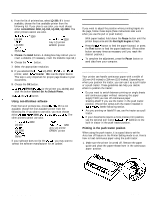
EPSON LQ-300 Changing the printer settings If you cannot use your software program to change the printer's settings, you can use the Printer Setting mode. Here's how: El Caution: To print the help text, use paper w&for single Sheets or 240 kn a(9t.5leainstch2e1s0) fmomr (8.3 inches) wntinuous~ paper; otherwise the print heud prints directly on the platen. Also make sure you have enough sheets qf paper because the printer prints several pages #help text. 1. Turn off the printer. Make sure the paper is loaded correctly. 2. Hold down the Font button while you turn on the printer. If you are using single sheets, insert a sheet of paper. The printer automatically loads the paper and prints out a table of languages from which you can choose. You can print instructions in Eqlish, French, German, Italian or Spanish, as shown in Table A below. Table A Font lights 1 l 0 2 Wifurge 0 English ti French 0 .Gamafl 0 0 llaliall 0 6 spanll O=on,O=off, t5=lhshing To choose a language, press the Font button repeatedly until the Font lights match your desired selection. For example, to choose Spanish, press the Font button until Font 1 is on and Font 2 is flashing. Press LF/R to select the language. The printer prints the current settings in the languae of your choice, and then StOpS. Press the Font button now to print help text that guides you through the operations. The printed instructions include submenu tables that list all of the settings you can change and show you how the control panel lights appear for each selection. After printing is finished, go on to step 6. Note If you have changed the printer settings bejke and do not need the help text, you can skip this step by pressing LF/FF instend #the Font buttan. 6. At this point, you are in Table B. Press the Font or LF/FF button to move through the printer m listed in Table B, and notice how the control panel lights change to indicate your position Table B 0 0 EXT/ACK Table E c izs ij 0 -tareply TableE 4 0=on,*=otf,~=nashing For example, if you want to change the Interface setting, press Font or LF/FF until Font 1 is flashing, Font 2 is off, and the Pause light is flashing. The printer beeps once each time you press the button while in Table B. When you reach the setting that you want to change, press ,--. the Pause button once. The printer beeps twice and enters a submenu table for that setting. For example, if you choose Interface and then press Pause, you enter Table H. See the appropriate table in your help text. Press the Font button to move through the se&ngs in the table. The printer beeps twice each time you press the Font button while in a submenu table. When the control panel lights match your desired setting, press the Pause button to make your selection. The printer saves the new setting and returns to Table B. lO.ReFt steps 6 through 9 for each additional setting you want to change, or skip to step 11 to exit the Printer Setting mode. ll.Whenyouarefinished,tumtheprinteroff.Anysettings you have made remain in effect until you change them again. EPSON LQ-300-6 10/2/94 Dot Matrix Printers
-
 1
1 -
 2
2 -
 3
3 -
 4
4 -
 5
5 -
 6
6 -
 7
7 -
 8
8 -
 9
9 -
 10
10 -
 11
11 -
 12
12 -
13
 |
 |