Epson P10000 User Manual - Page 66
right arrow button on the printer: Epson Singleweight Matte Paper, Epson Premium Glossy Photo
 |
View all Epson P10000 manuals
Add to My Manuals
Save this manual to your list of manuals |
Page 66 highlights
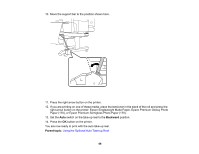
10. Move the support bar to the position shown here. 11. Press the right arrow button on the printer. 12. If you are printing on one of these media, place the tensioner in the slack of the roll and press the right arrow button on the printer: Epson Singleweight Matte Paper, Epson Premium Glossy Photo Paper (170), or Epson Premium Semigloss Photo Paper (170). 13. Set the Auto switch on the take-up reel to the Backward position. 14. Press the OK button on the printer. You are now ready to print with the auto take-up reel. Parent topic: Using the Optional Auto Take-up Reel 66
-
 1
1 -
2
-
3
-
4
-
5
-
6
-
7
-
8
-
9
-
10
-
11
-
12
-
13
-
14
-
15
-
16
-
17
-
18
-
19
-
20
-
21
-
22
-
23
-
24
-
25
-
26
-
27
-
28
-
29
-
30
-
31
-
32
-
33
-
34
-
35
-
36
-
37
-
38
-
39
-
40
-
41
-
42
-
43
-
44
-
45
-
46
-
47
-
48
-
49
-
50
-
51
-
52
-
53
-
54
-
55
-
56
-
57
-
58
-
59
-
60
-
 61
61 -
 62
62 -
 63
63 -
 64
64 -
 65
65 -
 66
66 -
 67
67 -
 68
68 -
 69
69 -
 70
70 -
 71
71 -
72
-
73
-
74
-
75
-
76
-
77
-
78
-
79
-
80
-
81
-
82
-
83
-
84
-
85
-
86
-
87
-
88
-
89
-
90
-
91
-
92
-
93
-
94
-
95
-
96
-
97
-
98
-
99
-
100
-
101
-
102
-
103
-
104
-
105
-
106
-
107
-
108
-
109
-
110
-
111
-
112
-
113
-
114
-
115
-
116
-
117
-
118
-
119
-
120
-
121
-
122
-
123
-
124
-
125
-
126
-
127
-
128
-
129
-
130
-
131
-
132
-
133
-
134
-
135
-
136
-
137
-
138
-
139
-
140
-
141
-
142
-
143
-
144
-
145
-
146
-
147
-
148
-
149
-
150
-
151
-
152
-
153
-
154
-
155
-
156
-
157
-
158
-
159
-
160
-
161
-
162
-
163
-
164
-
165
-
166
-
167
-
168
-
169
-
170
-
171
-
172
-
173
-
174
-
175
-
176
-
177
-
178
-
179
-
180
-
181
-
182
-
183
-
184
-
185
-
186
-
187
-
188
-
189
-
190
-
191
-
192
-
193
-
194
-
195
-
196
-
197
-
198
-
199
-
200
-
201
-
202
-
203
-
204
-
205
-
206
-
207
-
208
-
209
-
210
-
211
-
212
-
213
-
214
-
215
-
216
-
217
-
218
-
219
-
220
-
221
-
222
-
223
-
224
-
225
-
226
-
227
-
228
-
229
 |
 |

66
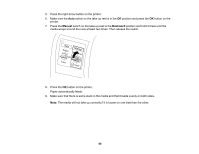
10. Move the support bar to the position shown here.
11. Press the right arrow button on the printer.
12. If you are printing on one of these media, place the tensioner in the slack of the roll and press the
right arrow button on the printer: Epson Singleweight Matte Paper, Epson Premium Glossy Photo
Paper (170), or Epson Premium Semigloss Photo Paper (170).
13. Set the
Auto
switch on the take-up reel to the
Backward
position.
14. Press the
OK
button on the printer.
You are now ready to print with the auto take-up reel.
Parent topic:
Using the Optional Auto Take-up Reel