Epson P10000 User Manual - Page 70
Assembling and Using the Tensioner, these media types: Epson Singleweight Matte Paper
 |
View all Epson P10000 manuals
Add to My Manuals
Save this manual to your list of manuals |
Page 70 highlights
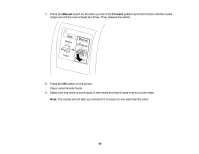
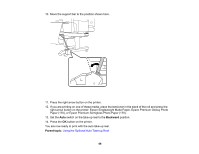
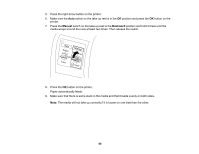
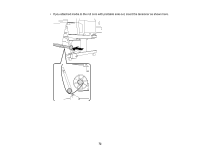
Related references Setup Menu Settings Assembling and Using the Tensioner The tensioner keeps the roll media from becoming too slack. Use the tensioner only when printing on these media types: Epson Singleweight Matte Paper, Epson Premium Glossy Photo Paper (170), Epson Premium Semigloss Photo Paper (170), and other thin media wider that 17 inches (432 mm). You need to adjust the width of the tensioner to match the roll paper you are using before inserting it. 1. Attach the right flange to the right end of the large tension pipe. 2. If the roll paper you are using is wider than 24 inches (610 mm), attach small tension pipes to the left end of the large tension pipe as necessary. Note: Each small tension pipe adds 10 inches (254 mm) of width to the tensioner. Add up to 4 small tension pipes to the large tension pipe, as necessary. 3. Attach the left flange to the left end of the tension pipe. Note: Make sure the flange is set wider than the width of the roll media. 70
-
 1
1 -
2
-
3
-
4
-
5
-
6
-
7
-
8
-
9
-
10
-
11
-
12
-
13
-
14
-
15
-
16
-
17
-
18
-
19
-
20
-
21
-
22
-
23
-
24
-
25
-
26
-
27
-
28
-
29
-
30
-
31
-
32
-
33
-
34
-
35
-
36
-
37
-
38
-
39
-
40
-
41
-
42
-
43
-
44
-
45
-
46
-
47
-
48
-
49
-
50
-
51
-
52
-
53
-
54
-
55
-
56
-
57
-
58
-
59
-
60
-
61
-
62
-
63
-
64
-
 65
65 -
 66
66 -
 67
67 -
 68
68 -
 69
69 -
 70
70 -
 71
71 -
 72
72 -
 73
73 -
 74
74 -
 75
75 -
76
-
77
-
78
-
79
-
80
-
81
-
82
-
83
-
84
-
85
-
86
-
87
-
88
-
89
-
90
-
91
-
92
-
93
-
94
-
95
-
96
-
97
-
98
-
99
-
100
-
101
-
102
-
103
-
104
-
105
-
106
-
107
-
108
-
109
-
110
-
111
-
112
-
113
-
114
-
115
-
116
-
117
-
118
-
119
-
120
-
121
-
122
-
123
-
124
-
125
-
126
-
127
-
128
-
129
-
130
-
131
-
132
-
133
-
134
-
135
-
136
-
137
-
138
-
139
-
140
-
141
-
142
-
143
-
144
-
145
-
146
-
147
-
148
-
149
-
150
-
151
-
152
-
153
-
154
-
155
-
156
-
157
-
158
-
159
-
160
-
161
-
162
-
163
-
164
-
165
-
166
-
167
-
168
-
169
-
170
-
171
-
172
-
173
-
174
-
175
-
176
-
177
-
178
-
179
-
180
-
181
-
182
-
183
-
184
-
185
-
186
-
187
-
188
-
189
-
190
-
191
-
192
-
193
-
194
-
195
-
196
-
197
-
198
-
199
-
200
-
201
-
202
-
203
-
204
-
205
-
206
-
207
-
208
-
209
-
210
-
211
-
212
-
213
-
214
-
215
-
216
-
217
-
218
-
219
-
220
-
221
-
222
-
223
-
224
-
225
-
226
-
227
-
228
-
229
 |
 |
