Epson P10000 Quick Reference - Page 16
then adjust the settings., if the settings are correct, or select
 |
View all Epson P10000 manuals
Add to My Manuals
Save this manual to your list of manuals |
Page 16 highlights
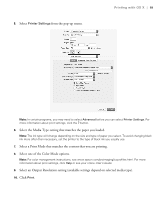
Loading poster board | 15 5. Align the right edge of the board with the line on the poster board support. Make sure the paper is flush with the front of the printer. 6. Press OK. The poster board feeds into the printer. 7. On the screen that appears, select Keep Settings Above if the settings are correct, or select Change Settings, then adjust the settings. Note: Make sure you select Enhanced Board as the media type from the Others menu. 8. Press OK. 9. Print your image. After it is finished, the sheet stays in the printer. 10. To remove your print, press OK while holding the board. Pull the board forward as shown on the LCD screen and remove it from the printer. M Note: To remove poster board that was loaded but not used, press the button, press the d or u button to select Remove Paper and press OK.
-
 1
1 -
2
-
3
-
4
-
5
-
6
-
7
-
8
-
9
-
10
-
 11
11 -
 12
12 -
 13
13 -
 14
14 -
 15
15 -
 16
16 -
 17
17 -
 18
18 -
 19
19 -
 20
20 -
 21
21 -
22
-
23
-
24
-
25
-
26
-
27
-
28
-
29
-
30
-
31
-
32
-
33
-
34
 |
 |
