Epson PhotoPC L-410 User Manual - Page 60
Printing the photo displayed on the LCD screen, Print This Image, Print Settings, Paper Type
 |
View all Epson PhotoPC L-410 manuals
Add to My Manuals
Save this manual to your list of manuals |
Page 60 highlights
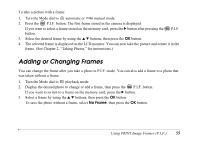
Printing the photo displayed on the LCD screen Before you start, make sure your printer is set up and has ink installed. Load 4 × 6 inch Epson Premium Glossy Photo Paper, following the instructions that came with your printer. 1. Connect the camera to the printer as described in "Connecting the Camera to Your Printer" on page 58. 2. Turn on the printer and camera. 3. Turn the Mode dial to playback mode and use the l r buttons to display the photo you want to print. 4. Press the button. The Print menu is displayed. 5. Select Print This Image by using the u d buttons, then press the or OK button. 6. If you want to print just one copy, go to step 7. If you want to print more than one copy, press the OK button and use the u button to select the number of copies you want. Then press OK. 7. Press the d button to select Print Settings, then press OK. 8. Press the r button to select Paper Type, then press the d button to select 4 × 6in.Prem.Glossy and press OK. If you want to print a photo with white borders, turn off the date, or change other settings, see "Making Print Settings" on page 64. 9. Press the MENU button, then press the button. Printing starts. When printing is complete, press the OK button. Note: If you want to cancel printing, press the MENU button. Using Direct Print 60
-
 1
1 -
2
-
3
-
4
-
5
-
6
-
7
-
8
-
9
-
10
-
11
-
12
-
13
-
14
-
15
-
16
-
17
-
18
-
19
-
20
-
21
-
22
-
23
-
24
-
25
-
26
-
27
-
28
-
29
-
30
-
31
-
32
-
33
-
34
-
35
-
36
-
37
-
38
-
39
-
40
-
41
-
42
-
43
-
44
-
45
-
46
-
47
-
48
-
49
-
50
-
51
-
52
-
53
-
54
-
 55
55 -
 56
56 -
 57
57 -
 58
58 -
 59
59 -
 60
60 -
 61
61 -
 62
62 -
 63
63 -
 64
64 -
 65
65 -
66
-
67
-
68
-
69
-
70
-
71
-
72
-
73
-
74
-
75
-
76
-
77
-
78
-
79
-
80
-
81
-
82
-
83
-
84
-
85
-
86
-
87
-
88
-
89
-
90
-
91
-
92
-
93
-
94
 |
 |
