Epson PowerLite 9300i User's Guide - Page 120
Installing the Rear Cable Cover, Appendix A: Projector Installation
 |
View all Epson PowerLite 9300i manuals
Add to My Manuals
Save this manual to your list of manuals |
Page 120 highlights
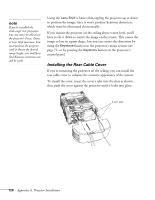
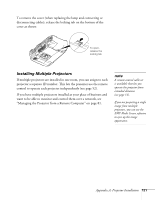
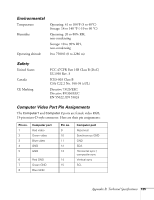
note If you've installed the wide-angle rear projection lens, you won't be able to use the projector's Focus, Zoom, or Lens Shift functions. You must position the projector itself to obtain the desired image height, size, and focus (but Keystone correction can still be used). Using the Lens Shift is better than angling the projector up or down to position the image, since it won't produce keystone distortion, which must be eliminated electronically. If you mount the projector on the ceiling above screen level, you'll have to tilt it down to center the image on the screen. This causes the image to lose its square shape, but you can correct the distortion by using the Keystone function in the projector's menu system (see page 71) or by pressing the Keystone button on the projector's control panel. Installing the Rear Cable Cover If you're mounting the projector on the ceiling, you can install the rear cable cover to enhance the cosmetic appearance of the system. To install the cover, insert the cover's tabs into the slots as shown, then push the cover against the projector until it locks into place. Insert tabs 120 Appendix A: Projector Installation
-
 1
1 -
2
-
3
-
4
-
5
-
6
-
7
-
8
-
9
-
10
-
11
-
12
-
13
-
14
-
15
-
16
-
17
-
18
-
19
-
20
-
21
-
22
-
23
-
24
-
25
-
26
-
27
-
28
-
29
-
30
-
31
-
32
-
33
-
34
-
35
-
36
-
37
-
38
-
39
-
40
-
41
-
42
-
43
-
44
-
45
-
46
-
47
-
48
-
49
-
50
-
51
-
52
-
53
-
54
-
55
-
56
-
57
-
58
-
59
-
60
-
61
-
62
-
63
-
64
-
65
-
66
-
67
-
68
-
69
-
70
-
71
-
72
-
73
-
74
-
75
-
76
-
77
-
78
-
79
-
80
-
81
-
82
-
83
-
84
-
85
-
86
-
87
-
88
-
89
-
90
-
91
-
92
-
93
-
94
-
95
-
96
-
97
-
98
-
99
-
100
-
101
-
102
-
103
-
104
-
105
-
106
-
107
-
108
-
109
-
110
-
111
-
112
-
113
-
114
-
 115
115 -
 116
116 -
 117
117 -
 118
118 -
 119
119 -
 120
120 -
 121
121 -
 122
122 -
 123
123 -
 124
124 -
 125
125 -
126
-
127
-
128
-
129
-
130
-
131
-
132
-
133
-
134
-
135
-
136
-
137
-
138
-
139
-
140
-
141
-
142
 |
 |
