Epson PowerLite S9 User's Guide
Epson PowerLite S9 Manual
 |
View all Epson PowerLite S9 manuals
Add to My Manuals
Save this manual to your list of manuals |
Epson PowerLite S9 manual content summary:
- Epson PowerLite S9 | User's Guide - Page 1
PowerLite® S9/1220/1260 Multimedia Projector User's Guide - Epson PowerLite S9 | User's Guide - Page 2
User's Guide, do not attempt to service this product yourself. Refer all servicing to qualified service personnel. WARNING: The projector and its accessories come packaged in plastic bags. Keep plastic bags away from small children to avoid any risk of suffocation. Caution: When you replace the lamp - Epson PowerLite S9 | User's Guide - Page 3
Seiko Epson Corporation. PowerLite, PrivateLine, and Accolade are registered trademarks, SizeWise and Duet are trademarks, and Extra Care is a service mark of Epson America, Inc. Pixelworks, DNX, and the DNX logo are trademarks of Pixelworks, Inc. HDMI, the HDMI logo, and High-Definition Multimedia - Epson PowerLite S9 | User's Guide - Page 4
4 - Epson PowerLite S9 | User's Guide - Page 5
Connecting to Video Equipment 33 Connecting an HDMI Video Source (PowerLite 1220/PowerLite 1260 Only 34 Connecting a Composite Video Source 35 Connecting an S-Video Source 36 Connecting a Component Video Source 37 Connecting an RGB Video Source 38 Connecting an External Monitor (PowerLite S9 - Epson PowerLite S9 | User's Guide - Page 6
Projector 40 Connecting External Speakers (PowerLite S9 Only 41 Connecting a Digital Camera or Other USB Device (PowerLite 1220/PowerLite 1260 Only 42 Turning the Projector On and Off 43 Using the Direct Power On Function 45 Shutting Down the Projector the Remote Control 55 Using the Remote - Epson PowerLite S9 | User's Guide - Page 7
82 Cleaning the Air Filter 82 Replacing the Air Filter 83 Replacing the Lamp 84 Resetting the Lamp Timer 87 Checking Lamp Usage 88 Replacing the Remote Control Batteries 88 Transporting the Projector 89 6 Solving Problems 91 Using On-Screen Help 92 Checking Projector Status 93 What To Do - Epson PowerLite S9 | User's Guide - Page 8
A Technical Specifications 105 B Notices 117 Important Safety Instructions 117 FCC Compliance Statement 120 Index 121 8 Contents - Epson PowerLite S9 | User's Guide - Page 9
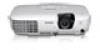
lightweight projector with a built-in speaker. It offers up to 2500 (PowerLite S9) or 2600 (PowerLite 1220/PowerLite 1260) lumens of white and color light output (brightness). It also provides a native SVGA (PowerLite S9), XGA (PowerLite 1220), or WXGA (PowerLite 1260) resolution. You can connect it - Epson PowerLite S9 | User's Guide - Page 10
out (PowerLite S9 only) ■ 2000:1 contrast ratio (in Dynamic color mode with Auto Iris setting turned on) ■ Integral lens cover (A/V Mute slide) that won't get lost ■ Low power, long-lasting lamp with 2 Power Consumption modes ■ Carrying case and remote control included note Your projector may - Epson PowerLite S9 | User's Guide - Page 11
FAQs (frequently asked questions) and e-mail your questions to Epson support 24 hours a day. ■ PrivateLine® support If you still need help after checking this User's Guide and the sources listed in this section, you can use the Epson PrivateLine Support service to get help fast. Call (800) 637-7661 - Epson PowerLite S9 | User's Guide - Page 12
Projector Parts PowerLite S9 Front Lamp cover Ventilation slots Focus ring Control panel A/V mute slide (lens cover) Air filter cover Foot release lever Adjustable Infrared foot receiver Air filter Kensington lock port PowerLite 1220/PowerLite 1260 Front Zoom ring Lamp cover - Epson PowerLite S9 | User's Guide - Page 13
PowerLite S9 Back USB (TypeB) port Infrared receiver S-Video port Audio out port Video port Computer (Component Video) port Monitor out port Lamp cover screw Rear adjustable foot AC power inlet Audio in port Rear adjustable foot PowerLite 1220/PowerLite 1260 Back USB (TypeB) port - Epson PowerLite S9 | User's Guide - Page 14
1220/PowerLite 1260 Keystone button (corrects screen shape) Source Search button (searches for connected video sources) Menu button (displays projector menus) Esc button (exits menu items) Power light Power button Help button Volume down button Volume up button Lamp and Temperature - Epson PowerLite S9 | User's Guide - Page 15
Remote Control Power button A/V Mute button (turns off image) Aspect button (changes screen size) Page Up/Down buttons (control PowerPoint® slides; USB cable required) E-Zoom +/- buttons (zoom into image) Menu button (accesses projector menus) Source Search and Source buttons (select image source) - Epson PowerLite S9 | User's Guide - Page 16
the dimensions below to guide you in placing or installing the projector. 11.61 in. (295 mm) 3.11 in. (79 mm) 3.03 in. (77 mm) 3.62 in. (92 mm) 1.5 in. (38.3 mm) 1.57 in. (39.8 mm); center of lens to mounting bracket holes 0.51 in. (13 mm) 8.98 in. (228 mm) 9.59 in - Epson PowerLite S9 | User's Guide - Page 17
updates on new accessories, products, and service. Optional Accessories To enhance your use of the projector, Epson offers the following optional accessories: Product Replacement lamp Replacement air filter set Universal projector ceiling mount Adjustable suspended ceiling channel kit False - Epson PowerLite S9 | User's Guide - Page 18
carrying case Part number ELPKC19 ELPSV01 V12H321005 ELPDC10S V12H377020 ELPKS58 You can purchase screens or other accessories from an Epson authorized reseller. To find the nearest reseller, call 800-GO-EPSON (800-463-7766). Or you can purchase online at www.epsonstore.com (U.S. sales) or www - Epson PowerLite S9 | User's Guide - Page 19
device or digital camera (PowerLite 1220/PowerLite 1260 only). Follow the instructions in this chapter on: ■ Unpacking the projector ■ Positioning the projector ■ Connecting to a computer ■ Connecting to video equipment ■ Connecting an external monitor (PowerLite S9 only) ■ Playing sound through - Epson PowerLite S9 | User's Guide - Page 20
the Projector After unpacking the projector, make sure you have all these parts: PowerLite S9 Projector Power cord PDF manuals and Password Protected registration CD-ROM sticker Remote control 2 AA batteries (for remote control) VGA computer cable Carrying case 20 Setting Up the Projector - Epson PowerLite S9 | User's Guide - Page 21
PowerLite 1220/PowerLite 1260 Projector Power cord PDF manuals and Password Protected registration CD-ROM sticker Remote control 2 AA batteries (for remote control) VGA computer cable Carrying case USB cable Save all packaging in case you need to ship the projector. Always use the original - Epson PowerLite S9 | User's Guide - Page 22
Epson. See "Optional Accessories" on page 17. ■ To receive an audio signal, you'll need an RCA-type audio cable with two male plugs (PowerLite 1220/PowerLite 1260), or a stereo mini-jack to RCA-type audio adapter cable (with red and white jacks on one end; PowerLite S9). Positioning the Projector - Epson PowerLite S9 | User's Guide - Page 23
determine the projection distance. Center of lens You can also use the Image Size Calculator on the Epson website. PowerLite S9 (4:3 images) Screen size 30 inches (76 cm) 50 inches (127 cm) 60 inches (152 cm) -9.8 inches (-25 cm) -13.1 inches (-33 cm) Center of lens Setting Up the Projector 23 - Epson PowerLite S9 | User's Guide - Page 24
(+2 cm) +0.8 inch (+2 cm) +1.1 inches (+3 cm) +1.6 inches (+4 cm) +2.1 inches (+5 cm) PowerLite S9 (16:10 images) Screen size Projection distance (A) Wide to Tele 30 inches (76 cm) 36 to 50 inches (-3 cm) -1.6 inches (-4 cm) -2.4 inches (-6 cm) -3.3 inches (-8 cm) 24 Setting Up the Projector - Epson PowerLite S9 | User's Guide - Page 25
-10 inches (-25 cm) -13.3 inches (-34 cm) -16.7 inches (-42 cm) -20 inches (-51 cm) PowerLite 1220 (16:9 images) Screen size Projection distance (A) Wide to Tele 30 inches (76 cm) 38 to 46 inches (97 to (+1 cm) +0.5 inch (+1 cm) +0.7 inch (+2 cm) +0.9 inch (+2 cm) Setting Up the Projector 25 - Epson PowerLite S9 | User's Guide - Page 26
(B) +1.4 inches (+3 cm) +1.8 inches (+5 cm) +2.3 inches (+6 cm) +2.5 inches (+6 cm) PowerLite 1220 (16:10 images) Screen size Projection distance (A) Wide to Tele 30 inches (76 cm) 37 to 45 inches (-7 cm) -3.5 inches (-9 cm) -4.4 inches (-11 cm) -5 inches (-13 cm) 26 Setting Up the Projector - Epson PowerLite S9 | User's Guide - Page 27
-8.6 inches (-22 cm) -12.9 inches (-33 cm) -17.1 inches (-44 cm) -24 inches (-61 cm) PowerLite 1260 (16:9 image) Screen size Projection distance (A) Wide to Tele 40 inches (102 cm) 45 to 54 inches (114 to inches (-19 cm) -10.1 inches (-26 cm) -15.7 inches (-40 cm) Setting Up the Projector 27 - Epson PowerLite S9 | User's Guide - Page 28
level, you may need to tilt it up by extending the front adjustable foot. Tilting the projector causes the image to become "keystone" shaped, but you can correct the distortion (see page 49). The PowerLite 1220/PowerLite 1260 may be able to correct the distortion automatically. 28 Setting Up the - Epson PowerLite S9 | User's Guide - Page 29
, you'll need the optional ceiling mounting hardware (see page 17). You'll also need to select the appropriate Projection setting in the projector's Extended menu to orient the image correctly (see page 73). Connecting to a Computer You can connect the projector to a Windows or Macintosh computer - Epson PowerLite S9 | User's Guide - Page 30
is set to USB Display (see page 73). 3. Turn on your computer. 4. Connect the square end of a USB cable to the projector's TypeB (square) USB port. PowerLite S9 USB TypeB port PowerLite 1220/PowerLite 1260 USB TypeB port 5. Connect the flat end of the cable to any available USB port on your - Epson PowerLite S9 | User's Guide - Page 31
you connect a computer to the projector's USB port, you will need to install software from the projector on your computer. Follow the instructions for on the remote control or the projector. Windows XP and Windows 2000 Follow the instructions on the screen to install the Epson USB Display software - Epson PowerLite S9 | User's Guide - Page 32
's monitor port. PowerLite S9 Computer (Component Video) port caution Don't try to force a connector to fit a port with a different shape or number of pins. You may damage the port or connector, or the device you are trying to connect. PowerLite 1220/PowerLite 1260 Computer (Component Video - Epson PowerLite S9 | User's Guide - Page 33
2 for instructions on displaying and adjusting the image. Connecting to Video Equipment You can connect several video sources to the projector at the same time. Before starting, look at your video equipment to determine its available video output connections: ■ PowerLite 1220/PowerLite 1260 only: If - Epson PowerLite S9 | User's Guide - Page 34
Video Source (PowerLite 1220/PowerLite 1260 Only) For the best image and sound quality, connect your video equipment to the HDMI (High-Definition Multimedia Interface) port, if possible. Connect an HDMI cable to the HDMI connector on your video equipment and the HDMI connector on the projector. HDMI - Epson PowerLite S9 | User's Guide - Page 35
on the projector. PowerLite S9 Video port note If the video cable was not provided with your video device, you can purchase one from an electronics dealer. PowerLite 1220/PowerLite 1260 Video port 2. If you want to play sound through the projector, see page 40 for instructions on connecting an - Epson PowerLite S9 | User's Guide - Page 36
S-Video port on the projector. PowerLite S9 S-Video port PowerLite 1220/PowerLite 1260 S-Video port 2. If you want to play sound through the projector, see page 40 for instructions on connecting an audio cable. When you've finished making connections, see page 43 for instructions on turning on the - Epson PowerLite S9 | User's Guide - Page 37
from Epson (see page 17) or an electronics dealer. 1. Connect Connect the other end of the cable (HD15 male) to the Computer (Component Video) port on your projector using an optional component-to-VGA video cable or adapter. PowerLite S9 Computer (Component Video) port PowerLite 1220/PowerLite 1260 - Epson PowerLite S9 | User's Guide - Page 38
using the VGA computer cable provided with the projector. 1. Connect the cable to the RGB video port on your player and the Computer (Component Video) port on the projector. PowerLite S9 Computer (Component Video) port PowerLite 1220/PowerLite 1260 Computer (Component Video) port 2. You may need to - Epson PowerLite S9 | User's Guide - Page 39
, see page 40 for instructions on connecting audio cables. When you've finished making connections, see page 43 for instructions on turning on the projector and Chapter 2 for instructions on displaying and adjusting the image. Connecting an External Monitor (PowerLite S9 Only) If you want to - Epson PowerLite S9 | User's Guide - Page 40
You can play sound through the projector's speaker system. 1. Locate the appropriate cable and connect it to the Audio port on the projector. PowerLite S9 Audio port PowerLite 1220/PowerLite 1260 Audio ports 2. Connect the other end of the cable to the audio output connector(s) on your computer - Epson PowerLite S9 | User's Guide - Page 41
External Speakers (PowerLite S9 Only) You can output sound from the projector to external speakers with a built-in amplifier. 1. Locate the appropriate cable to connect your speakers. Depending on your speakers, you may be able to use a standard audio cable with a stereo mini-jack connector - Epson PowerLite S9 | User's Guide - Page 42
a Digital Camera or Other USB Device (PowerLite 1220/ PowerLite 1260 Only) You can connect your digital camera, USB thumb (flash memory) drive, USB hard drive, or multimedia storage viewer, such as the Epson P-7000. Then you can use the projector's Slideshow function to display JPEG images or - Epson PowerLite S9 | User's Guide - Page 43
to another image source, the Slideshow program appears. If you are connected to another image source, press the USB button on the remote control to go to the Slideshow program. 5. See page 61 for instructions on controlling the slideshow. 6. When you're finished, press Esc and select Exit to - Epson PowerLite S9 | User's Guide - Page 44
2. Plug one end of the power cord into the projector, and the other end into an electrical outlet. The Ppower light turns orange. Power light 3. Press the Ppower button on the projector or on the remote control. Power button 44 Setting Up the Projector - Epson PowerLite S9 | User's Guide - Page 45
1. Press the Menu button on the remote control or projector, then select the Extended menu and lamp is on. This can damage your eyes, and is especially dangerous for children. 4. Highlight On and press Enter. 5. Press Menu to exit. The setting will take effect the next time you plug the projector - Epson PowerLite S9 | User's Guide - Page 46
first. 1. To turn off the projector, press the Ppower button on the remote control or projector. You see a confirmation message. (If you don't want to turn it off, press any other button.) 2. Press the Ppower button again. The projection lamp turns off and the projector beeps twice. You can then - Epson PowerLite S9 | User's Guide - Page 47
2 Displaying and Adjusting the Image Follow the guidelines in this chapter for: ■ Selecting an image source ■ Adjusting the image 47 - Epson PowerLite S9 | User's Guide - Page 48
of connected equipment. If you don't see the image you want, press the Source Search button on the remote control or the projector until you . Select USB to project from a USB device (PowerLite 1220/ PowerLite 1260 only). See page 61 for instructions. Adjusting the Image Once you see your image, - Epson PowerLite S9 | User's Guide - Page 49
on the screen, you can use the front adjustable foot to raise it. 1. Press the foot release lever up and lift the front of the projector. 2. Once the image is positioned where you want it, release the lever to lock the foot in position. 3. If the image is tilted or you - Epson PowerLite S9 | User's Guide - Page 50
panel until the shape is evenly rectangular. PowerLite S9 PowerLite 1220/PowerLite 1260 Keystone correction buttons Keystone correction buttons ■ Select the Keystone setting in the projector's Settings menu (see page 71). Then use the arrow buttons on the remote control to adjust the shape of the - Epson PowerLite S9 | User's Guide - Page 51
the image. PowerLite S9 PowerLite 1220/PowerLite 1260 PowerLite S9: to enlarge or reduce the image, press the Wide (enlarge) or Tele (reduce) button on the projector's control panel. You can also use the Zoom setting in the projector's Settings menu; see page 71 for instructions. Wide button - Epson PowerLite S9 | User's Guide - Page 52
brightness, contrast, and color for various common viewing environments. Use this setting to quickly obtain a good picture. Press the Color Mode button on the remote control to select an option. Press it until the option you want is projected in the upper right corner. Color Mode button Select from - Epson PowerLite S9 | User's Guide - Page 53
from a computer using the USB TypeB port or from a USB device using the USB source on the PowerLite 1220/ PowerLite 1260. Select from one of these Aspect options: PowerLite S9/PowerLite 1220 ■ Normal (for images sent through the Computer (Component Video) port only): Displays images using the full - Epson PowerLite S9 | User's Guide - Page 54
PowerLite 1260 ■ Normal: Displays images using the full projection area and maintains the aspect ratio of the and bottom depending on its aspect ratio. ■ Native: Displays images as is (aspect ratio and resolution are maintained). Black bands may appear or images may be cut off, depending on the - Epson PowerLite S9 | User's Guide - Page 55
the projector from anywhere in the room-up to 19.7 feet (6 meters) away. This chapter covers: ■ Using the remote control ■ Controlling the picture and sound ■ Operating your computer with the remote control ■ Highlighting your presentation ■ Presenting a slideshow from a USB device (PowerLite 1220 - Epson PowerLite S9 | User's Guide - Page 56
to conserve battery power. When you release the button, normal operation resumes. Using the remote control under bright fluorescent lamps or in direct sunlight may affect projector response. Using the Remote Control Make sure batteries are installed as described on page 88. Follow these tips for - Epson PowerLite S9 | User's Guide - Page 57
the Lens Cover Timer setting to automatically turn off the projector after 30 minutes to protect the projector if the A/V Mute slide is closed for a long time. See page 73 for instructions. Stopping Action Press the Freeze button on the remote control to stop the action in your video or computer - Epson PowerLite S9 | User's Guide - Page 58
projector, press the or button on the remote control. Volume buttons On the PowerLite 1220/PowerLite 1260 projector, you can also press the or button on the projector use one of these functions, you must connect a USB cable to the USB TypeB port on the projector (see page 30) and select the function - Epson PowerLite S9 | User's Guide - Page 59
control your presentation using those buttons. Page up or down to change slides in PowerPoint Right-click Left-click If you want to use the remote control as a wireless mouse, select Wireless Mouse as the USB Type B setting on the Extended menu (see page 73). Then you can control your presentation - Epson PowerLite S9 | User's Guide - Page 60
control. A pointer appears on the screen. Pointer button If you prefer to use a different style of pointer, see the instructions in the next section. 2. Use the arrow buttons on the remote control to position the pointer on the screen. 3. When you're done using the pointer, press the Pointer or Esc - Epson PowerLite S9 | User's Guide - Page 61
Presenting a Slideshow (PowerLite 1220/PowerLite 1260 Only) You can use your projector's Slideshow feature whenever you connect a USB device that contains .JPG image files. This lets you quickly and easily display individual images, or start a slideshow of all the images in a folder. - Epson PowerLite S9 | User's Guide - Page 62
If you are not connected to another image source, the Slideshow program appears automatically. note To rotate a displayed image, press the u or d button on the remote control until it is displayed correctly. note To display a slideshow from a folder that is not open, highlight the folder and press - Epson PowerLite S9 | User's Guide - Page 63
to last In Descending sorts the files last to first Continuous On displays a slideshow continuously play Off displays a slideshow one time through Presenting With the Remote Control 63 - Epson PowerLite S9 | User's Guide - Page 64
finished, highlight OK at the bottom of the screen and press Enter. (Highlight Cancel and press Enter to cancel your changes.) 64 Presenting With the Remote Control - Epson PowerLite S9 | User's Guide - Page 65
4 Fine-Tuning the Projector You can use the projector's on-screen menus to adjust the image, sound, and other features. This chapter covers the following information: ■ Using the menu system ■ Adjusting the image ■ Adjusting signal settings ■ Customizing projector features ■ Customizing power and - Epson PowerLite S9 | User's Guide - Page 66
's control panel to access the menus and change settings. Follow these steps: 1. To display the menu screen, press the Menu button on the remote control or on the projector. You see a menu screen similar to the one below: Options Menu list The menus are listed on the left and the options available - Epson PowerLite S9 | User's Guide - Page 67
Press the Menu button on the projector or remote control and select the Image menu. You see a screen similar to one of these: Computer/USB display/ RGB video/ USB* Component video/ Composite video/ S-Video note If you are using the HDMI port (PowerLite 1220/ PowerLite 1260 only), you see the menu - Epson PowerLite S9 | User's Guide - Page 68
note The available settings vary depending on the input source selected. The Brightness setting changes the opacity of the projector's LCD panels. You can also change the lamp's brightness. Select Power Consumption in the Settings menu, then choose Normal or ECO (the default setting is Normal). 2. - Epson PowerLite S9 | User's Guide - Page 69
Adjusting Signal Settings Although the projector normally detects and optimizes the input signal automatically, you can use the Signal menu to make manual adjustments. In addition to Component video Composite video/S-Video HDMI (PowerLite 1220/ PowerLite 1260 only) Fine-Tuning the Projector 69 - Epson PowerLite S9 | User's Guide - Page 70
remote control's Auto button to automatically reset the projector Position settings. ■ Resolution Set to Auto to have the projector automatically identify the resolution of the input signal Range (PowerLite 1220/PowerLite 1260 only) When you connect to the HDMI input port, set the projector's video - Epson PowerLite S9 | User's Guide - Page 71
only) Select the setting for the type of equipment you've connected to the Video port. Leave this setting at Auto unless you projector, adjust audio volume, and customize several other features. PowerLite S9 PowerLite 1220/PowerLite 1260 ■ Keystone Adjusts the shape of the image if the projector - Epson PowerLite S9 | User's Guide - Page 72
the lamp's operating life. ■ Volume Raises or lowers the volume of the projector's speaker. ■ User Button Lets you create a shortcut to one of the following menu items: Closed Caption (PowerLite S9 only), Power Consumption, Info, Progressive, Resolution. When you press the User button on the remote - Epson PowerLite S9 | User's Guide - Page 73
Closed Caption (PowerLite S9 only) Lets you display closed captioning for content that provides it. ■ User's Logo Create a custom startup screen, as described on page 77. ■ Projection Select Front (to project onto the front of a screen), Front/Ceiling (when the projector is mounted upside-down from - Epson PowerLite S9 | User's Guide - Page 74
Mouse to use the remote control buttons like a wireless mouse. See page 58 for restrictions and details. ■ Link 21L Select On to enable the projector to be monitored and controlled from a computer using Link 21L software and the Epson USB Communication driver. ■ Language Select a language to - Epson PowerLite S9 | User's Guide - Page 75
this is useful, for example, in a classroom when you want to ensure that no one touches the projector's buttons while you're using the remote control. See page 79. ■ Secure the projector to prevent theft using a cable locking system. See page 80. Enabling Password Protection The default setting for - Epson PowerLite S9 | User's Guide - Page 76
a confirmation message, reenter the password. 7. Press the Menu button, then press Enter to exit the screen. 8. Turn off and unplug the projector. note If you leave the projector plugged in, the Password screen will not appear. It appears only if you unplug and reconnect the power cord. Hold down - Epson PowerLite S9 | User's Guide - Page 77
for assistance. See "Where To Get Help" on page 102. ■ If you enter an incorrect password 30 times in succession, the projector remains locked and you must contact Epson to arrange for service. Creating Your Own Startup Screen You can transfer any image from your computer or video source to the - Epson PowerLite S9 | User's Guide - Page 78
message Save this image as the User's Logo? appears, select Yes and press Enter. Saving the logo may take a few moments. Do not use your projector, remote control, or video source while the logo is being saved. 8. When you see the message Completed, press Menu to exit. 78 Fine-Tuning the - Epson PowerLite S9 | User's Guide - Page 79
When you enable the Control Panel Lock function, you can lock all of the projector's buttons, or all of the buttons except the Ppower button. The remote control can still be used to operate the projector. 1. Press the Menu button, highlight the Settings menu, and press Enter. 2. Select Control Panel - Epson PowerLite S9 | User's Guide - Page 80
to a table or ceiling mount. Security cable attachment Kensington security slot ■ Kensington security slot. The security slot (located on the side of the projector) is compatible with the MicroSaver security systems manufactured by Kensington. You can purchase this lock from Epson (see page 17 - Epson PowerLite S9 | User's Guide - Page 81
replace are the lamp and air filter. If any other part needs replacing, contact your dealer or a qualified servicer. This chapter covers the following: ■ Cleaning the lens ■ Cleaning the projector case ■ Cleaning the air filter ■ Replacing the air filter ■ Replacing the lamp ■ Replacing the remote - Epson PowerLite S9 | User's Guide - Page 82
detergent and firmly wring the cloth dry. Then wipe the case. note To order replacement air filters, request part number V13H134A25. See page 17 for ordering information. Cleaning the Air Filter Your projector includes an air filter to ensure the best performance. If dust collects on the air - Epson PowerLite S9 | User's Guide - Page 83
damaged or torn ■ You repeatedly see a projected message telling you to clean or replace it 1. Turn off the projector and unplug the power cord. 2. Open the air filter cover on the side of the projector. note To order replacement air filters, request part number V13H134A25. See page 17 for ordering - Epson PowerLite S9 | User's Guide - Page 84
place. 5. Close the air filter cover. note Turn off this product when not in use to prolong the life of the projector. Replacing the Lamp The life span of the projection lamp is about 4,000 hours if Power Consumption in the Settings menu is Normal (default), and 5,000 hours if this setting is - Epson PowerLite S9 | User's Guide - Page 85
If the projector has been installed on the ceiling, you should stand to the side of the lamp cover, not underneath it. If the lamp is used after the replacement period has passed, the possibility that the lamp may break increases. When a lamp replacement message appears, replace the lamp with a new - Epson PowerLite S9 | User's Guide - Page 86
lamp(s) in this product contain mercury. Please consult your state and local regulations regarding disposal or recycling. Do not put in the trash. 5. Hold the lamp as shown and pull it straight out. 6. Gently insert the new lamp. (If it doesn't fit easily, make - Epson PowerLite S9 | User's Guide - Page 87
timer as described in the next section. Resetting the Lamp Timer After you replace the lamp, you need to reset the lamp timer using the projector's menu system. 1. Press the Menu button on the remote control or on the projector's control panel. You see the main menu. 2. Select the Reset menu and - Epson PowerLite S9 | User's Guide - Page 88
■ Do not use batteries other than those specified in this User's Guide and do not use batteries of different types or mix old and new the life span of your lamp. Replacing the Remote Control Batteries Replace the batteries in the remote as described below: 1. Turn the remote control over. 2. Press - Epson PowerLite S9 | User's Guide - Page 89
when transporting it: ■ Close the A/V Mute slide (lens cover). ■ If a USB device is connected, remove it from the projector. ■ Return the projector feet to their stored (highest) positions. ■ When shipping the projector for repairs, use the original packaging material if possible. If you do not have - Epson PowerLite S9 | User's Guide - Page 90
90 Maintaining the Projector - Epson PowerLite S9 | User's Guide - Page 91
. The following information is included: ■ Using the projector's on-screen help system ■ What to do when the projector's status lights flash ■ Solving projector operation problems ■ Solving problems with the image or sound ■ Solving problems with the remote control ■ Contacting technical support 91 - Epson PowerLite S9 | User's Guide - Page 92
Press the Enter button on the remote control or the projector to select the menu item and read the solutions. 4. To exit the help system, press the ? Help button or Esc button. If none of the suggestions solve your problem, see additional solutions to problems in the following sections. 92 Solving - Epson PowerLite S9 | User's Guide - Page 93
power cord back in and turn on the projector. If this doesn't solve the problem, check the lights on top of the projector. What To Do When the Lights Flash The lights on top of the projector indicate the projector's status. Power light Lamp light Temperature light Refer to the following tables - Epson PowerLite S9 | User's Guide - Page 94
help as described on page 102. Warning: Except as specifically explained in this User's Guide, do not attempt to service this product yourself. The projector has an internal problem. Stop using the projector, disconnect the power cord, and contact Epson for help, as described on page 102. There is - Epson PowerLite S9 | User's Guide - Page 95
Problems The power doesn't turn on. ■ If the projector doesn't turn on when you press the Ppower button, make sure the power cord is connected to the projector and plugged into a working electrical outlet. ■ The power cord may be defective. Disconnect the cord from the outlet and contact Epson - Epson PowerLite S9 | User's Guide - Page 96
up after pressing it. Check your notebook's manual or online help for details. On most systems, the key lets you toggle between the LCD screen and the projector, or display on both at the same time. If you connect the notebook while the projector or computer are already turned on, the function - Epson PowerLite S9 | User's Guide - Page 97
page 69). ■ Make sure your computer's resolution and frequency or refresh rate is supported by the projector (see page 108). If necessary, change ■ Press the Esc button on the remote control to cancel the E-Zoom function. ■ Make sure your computer's resolution setting is correct. See the compatible - Epson PowerLite S9 | User's Guide - Page 98
the Resolution setting notebook computer and the projector, turn off the notebook's LCD display. ■ Make sure projector. See page 108. ■ If you're projecting from a computer, press the Auto button on the remote control to reset the projector's Tracking, Sync, and Position settings. 98 Solving Problems - Epson PowerLite S9 | User's Guide - Page 99
the Auto button on the remote control or the Enter button on the projector to reset the projector's Tracking, Sync, and Position settings. ■ If further adjustment is needed, you can fine-tune the Tracking and Sync settings manually Problems 99 - Epson PowerLite S9 | User's Guide - Page 100
to correct the color balance. ■ The projector's lamp may need to be replaced. See page 84 for instructions. ■ Make sure the correct input signal is selected in the Signal menu (see page 70). ■ Make sure that all cables are connected to the proper ports and connected securely. 100 Solving Problems - Epson PowerLite S9 | User's Guide - Page 101
on an external monitor (PowerLite S9 only) The only images that can be displayed on an external monitor are computer images connected through the Computer (Component Video) port (see page 39). Solving Problems With the Remote Control The projector doesn't respond to remote control commands. ■ Point - Epson PowerLite S9 | User's Guide - Page 102
support services: Internet Support Visit Epson's support website for solutions to common problems with the PowerLite S9, PowerLite 1220, or PowerLite 1260 (U.S.) or PowerLite S9, PowerLite 1220, or PowerLite 1260 (Canada). You can download utilities and documentation, get FAQs and troubleshooting - Epson PowerLite S9 | User's Guide - Page 103
Product name (PowerLite S9, PowerLite 1220, or PowerLite 1260) ■ Product serial number (located on the bottom of the projector) ■ Proof of purchase (such as a store receipt) and date of purchase ■ Computer or video configuration ■ Description of the problem Purchase Supplies and Accessories You can - Epson PowerLite S9 | User's Guide - Page 104
104 Solving Problems - Epson PowerLite S9 | User's Guide - Page 105
Resolution (native format) Color reproduction Light output (brightness) Poly-silicon TFT active matrix PowerLite S9 800 × 600 pixels (SVGA) PowerLite 1220 1024 × 768 pixels (XGA) PowerLite 1260 1280 × 800 pixels (WXGA) 16.8 million colors PowerLite S9 Normal mode: White light output 2500 lumens - Epson PowerLite S9 | User's Guide - Page 106
(16:10 image) 36 to 429 inches (91 to 1089 cm) Front, rear, upside-down (ceiling mount) 1 W PowerLite S9/PowerLite 1220 4:3 (horizontal:vertical) PowerLite 1260 16:10 (horizontal:vertical) PowerLite S9 Digital 1:1.35 PowerLite 1220/PowerLite 1260 Manual 1:1.2 29 dB in ECO mode 37 dB in Normal mode - Epson PowerLite S9 | User's Guide - Page 107
Lamp life Part number Remote Control Range Batteries (2) Dimensions Height Width Depth Weight Electrical Rated frequency Power supply Power consumption UHE (Ultra High Efficiency) PowerLite S9 175 W PowerLite 1220/PowerLite 1260 Standby (Communication On) note Lamp life will vary depending upon - Epson PowerLite S9 | User's Guide - Page 108
These projectors support the high definition video and computer display formats listed here. To project images output from a computer, the computer's video card must be set at a refresh rate (vertical frequency) that's compatible with the projector. Some images are automatically resized using Epson - Epson PowerLite S9 | User's Guide - Page 109
PowerLite S9 Computer, component video, composite video, and S-Video Mode Refresh rate (Hz) Resolution VGA EGA 85 640 × 350 VGA-60 VESA-72 VESA-75 VESA-85 60 640 × 480 72 640 × 480 75 640 × 480 85 640 × 480 SVGA-56 SVGA-60 SVGA-72 SVGA-75 SVGA-85 56 800 × 600* 60 800 × 600* 72 - Epson PowerLite S9 | User's Guide - Page 110
Computer, component video, composite video, and S-Video (continued) Mode Refresh rate (Hz) Resolution NTSC NTSC 4:43 PAL N-PAL M-PAL PAL-60 SECAM 60 720 × 480 60 720 × 480 /50 720 × 480 720 × 576 720 × 480 720 × 576 1280 × 720 1920 × 1080 * Native resolution 110 Technical Specifications - Epson PowerLite S9 | User's Guide - Page 111
PowerLite 1220 Computer, component video, composite video, and S-Video Mode Refresh rate (Hz) Resolution VGA EGA 85 640 × 350 VGA-60 VESA-72 VESA-75 VESA-85 60 640 × 480 72 640 × 480 75 640 × 480 85 640 × 480 SVGA-56 SVGA-60 SVGA-72 SVGA-75 SVGA-85 56 800 × 600 60 800 × 600 72 - Epson PowerLite S9 | User's Guide - Page 112
) HDTV (720p) HDTV (1080i) 60 50 60 50 60/50 60/50 720 × 480 720 × 576 720 × 480 720 × 576 1280 × 720 1920 × 1080 * Native resolution HDMI signals Mode VGA SVGA XGA WXGA SXGA SXGA SXGA+ UXGA SDTV (480i) SDTV (576i) SDTV (480p) SDTV (576p) HDTV (720p) HDTV (1080i) HDTV (1080p) * Native - Epson PowerLite S9 | User's Guide - Page 113
PowerLite 1260 Computer, component video, composite video, and S-Video Mode Refresh rate (Hz) Resolution VGA EGA 85 640 × 350 VGA-60 VESA-72 VESA-75 VESA-85 60 640 × 480 72 640 × 480 75 640 × 480 85 640 × 480 SVGA-56 SVGA-60 SVGA-72 SVGA-75 SVGA-85 56 800 × 600 60 800 × 600 72 - Epson PowerLite S9 | User's Guide - Page 114
Computer, component video, composite video, and S-Video (continued) Mode Refresh rate (Hz) Resolution iMAC VGA iMAC SVGA iMAC XGA MAC13 MAC16 MAC19 MAC19-60 MAC21 117 640 × 480 95 800 × 600 75 1024 × 768 67 640 × 480 75 832 × 624 75 1024 × - Epson PowerLite S9 | User's Guide - Page 115
HDMI signals Mode VGA SVGA XGA WXGA SXGA SXGA SXGA+ UXGA SDTV (480i) SDTV (576i) SDTV (480p) SDTV (576p) HDTV (720p) HDTV (1080i) HDTV (1080p) * Native Resolution Refresh rate (Hz) 60 60 60 60 60 60 60 60 60 50 60 50 60/50 60/50 60/50 Resolution 640 × 480 800 × 600 1024 - Epson PowerLite S9 | User's Guide - Page 116
116 Technical Specifications - Epson PowerLite S9 | User's Guide - Page 117
if you use lubricants or oils on the projector, the projector case may crack and the projector may fall from its ceiling mount. This could cause serious injury to anyone under the mount and could damage the projector. When installing or adjusting a ceiling mount, do not use adhesives to prevent the - Epson PowerLite S9 | User's Guide - Page 118
it will not be used for extended periods. ■ Unplug the projector from the wall outlet and refer servicing to qualified service personnel under the following conditions: If it does not operate normally when you follow the operating instructions, or exhibits a distinct change in performance; If smoke - Epson PowerLite S9 | User's Guide - Page 119
being inhaled or coming in contact with the eyes or mouth. ■ If the projector is mounted overhead and the lamp breaks, be careful to prevent pieces of glass from falling into your eyes when you open the lamp cover. WARNING: The cords included with this product contain chemicals, including lead - Epson PowerLite S9 | User's Guide - Page 120
energy and, if not installed and used in accordance with the instructions, may cause harmful interference to radio or television reception. However, has more than one interface connector, do not leave cables connected to unused interfaces. Changes or modifications not expressly approved by the - Epson PowerLite S9 | User's Guide - Page 121
, 43, 56, 95 Accessories, 17 to 18 Air filter cleaning, 82 to 83 ordering, 17 replacing, 83 to 84 Altitude, 74, 94, 108 Anti-theft device, 10, 17, 28, 80 Aspect ratio, 53 to 54, 71, 106 Audio cable, 40 connecting equipment, 40 to 41 controlling volume, 58 problems, troubleshooting, 101 turning off - Epson PowerLite S9 | User's Guide - Page 122
Power On, 45 Distance from projector to screen, 23 to 28, 106 Documentation, 10 to 11 DVD player, connecting, 33 to 39 Dynamic color mode, 52 E Electrical specifications, 107 Environmental specifications, 108 Epson accessories, 17 to 18 PrivateLine Support, 11 technical support, 11, 102 to 103 - Epson PowerLite S9 | User's Guide - Page 123
on projector, 77 to 79 M Macintosh display problems, 97 Manuals, 10 Menus changing settings, 66 default settings, restoring, 67 Extended, 73 to 74 Image, 67 to 68 Info, 88 Reset, 67, 87 Settings, 71 to 72 Signal, 69 to 71 User's Logo, 78 Monitor, connecting external, 39 Mouse, using remote control - Epson PowerLite S9 | User's Guide - Page 124
, 107 specifications, 107 troubleshooting, 101 USB button, 43, 48 using, 56 Replacing lamp, 84 to 87 Request code, password, 77 Resetting lamp timer, 87 Resetting menu options, 67 124 Index Resize image, 53 to 54 Resolution, 53 to 54, 97, 105 Resolution setting, 70 S Safety instructions, 117 to 119 - Epson PowerLite S9 | User's Guide - Page 125
68 Tracking, adjusting, 70, 99 to 100 Transporting projector, 89 Troubleshooting blank screen, 95 to 96 cut-off image, 97 to 98 distorted image, 50 image and sound problems, 95 to 101 no signal, 96 to 97 projector problems, 91 to 103 remote control problems, 101 tapered image, 50 Turning off picture - Epson PowerLite S9 | User's Guide - Page 126
-
 1
1 -
 2
2 -
 3
3 -
 4
4 -
 5
5 -
 6
6 -
 7
7 -
8
-
9
-
10
-
11
-
12
-
13
-
14
-
15
-
16
-
17
-
18
-
19
-
20
-
21
-
22
-
23
-
24
-
25
-
26
-
27
-
28
-
29
-
30
-
31
-
32
-
33
-
34
-
35
-
36
-
37
-
38
-
39
-
40
-
41
-
42
-
43
-
44
-
45
-
46
-
47
-
48
-
49
-
50
-
51
-
52
-
53
-
54
-
55
-
56
-
57
-
58
-
59
-
60
-
61
-
62
-
63
-
64
-
65
-
66
-
67
-
68
-
69
-
70
-
71
-
72
-
73
-
74
-
75
-
76
-
77
-
78
-
79
-
80
-
81
-
82
-
83
-
84
-
85
-
86
-
87
-
88
-
89
-
90
-
91
-
92
-
93
-
94
-
95
-
96
-
97
-
98
-
99
-
100
-
101
-
102
-
103
-
104
-
105
-
106
-
107
-
108
-
109
-
110
-
111
-
112
-
113
-
114
-
115
-
116
-
117
-
118
-
119
-
120
-
121
-
122
-
123
-
124
-
125
-
126
 |
 |

PowerLite
®
S9/1220/1260
Multimedia Projector
User’s Guide