Epson PowerLite S9 User's Guide - Page 28
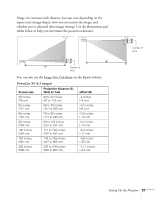
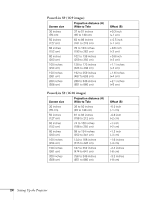
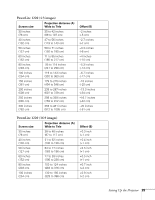
Projector Placement Options, PowerLite 1260 16:10 image
 |
View all Epson PowerLite S9 manuals
Add to My Manuals
Save this manual to your list of manuals |
Page 28 highlights
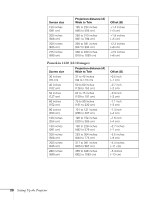
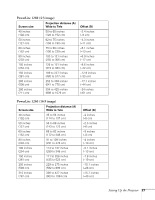
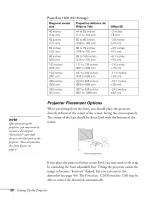
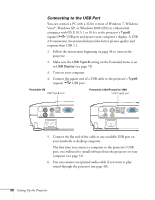
PowerLite 1260 (16:10 image) Diagonal screen size Projection distance (A) Wide to Tele 40 inches (102 cm) 44 to 53 inches (111 to 134 cm) 50 inches (127 cm) 55 to 66 inches (139 to 168 cm) 60 inches (152 cm) 66 to 79 inches (168 to 202 cm) 80 inches (203 cm) 88 to 106 inches (225 to 270 cm) 100 inches (254 cm) 111 to 133 inches (281 to 338 cm) 150 inches (381 cm) 167 to 200 inches (424 to 509 cm) 200 inches (508 cm) 223 to 268 inches (566 to 680 cm) 320 inches (813 cm) 357 to 429 inches (907 to 1089 cm) Offset (B) -3 inches (-8 cm) -3.8 inches (-10 cm) -4.5 inches (-12 cm) -6.1 inches (-15 cm) -7.6 inches (-19 cm) -11.4 inches (-29 cm) -15.1 inches (-38 cm) -24.2 inches (-62 cm) note After positioning the projector, you may want to connect a Kensington MicroSaver® anti-theft device to the lock port on the projector. You can purchase this from Epson; see page 17. Projector Placement Options When projecting from the front, you should place the projector directly in front of the center of the screen, facing the screen squarely. The center of the lens should be about level with the bottom of the screen. Front projection If you place the projector below screen level, you may need to tilt it up by extending the front adjustable foot. Tilting the projector causes the image to become "keystone" shaped, but you can correct the distortion (see page 49). The PowerLite 1220/PowerLite 1260 may be able to correct the distortion automatically. 28 Setting Up the Projector
-
 1
1 -
2
-
3
-
4
-
5
-
6
-
7
-
8
-
9
-
10
-
11
-
12
-
13
-
14
-
15
-
16
-
17
-
18
-
19
-
20
-
21
-
22
-
 23
23 -
 24
24 -
 25
25 -
 26
26 -
 27
27 -
 28
28 -
 29
29 -
 30
30 -
 31
31 -
 32
32 -
 33
33 -
34
-
35
-
36
-
37
-
38
-
39
-
40
-
41
-
42
-
43
-
44
-
45
-
46
-
47
-
48
-
49
-
50
-
51
-
52
-
53
-
54
-
55
-
56
-
57
-
58
-
59
-
60
-
61
-
62
-
63
-
64
-
65
-
66
-
67
-
68
-
69
-
70
-
71
-
72
-
73
-
74
-
75
-
76
-
77
-
78
-
79
-
80
-
81
-
82
-
83
-
84
-
85
-
86
-
87
-
88
-
89
-
90
-
91
-
92
-
93
-
94
-
95
-
96
-
97
-
98
-
99
-
100
-
101
-
102
-
103
-
104
-
105
-
106
-
107
-
108
-
109
-
110
-
111
-
112
-
113
-
114
-
115
-
116
-
117
-
118
-
119
-
120
-
121
-
122
-
123
-
124
-
125
-
126
 |
 |
