Epson R340 Product Information Guide - Page 12
Aligning the Print Head, Transporting the Printer, Printer Basics, User's Guide, Start Here - stylus photo installation software
 |
UPC - 010343855632
View all Epson R340 manuals
Add to My Manuals
Save this manual to your list of manuals |
Page 12 highlights
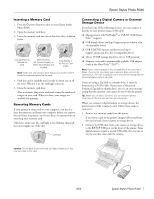
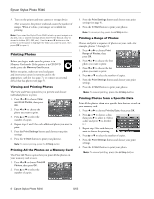
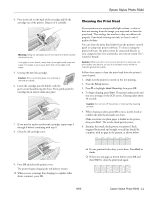
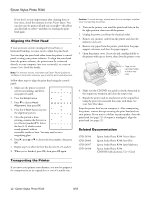
Epson Stylus Photo R340 If you don't see any improvement after cleaning three or four times, check the solutions in your Printer Basics. You can also turn the printer off and wait overnight-this allows any dried ink to soften-and then try cleaning the print head again. Aligning the Print Head If your printouts contain misaligned vertical lines or horizontal banding, you may need to align the print head. You can align the print head either from the printer's control panel or using your printer software. To align the print head from the printer software, the printer must be connected directly to your computer (not over a network); see your onscreen User's Guide for details. Note: For the best results, load letter-size Epson Photo Quality Ink Jet Paper in the printer whenever you check the print head alignment. Follow these steps to align the print head using the control panel: 1. Make sure the printer is turned on but not printing, and lettersize paper is loaded. 2. Press the Setup button. 3. Press d to choose Head Alignment, then press OK. 4. Press the x Start button to print the alignment pattern. 5. Once the pattern is done printing, examine the first row or set of boxes (marked #1). Select the box (1-9) which is most evenly printed, with no noticeable streaks or lines. You may need to use a magnifying glass. 6. Press r, press u or d to choose the box number, then press OK. 7. Repeat step 6 to select the best box for sets #2, #3, and #4. 8. When you're finished, press OK, then press OK again. Caution: To avoid damage, always leave the ink cartridges installed when transporting the printer. 1. Turn on the printer, wait until the print head locks in the far right position, then turn off the printer. 2. Unplug the power cord from the electrical outlet. 3. Remove any memory cards from the printer and close the memory card cover. 4. Remove any paper from the printer, push down the paper support extension, and close the paper support. 5. Open the printer cover. Secure the ink cartridge holder to the printer with tape as shown, then close the printer cover. Tape the ink cartridge holder to the printer case 6. Make sure the CD/DVD tray guide is closed, then push in the output tray extension and close the output tray. 7. Repack the printer and its attachments in the original box using the protective materials that came with them. See your Start Here sheet. Keep the printer level as you transport it. After transporting the printer, remove the tape securing the print head and test your printer. If you notice a decline in print quality, clean the print head (see page 11); if output is misaligned, align the print head (see page 12). Related Documentation CPD-20396 CPD-20406 CPD-20397 CPD-20398 Epson Stylus Photo R340 Printer Basics Epson Stylus Photo R340 Start Here Epson Stylus Photo R340 Quick Reference Epson Stylus Photo R340 CD-ROM with electronic User's Guide Transporting the Printer If you move your printer some distance, you need to prepare it for transportation in its original box or one of a similar size. 12 - Epson Stylus Photo R340 8/05
-
 1
1 -
2
-
3
-
4
-
5
-
6
-
 7
7 -
 8
8 -
 9
9 -
 10
10 -
 11
11 -
 12
12
 |
 |