Epson R340 Product Information Guide - Page 6
Loading CDs and DVDs, Printing Without a Computer - cd tray
 |
UPC - 010343855632
View all Epson R340 manuals
Add to My Manuals
Save this manual to your list of manuals |
Page 6 highlights
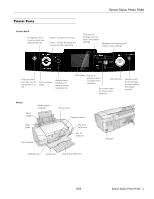
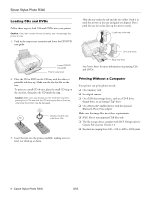
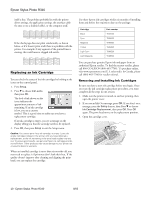
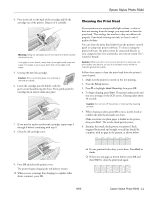
Epson Stylus Photo R340 Loading CDs and DVDs Follow these steps to load CDs and DVDs into your printer: Caution: If you don't insert the tray correctly, you may damage the printer or tray. 1. Push in the output tray extension and lower the CD/DVD tray guide. Slide the tray under the tab and the two rollers. Push it in until the arrows on the tray and guide are aligned. Don't push the tray in too far; line up the arrows exactly. Load tray under tab Line up arrows Lower CD/DVD tray guide Push in extension 2. Place the CD or DVD on the CD tray with the white or printable side face-up. Make sure the disc lies flat on the tray. To print on a small CD (8-cm), place the small CD ring on the tray first, then place the CD inside the ring. Caution: Make sure you always use the small CD ring when printing 8-cm CDs and that the CD and ring lie flat on the tray; otherwise the printer may be damaged. Always use this ring with 8-cm CDs Keep tray level See Printer Basics for more information on printing CDs and DVDs. Printing Without a Computer Your printer can print photos stored: ❏ On a memory card ❏ In a digital camera ❏ On a USB data storage device, such as a CD-R drive, thumb drive, or an Iomega® Zip® drive ❏ On a Bluetooth®-enabled device with the optional Bluetooth Photo Print adapter Make sure the image files meet these requirements: ❏ JPEG files or uncompressed Tiff files only ❏ The file storage device complies with DCF (Design rule for Camera File systems) Version 1.0 ❏ Resolutions ranging from 160 × 160 to 4600 × 4600 pixels 3. Insert the tray into the printer carefully, making sure it is level, not tilted up or down. 6 - Epson Stylus Photo R340 8/05
-
 1
1 -
 2
2 -
 3
3 -
 4
4 -
 5
5 -
 6
6 -
 7
7 -
 8
8 -
 9
9 -
 10
10 -
 11
11 -
 12
12
 |
 |
