Epson R340 Product Information Guide - Page 7
Inserting a Memory Card, Removing Memory Cards, Connecting a Digital Camera or External Storage Device - error message
 |
UPC - 010343855632
View all Epson R340 manuals
Add to My Manuals
Save this manual to your list of manuals |
Page 7 highlights
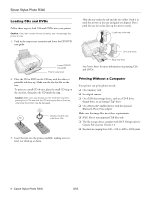
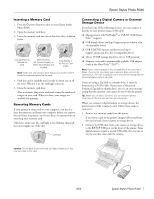
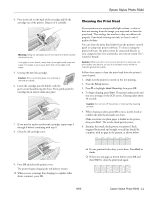
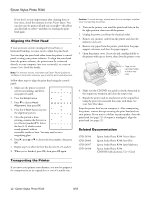
Epson Stylus Photo R340 Inserting a Memory Card 1. Press the P power button to turn on your Epson Stylus Photo R340. 2. Open the memory card door. 3. Insert the memory card into one of the three slots, as shown below. CompactFlash or Microdrive (left) Memory Stick, SD (Secure Digital), or MMC (MultiMediaCard) (middle) SmartMedia or xD Picture Card (right) Note: Insert just one card at a time. See your on-screen User's Guide for supported photo file formats. 4. Push the card in carefully until it stops (it doesn't go in all the way). When it is in, the card light comes on. 5. Close the memory card door. After a moment, the printer reads and counts the number of images on your card. When it's done, your images are available for printing. Removing Memory Cards If your printer is connected to your computer, you need to eject the memory card from your computer before you remove the card from the printer, see Printer Basics for instructions on removing your memory card. Otherwise, make sure the card light is not flashing, then pull the card straight out of the slot. Card light Connecting a Digital Camera or External Storage Device If you have one of the following devices, you can connect it directly to your printer using a USB cable: ❏ Digital camera with PictBridge® or USB DP (USB Direct Print™) support ❏ USB thumb drives (see http://support.epson.com for a list of compatible drives) ❏ USB CD/DVD burners and drives (see http:// support.epson.com for a list of compatible drives) ❏ 100 or 250MB Iomega Zip drive, AC or USB powered ❏ Memory cards with a commercially available USB adapter (such as the MicroTech™ ZiO!™) Note: Epson cannot guarantee the compatibility of any cameras or drives. If you're not sure about your camera or drive, you can try connecting it. If it's not compatible, you'll see a screen saying that the connected device cannot be used. If you are using a Zip disk or a thumb drive, it must be formatted as a FAT16 disk. If you insert a Macintoshformatted Zip disk or thumb drive, you see an error message saying that the inserted card cannot be used with the printer. Tip: When you connect a CD drive, you can also print photos from Picture CDs that you get from your photo lab. When you connect a digital camera or storage device, the printer treats it like a memory card. Follow these steps to connect it: 1. Remove any memory cards from the printer. If you leave a card in the printer, images will be read from the card instead of your camera or storage device. 2. Connect the USB cable from your camera or storage device to the EXT I/F USB port on the front of the printer. Some digital cameras require a special USB cable; if so, be sure to use the one that came with the camera. Caution: Do not eject a card while the card light is flashing, or you may lose data on the card. 8/05 Epson Stylus Photo R340 - 7
-
 1
1 -
 2
2 -
 3
3 -
 4
4 -
 5
5 -
 6
6 -
 7
7 -
 8
8 -
 9
9 -
 10
10 -
 11
11 -
 12
12
 |
 |
