Epson RX500 Product Information Guide - Page 13
Aligning the Print Head, Windows, Mac OS X, Mac OS 8.6 to 9.x - stylus photo scanner error
 |
UPC - 010343848467
View all Epson RX500 manuals
Add to My Manuals
Save this manual to your list of manuals |
Page 13 highlights
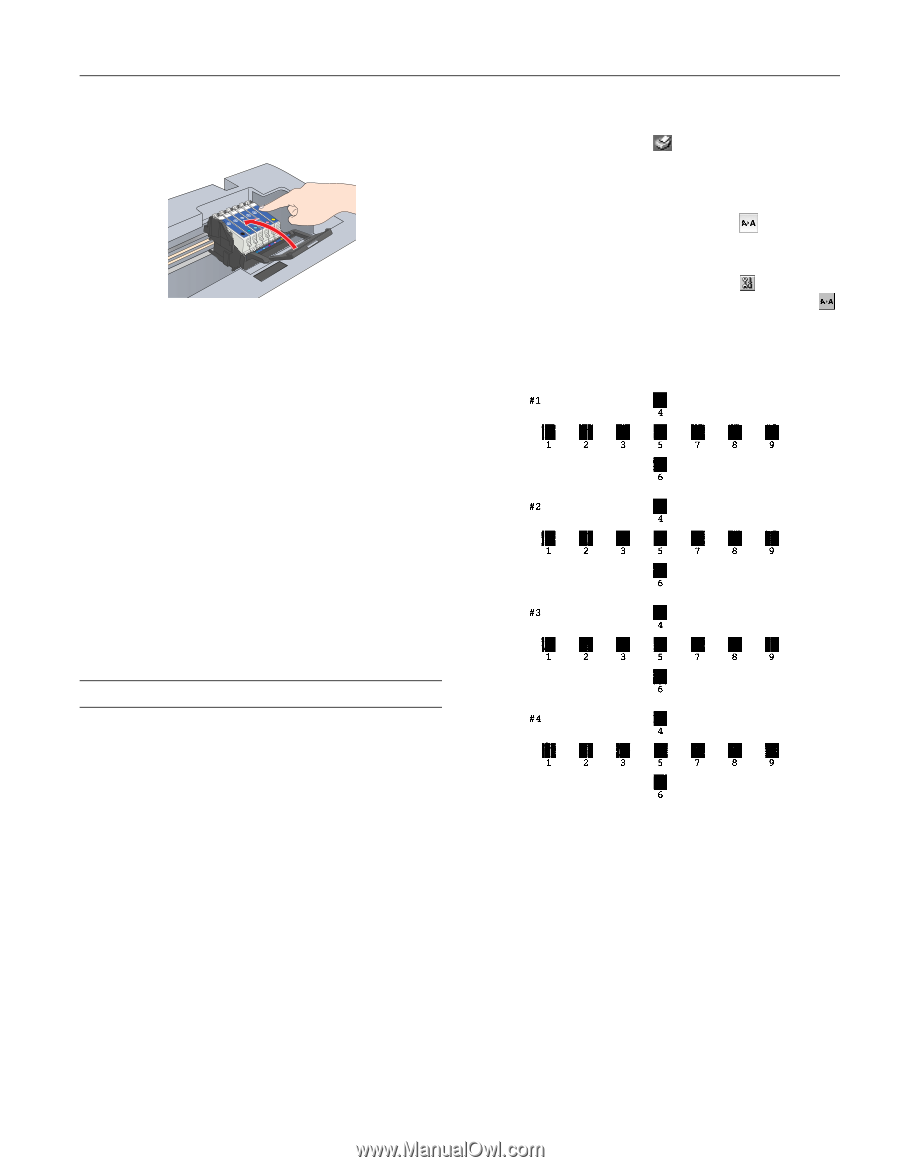
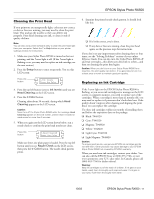
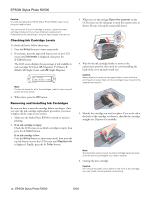
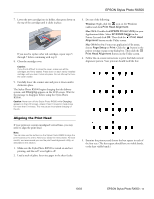
EPSON Stylus Photo RX500 7. Lower the new cartridge into its holder, then press down on the top of the cartridge until it clicks in place. If you need to replace other ink cartridges, repeat steps 5 through 7 before continuing with step 8. 8. Close the cartridge cover. Caution: If you find it difficult to close the cover, make sure all the cartridges are firmly seated. Press down on each newly installed cartridge until you hear it click into place. Do not attempt to force the cover closed. 9. Carefully lower the scanner unit and press it down until it clicks into place. The Stylus Photo RX500 begins charging the ink delivery system, and Charging appears on the LCD screen. Wait for the message to disappear before using the Stylus Photo RX500. Caution: Never turn off the Stylus Photo RX500 while Charging appears on the LCD screen, unless it hasn't moved or made noise for more than 5 minutes. This may cause incomplete charging of the ink. 3. Do one of the following: Windows: Right-click the icon on the Windows taskbar and click Print Head Alignment. Mac OS X: Double-click EPSON Printer Utility in your Applications folder. Select SP RX500 Series in the Printer List and click OK. Then click the Print Head Alignment button on the Utility screen. Mac OS 8.6 to 9.x: From your application's File menu, choose Page Setup or Print. Click the button in the printer settings or page setup dialog box. Then click the Print Head Alignment button on the Utility screen. 4. Follow the on-screen instructions to print the black vertical alignment pattern. Your printout should look like this: Aligning the Print Head If your printouts contain misaligned vertical lines, you may need to align the print head. Note: You can also use the buttons on the Stylus Photo RX500 to align the print head (see the online Reference Guide for instructions). For best results, we recommend you use the print head alignment utility, as described in this section. 1. Make sure the Stylus Photo RX500 is turned on and not printing, and the red ! error light is off. 2. Load a stack of plain, letter-size paper in the sheet feeder. 5. Examine the printout and choose the best square in each of the four sets. (The best square should have no visible bands, or the least visible bands.) 10/03 EPSON Stylus Photo RX500 - 13
-
 1
1 -
2
-
3
-
4
-
5
-
6
-
7
-
 8
8 -
 9
9 -
 10
10 -
 11
11 -
 12
12 -
 13
13 -
 14
14
 |
 |