Epson RX620 Quick Reference Guide - Page 51
Printing Your Stored Photos
 |
UPC - 010343851887
View all Epson RX620 manuals
Add to My Manuals
Save this manual to your list of manuals |
Page 51 highlights
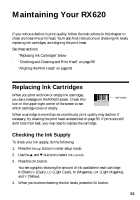
5. Press the d button to choose Backup, then press OK. 6. Press OK again to start the backup procedure. You may have to follow additional instructions on the RX620 screen. All the photos on your card are copied to your connected storage device. Depending on how many photos there are, this may take several minutes. 7. When you're done copying photos, remove the card as described on page 52. Note: When backing up photos to a CD-R/RW, the Stylus Photo RX620 creates a folder for each backup session. You can store multiple backup sessions on a CD-R/RW. Caution: Once the backup starts, do not disconnect the cable or interrupt the process, or you may lose data. If you need to stop the backup, press the y Stop button. Printing Your Stored Photos Once you have copied photos to your storage drive, you can print them by following these steps. 1. Connect your drive to the RX620 as shown on page 50. 2. When you see this screen, use the l and r buttons select which folder to print from, then press OK. 3. Press the Memory Card button, then follow the same steps as you would to print from your camera's memory card. See page 23. Copying Photos to a USB Drive 51
-
 1
1 -
2
-
3
-
4
-
5
-
6
-
7
-
8
-
9
-
10
-
11
-
12
-
13
-
14
-
15
-
16
-
17
-
18
-
19
-
20
-
21
-
22
-
23
-
24
-
25
-
26
-
27
-
28
-
29
-
30
-
31
-
32
-
33
-
34
-
35
-
36
-
37
-
38
-
39
-
40
-
41
-
42
-
43
-
44
-
45
-
 46
46 -
 47
47 -
 48
48 -
 49
49 -
 50
50 -
 51
51 -
 52
52 -
 53
53 -
 54
54 -
 55
55 -
 56
56 -
57
-
58
-
59
-
60
-
61
-
62
-
63
-
64
-
65
-
66
-
67
-
68
-
69
-
70
-
71
-
72
-
73
-
74
-
75
-
76
-
77
-
78
-
79
-
80
-
81
-
82
-
83
-
84
-
85
-
86
-
87
-
88
-
89
-
90
 |
 |
