Epson StoryTeller 5x7 10 pages Creating a Photo Book - Page 17
Saving Your Photo Changes, Fix Red Eye, Sharpen, Color Effects
 |
View all Epson StoryTeller 5x7 10 pages manuals
Add to My Manuals
Save this manual to your list of manuals |
Page 17 highlights
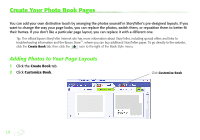
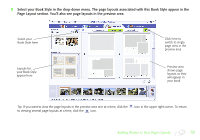
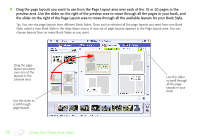
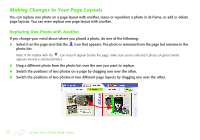
3 To automatically fix red eye, click Fix Red Eye. 4 To sharpen the image, click Sharpen. Then select a new setting in the Sharpen control. 5 To add a special color effect, click Color Effects. Then select one of the color effects settings. 6 To rotate the image 90° to the right or left, click one of the rotation icons at the top of the screen. 7 If you change your mind about any of the changes you made, click the Click the redo icon if you change your mind again! undo icon at the top of the screen. Now you're ready to add photos to your photo book. Continue with the instructions in "Create Your Photo Book Pages" on page 18, or go to the next section to save your photo changes. Saving Your Photo Changes Once you've fixed a photo, you can save it to your computer or a disk and use it at a later date. Just click the icon at the top of the screen. When you see the Save As dialog box, navigate to the location where you want to save it and click Save. Saving Your Photo Changes 17
-
 1
1 -
2
-
3
-
4
-
5
-
6
-
7
-
8
-
9
-
10
-
11
-
 12
12 -
 13
13 -
 14
14 -
 15
15 -
 16
16 -
 17
17 -
 18
18 -
 19
19 -
 20
20 -
 21
21 -
 22
22 -
23
-
24
-
25
-
26
-
27
-
28
-
29
-
30
-
31
-
32
-
33
-
34
-
35
-
36
-
37
-
38
-
39
-
40
-
41
-
42
-
43
-
44
-
45
-
46
-
47
-
48
-
49
-
50
-
51
-
52
-
53
-
54
-
55
-
56
-
57
-
58
-
59
-
60
-
61
-
62
-
63
-
64
-
65
-
66
-
67
-
68
-
69
-
70
-
71
-
72
-
73
-
74
-
75
-
76
-
77
-
78
-
79
-
80
-
81
-
82
-
83
-
84
-
85
-
86
-
87
-
88
-
89
-
90
-
91
-
92
-
93
-
94
-
95
-
96
-
97
-
98
 |
 |
