Epson StoryTeller 5x7 10 pages Creating a Photo Book - Page 26
Saving Your Photo Book to Your Computer, Once you've created your photo book
 |
View all Epson StoryTeller 5x7 10 pages manuals
Add to My Manuals
Save this manual to your list of manuals |
Page 26 highlights
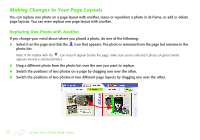
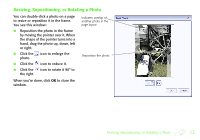
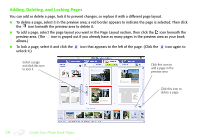
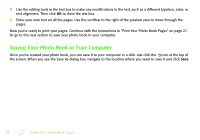
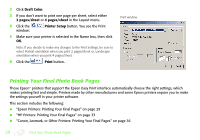
4 Use the editing tools in the text box to make any modifications to the text, such as a different typeface, color, or text alignment. Then click OK to close the text box. 5 Enter your own text on all the pages. Use the scrollbar to the right of the preview area to move through the pages. Now you're ready to print your pages. Continue with the instructions in "Print Your Photo Book Pages" on page 27. Or go to the next section to save your photo book to your computer. Saving Your Photo Book to Your Computer Once you've created your photo book, you can save it to your computer or a disk. Just click the icon at the top of the screen. When you see the Save As dialog box, navigate to the location where you want to save it and click Save. 26 Create Your Photo Book Pages
-
 1
1 -
2
-
3
-
4
-
5
-
6
-
7
-
8
-
9
-
10
-
11
-
12
-
13
-
14
-
15
-
16
-
17
-
18
-
19
-
20
-
 21
21 -
 22
22 -
 23
23 -
 24
24 -
 25
25 -
 26
26 -
 27
27 -
 28
28 -
 29
29 -
 30
30 -
 31
31 -
32
-
33
-
34
-
35
-
36
-
37
-
38
-
39
-
40
-
41
-
42
-
43
-
44
-
45
-
46
-
47
-
48
-
49
-
50
-
51
-
52
-
53
-
54
-
55
-
56
-
57
-
58
-
59
-
60
-
61
-
62
-
63
-
64
-
65
-
66
-
67
-
68
-
69
-
70
-
71
-
72
-
73
-
74
-
75
-
76
-
77
-
78
-
79
-
80
-
81
-
82
-
83
-
84
-
85
-
86
-
87
-
88
-
89
-
90
-
91
-
92
-
93
-
94
-
95
-
96
-
97
-
98
 |
 |
