Epson Stylus C80WN Product Support Bulletin(s) - Page 9
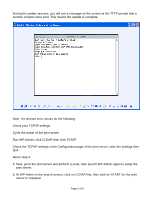
In the TCP/IP PROPERTIES box, select the IP ADDRESS tab
 |
View all Epson Stylus C80WN manuals
Add to My Manuals
Save this manual to your list of manuals |
Page 9 highlights
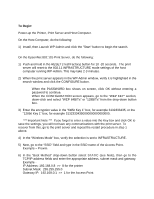
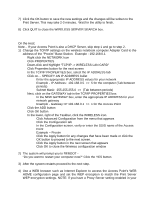
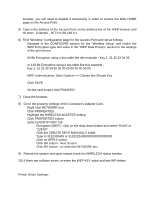
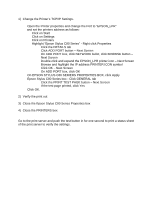
7) Click the OK button to save the new settings and the changes will be written to the Print Server. This may take 2-3 minutes. Wait for the utility to finish. 8) Click QUIT to close the WIRELESS SERVER SEARCH box. On the Host: Note - If your Access Point is also a DHCP Server, skip step 1 and go to step 2. 1) Change the TCP/IP settings on the wireless notebook computer Adapter Card to the address of the "Proxim" Base-Station. Example - 192.168.0.1 • Right click the NETWORK Icon • Click PROPERTIES • Down-click and highlight "TCP/IP -> WIRELESS LAN CARD" • Click Properties button for the next screen • In the TCP/IP PROPERTIES box, select the IP ADDRESS tab • Click on... SPECIFY AN IP ADDRESS bullet o Enter the appropriate IP ADDRESS values for your network o Example - IP Address: 192.168.0.5 >> 5 for the computer (Tab between periods) o Subnet Mask: 255.255.255.0 >> (Tab between periods) • Next, click on the GATEWAY tab in the TCP/IP PROPERTIES box o In the NEW GATEWAY box, enter the appropriate IP ADDRESS for your network gateway o Example - Gateway: IP 192.168.0.1 >> 1 for the Access Point • Click the ADD button • Click OK button • In the lower, right of the Taskbar, click the WIRELESS icon. o Click Advanced Configuration from the menu that appears o Click the Configuration tab o In the Configuration screen, verify or enter the SSID name of the Access Point Example - Proxim o Click the Apply button for any changes that have been made or click the OK button to proceed to the next screen. o Click the Apply button in the next screen that appears o Click OK to close the Wireless configuration window 2) The system will prompt you to REBOOT "Do you want to restart your computer now?" Click the YES button. 3) After the system restarts proceed to the next step. 4) Use a WEB browser such as Internet Explorer to access the Access Point's WEB HOME configuration page and set the WEP encryption to match the Print Server WEP encryption settings. NOTE: If you have a Proxy Server setting enabled in your
-
 1
1 -
2
-
3
-
 4
4 -
 5
5 -
 6
6 -
 7
7 -
 8
8 -
 9
9 -
 10
10 -
 11
11 -
 12
12 -
 13
13 -
 14
14 -
15
-
16
-
17
-
18
-
19
-
20
-
21
-
22
-
23
-
24
-
25
-
26
-
27
-
28
-
29
-
30
 |
 |