Epson Stylus NX510 Quick Guide - Page 16
Selecting Individual Photos for Printing - windows 7
 |
View all Epson Stylus NX510 manuals
Add to My Manuals
Save this manual to your list of manuals |
Page 16 highlights
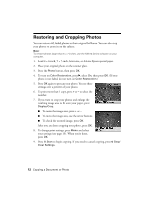
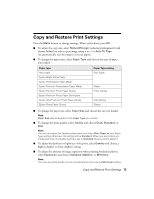
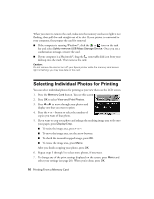
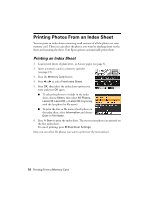
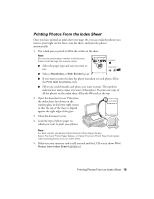
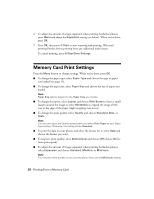
When you want to remove the card, make sure the memory card access light is not flashing, then pull the card straight out of its slot. If your printer is connected to your computer, first prepare the card for removal: ■ If the computer is running Windows®, click the or icon on the task bar and select Safely remove USB Mass Storage Device. Once you see a confirmation message, remove the card. ■ If your computer is a Macintosh®, drag the removable disk icon from your desktop into the trash. Then remove the card. Caution: Do not remove the card or turn off your Epson printer while the memory card access light is flashing; you may lose data on the card. Selecting Individual Photos for Printing You can select individual photos for printing as you view them on the LCD screen. 1. Press the Memory Card button. You see this screen: 2. Press OK to select View and Print Photos. 3. Press l or r to move through your photos and display one that you want to print. 4. Press the + or - button to select the number of copies you want of that photo. 5. If you want to crop your photo and enlarge the resulting image area to fit onto your paper, press Display/Crop. ■ To resize the image area, press + or -. ■ To move the image area, use the arrow buttons. ■ To check the zoomed/cropped image, press OK. ■ To rotate the image area, press Menu. After you finish cropping your photo, press OK. 6. Repeat steps 3 through 5 to select more photos, if you want. 7. To change any of the print settings displayed on the screen, press Menu and select your settings (see page 20). When you're done, press OK. 16 Printing From a Memory Card
-
 1
1 -
2
-
3
-
4
-
5
-
6
-
7
-
8
-
9
-
10
-
 11
11 -
 12
12 -
 13
13 -
 14
14 -
 15
15 -
 16
16 -
 17
17 -
 18
18 -
 19
19 -
 20
20 -
 21
21 -
22
-
23
-
24
-
25
-
26
-
27
-
28
-
29
-
30
-
31
-
32
-
33
-
34
-
35
-
36
-
37
-
38
-
39
-
40
-
41
-
42
-
43
-
44
-
45
-
46
-
47
-
48
-
49
-
50
-
51
-
52
 |
 |