Epson Stylus Pro 10000 - Photographic Dye Ink Product Information Guide - Page 13
Using Hex Dump Mode, Transporting or Storing the Printer, Preparing the Printer for Shipment - - photographic dye ink
 |
View all Epson Stylus Pro 10000 - Photographic Dye Ink manuals
Add to My Manuals
Save this manual to your list of manuals |
Page 13 highlights
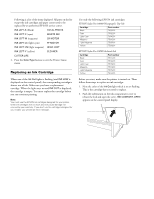
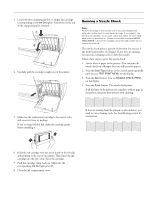
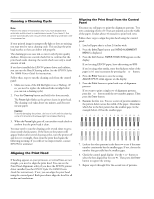
EPSON Stylus Pro 10000 10. If you chose a bar that generally, but not consistently, had the smallest gaps, print the row again. Then repeat steps 6 through 8 for that row. Repeat this step until you can choose a bar that is consistently the best aligned in every pattern in the row. 11. The print head is aligned when your printout shows that bar #8 (the current alignment setting) shows the smallest gaps for both rows. Press the Pause button to exit head alignment mode and return to normal printer operation. Using Hex Dump Mode You can use the printer's hex dump mode to identify problems if you know how to interpret hex code, or you can fax the hex printout to a technical support representative. Make sure the printer has paper loaded and is turned off. Then follow these steps: 1. Press and hold the Pause button while you press the Power button to turn on the printer. HEX DUMP=PRINT appears on the display. 2. Press the Enter button. 3. Send your problem file to the printer. The data in the print buffer is printed with 16-byte hex data in the left column and corresponding ASCII characters in the right column. If the last data is less than 16 bytes, you need to press the Pause button to print it. 4. When you're done, press the Power button to turn the printer off and exit maintenance mode. Transporting or Storing the Printer Follow these guidelines for transporting or storing the printer: ❏ Contact EPSON if you need to store your printer for an extended period (two years for the Photographic Dye Ink model, or six months for the Archival Ink model). A service technician must drain all ink from the printer before it is stored. ❏ To ship the printer, you should repack the printer using the original box and packing materials, and you may need to drain the ink from the printer. Then follow the instructions in "Preparing the Printer for Shipment" on the right. ❏ If you are moving the printer a short distance (for example, in the same building), you can move the printer on its stand. Follow the instructions in "Moving the Printer on the Stand" on page 14. Preparing the Printer for Shipment Follow the instructions below to prepare the printer for shipment: 1. First turn off the printer and make sure the print head is in the home (far right) position. If not, turn the printer back on, wait until the print head moves to the home position, then turn off the printer. 2. Remove the following parts: ❏ Ink cartridges ❏ Power cord ❏ Interface cable ❏ Paper hammock ❏ All paper or other media ❏ Roll paper spindles ❏ Optional Automatic Take-Up Reel (if installed) ❏ Optional manual cutter (if installed) After you remove the ink cartridges, store them in separate, resealable bags. Caution: Be sure that the printer is off before you remove the ink cartridges. Otherwise the ink valves may not close properly. If for any reason the printer will not be level during shipping, a service technician must drain all ink from the printer before it is shipped. 3. Make sure the ink cartridge clamps and cover are closed. 4. Make sure the casters on the leg assembly are locked, and the two stabilizer knobs are touching the floor. caster lock stabilizer knob 5. Remove the two wing nuts underneath the printer. Keep them in a safe place. 5/01 EPSON Stylus Pro 10000 - 13
-
 1
1 -
2
-
3
-
4
-
5
-
6
-
7
-
 8
8 -
 9
9 -
 10
10 -
 11
11 -
 12
12 -
 13
13 -
 14
14 -
 15
15
 |
 |