Epson Stylus Pro 10000 - Photographic Dye Ink Product Information Guide - Page 9
Printing a Status Check, Checking Ink Levels and Component Life, EPSON Stylus Pro 10000 - 9
 |
View all Epson Stylus Pro 10000 - Photographic Dye Ink manuals
Add to My Manuals
Save this manual to your list of manuals |
Page 9 highlights
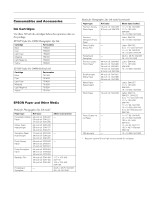
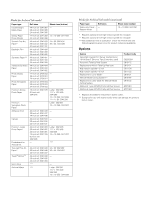
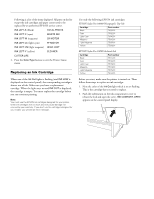
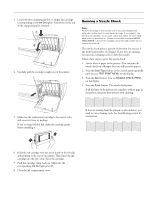
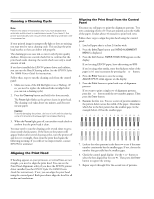
EPSON Stylus Pro 10000 Error conditions (continued) Display Message/Light RELOAD PAPER/ Paper Out light on REMOVE PAPER/ Paper Out light on SERVICE REQ. / All lights flashing SERVICE REQ. 00000100/ All lights flashing TURN PWR OFF AND ON UNABLE TO PRINT WRONG CARTRIDGE/ Ink Out light(s) on Explanation Paper could not be reversed into the printing position. Image is too wide for the paper loaded in the printer. Paper is not fully ejected. PAPER NOT CUT error was cleared. Paper is too thick for print head cleaning. An error has occured. The waste ink system is full. This message appears after you clear a paper jam. You tried to print a test pattern while an error condition was present or the ink compartment cover was open. Wrong ink cartridge installed. Response Remove the paper. Reload it so that the right and bottom edges are straight and aligned with both rows of holes. Resize your image or load wider paper. Cut the paper at the paper insertion slot, then reload paper. Reload paper. Pull out the paper set lever to remove the paper. Print head cleaning automatically starts. After cleaning, reload paper. Note the error number, and turn the printer off and then on. If the message remains, contact EPSON. Contact EPSON for service. Turn the printer off and then on again. After 3 seconds, the message disappears. Press the Pause button to exit SelecType mode. If the message appears again, clear the error before you print. If you are installing ink cartridges for the first time, you must install the cartridges that came with the printer. If you are replacing ink cartridges, check the package and product code. Printing a Status Check The status check shows the current default settings, amount of ink remaining in each cartridge, page count, and the status of various printer parts. Follow these steps to print the status check: 1. Load a sheet of paper in the printer. (You can print test pages on roll paper, but you will waste paper.) 2. Press the SelecType button on the control panel until you see TEST PRINT MENU on the display. 3. Press the Item button until you see STATUS CHECK=PRINT on the display. 4. Press the Enter button. The status check prints. The amount of ink left or component life is indicated as follows: E*****F = full (or full life remaining) E**** F = 3/4 full (or 3/4 life remaining) E*** F = 1/2 full (or 1/2 life remaining) E** F = 1/4 full (or 1/4 life remaining) E* F = nearly empty (or service life near end) E F = empty (or service life ended) 5. Press the SelecType button to exit the Test Print menu. Checking Ink Levels and Component Life You can view printer status information on the control panel display without printing a status check. Follow these steps: 1. Press the SelecType button on the control panel until you see PRINTER STATUS MENU on the display. 2. Press the Item button. You see VERSION on the display (indicates the firmware version installed). 3. Continue pressing the Item button to display the amount remaining for each of the 6 inks or life remaining for a number of printer parts. The indicators read as follows: E*****F = full (or full life remaining) E**** F = 3/4 full (or 3/4 life remaining) E*** F = 1/2 full (or 1/2 life remaining) E** F = 1/4 full (or 1/4 life remaining) E* F = nearly empty (or service life near end) %F = less than 10% of ink or service life remaining 5/01 EPSON Stylus Pro 10000 - 9
-
 1
1 -
2
-
3
-
 4
4 -
 5
5 -
 6
6 -
 7
7 -
 8
8 -
 9
9 -
 10
10 -
 11
11 -
 12
12 -
 13
13 -
 14
14 -
15
 |
 |
