Epson SureColor F6200 User Manual - Page 69
Cleaning the Print Head, Head Cleaning
 |
View all Epson SureColor F6200 manuals
Add to My Manuals
Save this manual to your list of manuals |
Page 69 highlights
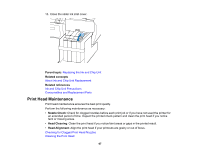
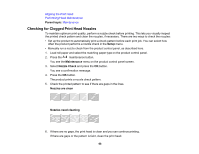
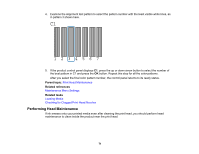
Parent topic: Print Head Maintenance Related references Setup Menu Settings Maintenance Menu Settings Related tasks Loading Media Viewing and Changing Media Settings Cleaning the Print Head Cleaning the Print Head If printouts are faint or have gaps, you should clean the print head to clear the clogged nozzles. Clean the print head only if print quality declines or image colors are incorrect. Note: You can also set up the product to automatically clean the print head at selected intervals using the Periodical Cleaning and Cleaning Cycle settings in the Setup menu. You can select from three levels of head cleaning: • Light: Use this cleaning level first. • Medium: Use this cleaning level if you cannot clear the clogged nozzles after cleaning with the light level. • Heavy: Use this cleaning level if you cannot clear the clogged nozzles after cleaning with the medium level. 1. Press the maintenance button on the control panel. You see the Maintenance menu. 2. Press the up or down arrow button to select Head Cleaning and press the OK button. 3. Press the up or down arrow button to choose one of the following cleaning options: • All Nozzles: Select this option when you see faint printing or gaps in all rows of nozzles in the check pattern. Go to step 5. • Selected Nozzles: Select this option when you see faint printing or gaps in only certain rows of nozzles in the check pattern. You can select to clean multiple nozzle rows, if necessary. 4. To select the nozzle rows for cleaning, press the up or down arrow button to highlight the row number and press the OK button. Repeat for each row you want to clean. When you finish, select Proceed and press the OK button. 69
-
 1
1 -
2
-
3
-
4
-
5
-
6
-
7
-
8
-
9
-
10
-
11
-
12
-
13
-
14
-
15
-
16
-
17
-
18
-
19
-
20
-
21
-
22
-
23
-
24
-
25
-
26
-
27
-
28
-
29
-
30
-
31
-
32
-
33
-
34
-
35
-
36
-
37
-
38
-
39
-
40
-
41
-
42
-
43
-
44
-
45
-
46
-
47
-
48
-
49
-
50
-
51
-
52
-
53
-
54
-
55
-
56
-
57
-
58
-
59
-
60
-
61
-
62
-
63
-
 64
64 -
 65
65 -
 66
66 -
 67
67 -
 68
68 -
 69
69 -
 70
70 -
 71
71 -
 72
72 -
 73
73 -
 74
74 -
75
-
76
-
77
-
78
-
79
-
80
-
81
-
82
-
83
-
84
-
85
-
86
-
87
-
88
-
89
-
90
-
91
-
92
-
93
-
94
-
95
-
96
-
97
-
98
-
99
-
100
-
101
-
102
-
103
-
104
-
105
-
106
-
107
-
108
-
109
-
110
-
111
-
112
 |
 |