Epson SureColor P400 Basics and warranty - Page 17
increases the contrast in images., Select one of the following as - driver
 |
View all Epson SureColor P400 manuals
Add to My Manuals
Save this manual to your list of manuals |
Page 17 highlights
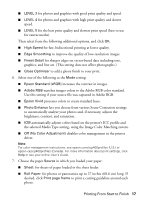
■ LEVEL 3 for photos and graphics with good print quality and speed. ■ LEVEL 4 for photos and graphics with high print quality and slower speed. ■ LEVEL 5 for the best print quality and slowest print speed (best to use for canvas media). Then select from the following additional options, and click OK: ■ High Speed for fast, bidirectional printing at lower quality. ■ Edge Smoothing to improve the quality of low-resolution images. ■ Finest Detail for sharper edges on vector-based data including text, graphics, and line art. (This setting does not affect photographs.) ■ Gloss Optimizer to add a glossy finish to your print. 6. Select one of the following as the Mode setting: ■ Epson Standard (sRGB) increases the contrast in images. ■ Adobe RGB matches images colors to the Adobe RGB color standard. Use this setting if your source file was captured in Adobe RGB. ■ Epson Vivid processes colors to create standard hues. ■ Photo Enhance lets you choose from various Scene Correction settings to automatically analyze your photos and, if necessary, adjusts the brightness, contrast, and saturation. ■ ICM automatically adjusts colors based on the printer's ICC profile and the selected Media Type setting, using the Image Color Matching system. ■ Off (No Color Adjustment) disables color management in the printer driver. Note: For color management instructions, see epson.com/scp400profiles (U.S.) or epson.ca/scp400profiles (Canada). For more information about print settings, click Help or see your online User's Guide. 7. Choose the paper Source in which you loaded your paper: ■ Sheet: for sheets of paper loaded in the sheet feeder. ■ Roll Paper: for photos or panoramics up to 27 inches (68.6 cm) long. If desired, click Print page frame to print a cutting guideline around each photo. Printing From Start to Finish 17
-
 1
1 -
2
-
3
-
4
-
5
-
6
-
7
-
8
-
9
-
10
-
11
-
 12
12 -
 13
13 -
 14
14 -
 15
15 -
 16
16 -
 17
17 -
 18
18 -
 19
19 -
 20
20 -
 21
21 -
 22
22 -
23
-
24
-
25
-
26
-
27
-
28
-
29
-
30
-
31
-
32
-
33
-
34
-
35
-
36
-
37
-
38
-
39
-
40
-
41
-
42
-
43
-
44
-
45
-
46
-
47
-
48
-
49
-
50
-
51
-
52
 |
 |
