Epson SureColor P400 Basics and warranty - Page 27
Cleaning the Print Head, Windows - drivers
 |
View all Epson SureColor P400 manuals
Add to My Manuals
Save this manual to your list of manuals |
Page 27 highlights
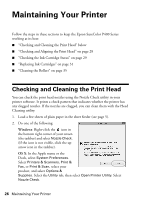
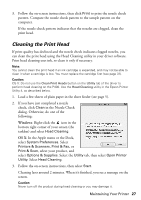
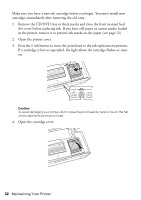
3. Follow the on-screen instructions, then click Print to print the nozzle check pattern. Compare the nozzle check pattern to the sample pattern on the computer. If the nozzle check pattern indicates that the nozzles are clogged, clean the print head. Cleaning the Print Head If print quality has declined and the nozzle check indicates clogged nozzles, you can clean the print head using the Head Cleaning utility in your driver software. Print head cleaning uses ink, so clean it only if necessary. Note: You cannot clean the print head if an ink cartridge is expended, and may not be able to clean it when a cartridge is low. You must replace the cartridge first (see page 31). Caution: OS X: Do not use the Clean Print Heads button on the Utility tab of the driver to perform head cleaning on the P400. Use the Head Cleaning utility in the Epson Printer Utility 4, as described below. 1. Load a few sheets of plain paper in the sheet feeder (see page 5). 2. If you have just completed a nozzle check, click Clean in the Nozzle Check dialog. Otherwise, do one of the following: Windows: Right-click the icon in the bottom right corner of your screen (the taskbar) and select Head Cleaning. OS X: In the Apple menu or the Dock, select System Preferences. Select Printers & Scanners, Print & Fax, or Print & Scan, select your product, and select Options & Supplies. Select the Utility tab, then select Open Printer Utility. Select Head Cleaning. 3. Follow the on-screen instructions, then select Start. Cleaning lasts around 2 minutes. When it's finished, you see a message on the screen. Caution: Never turn off the product during head cleaning or you may damage it. Maintaining Your Printer 27
-
 1
1 -
2
-
3
-
4
-
5
-
6
-
7
-
8
-
9
-
10
-
11
-
12
-
13
-
14
-
15
-
16
-
17
-
18
-
19
-
20
-
21
-
 22
22 -
 23
23 -
 24
24 -
 25
25 -
 26
26 -
 27
27 -
 28
28 -
 29
29 -
 30
30 -
 31
31 -
 32
32 -
33
-
34
-
35
-
36
-
37
-
38
-
39
-
40
-
41
-
42
-
43
-
44
-
45
-
46
-
47
-
48
-
49
-
50
-
51
-
52
 |
 |
