Epson SureColor S70675 Setup Guide - Page 10
Epson SureColor S70675 Manual
 |
View all Epson SureColor S70675 manuals
Add to My Manuals
Save this manual to your list of manuals |
Page 10 highlights
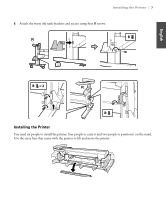
8 | Installing the Printer 1. From the front of the printer, insert the carry bars into both sides with the locking bolts toward the ground as shown. Once they are inserted, rotate the bars counterclockwise 180° to lock them into place. This keeps the printer from sliding when lifted. Caution: Before installing the printer, make sure the stand is fixed in place. To fix the stand, rotate the feet to the right, until they're firmly placed on the ground and lock the casters. 2. Lift the printer onto the stand. Line up the marks on the bottom of the printer with the arrows on the top of the stand legs before setting the printer down and removing the carry bars.
-
 1
1 -
2
-
3
-
4
-
 5
5 -
 6
6 -
 7
7 -
 8
8 -
 9
9 -
 10
10 -
 11
11 -
 12
12 -
 13
13 -
 14
14 -
 15
15 -
16
-
17
-
18
-
19
-
20
-
21
-
22
-
23
-
24
-
25
-
26
-
27
-
28
-
29
-
30
-
31
-
32
-
33
-
34
-
35
-
36
-
37
-
38
-
39
-
40
-
41
-
42
-
43
-
44
-
45
-
46
-
47
-
48
-
49
-
50
-
51
-
52
-
53
-
54
-
55
-
56
-
57
-
58
-
59
-
60
-
61
-
62
-
63
-
64
-
65
-
66
-
67
-
68
-
69
-
70
-
71
-
72
-
73
-
74
-
75
-
76
-
77
-
78
-
79
-
80
-
81
-
82
-
83
-
84
-
85
-
86
-
87
-
88
-
89
-
90
-
91
-
92
-
93
-
94
-
95
-
96
-
97
-
98
-
99
-
100
-
101
-
102
-
103
-
104
-
105
-
106
-
107
-
108
-
109
-
110
-
111
-
112
-
113
-
114
-
115
-
116
-
117
-
118
-
119
-
120
-
121
-
122
-
123
-
124
-
125
-
126
-
127
-
128
-
129
-
130
 |
 |
8
|
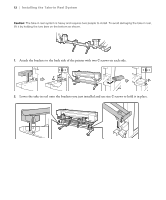
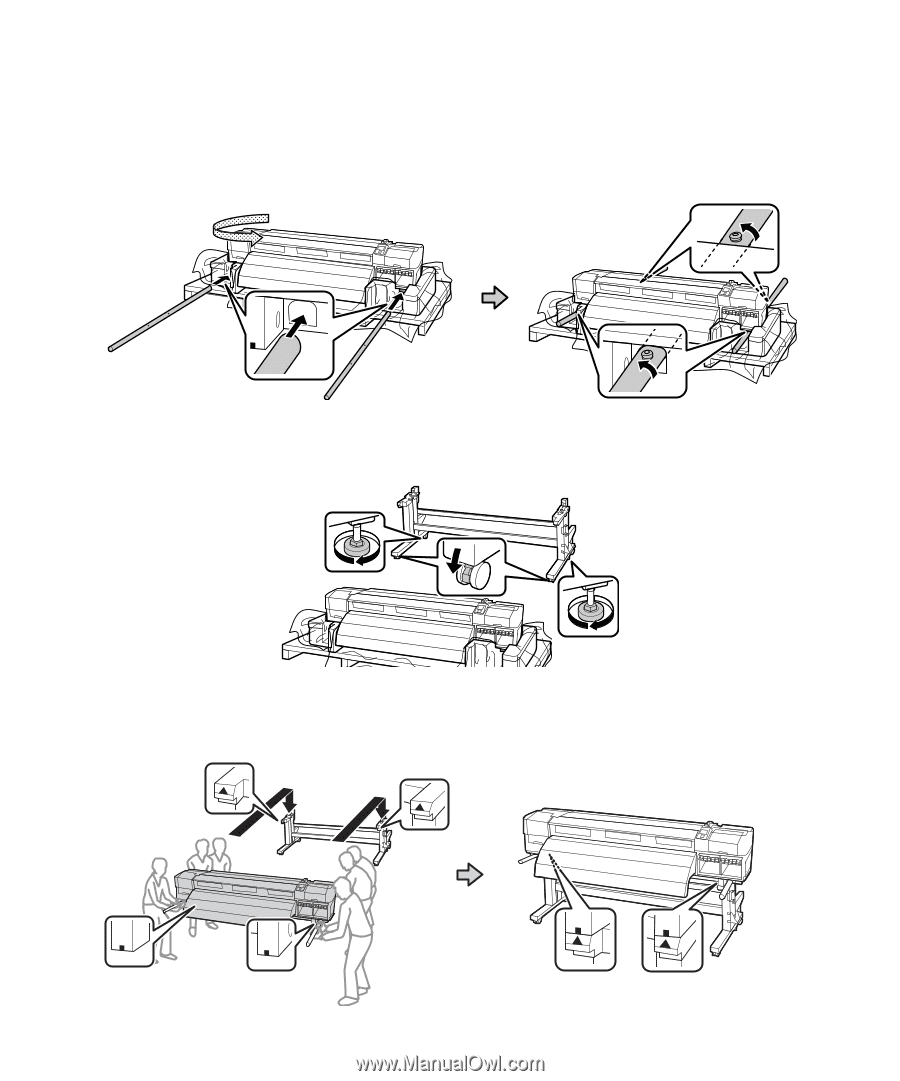
Installing the Printer
1.
From the front of the printer, insert the carry bars into both sides with the locking bolts toward the
ground as shown. Once they are inserted, rotate the bars counterclockwise 180° to lock them into
place. This keeps the printer from sliding when lifted.
Caution:
Before installing the printer, make sure the stand is fixed in place. To fix the stand, rotate the feet
to the right, until they’re firmly placed on the ground and lock the casters.
2.
Lift the printer onto the stand. Line up the marks on the bottom of the printer with the arrows on the
top of the stand legs before setting the printer down and removing the carry bars.